I first saw a lesson like this way back in college when I was observing in an art classroom - I can no longer remember which teacher or what grade level did it originally.
I start out this lesson by showing a slide show of autumn leaves and ask the students to raise their hand when they can tell me a color or something else about the pictures. Since they are 3rd graders and the pictures are really obvious I wait until EVERYONE has their hand in the air. I call on a few kids and I get answers like, "they are fall leaves" "they all have different shapes" "fall leaf colors: red, yellow, orange, green, brown" "some leaves are multiple colors". Most of the time I need to freeze the slideshow on a picture with lots of flat leaves and ask them a more guided questions to get to 'symmetrical'. We talk about how leaves are not always perfectly symmetrical but they are often close. I then explain that we will be making our own leaf stencils to make a leaf pile picture.
I gather the students around a table to do a demonstration. I explain that the will fold a piece of card stock in half hamburger style. Next, I make the biggest deal possible about starting and ending their leaf off the FOLD. I draw a line off the folded edge a little from the top and another a little from the bottom. I explain that we are going to draw HALF the leaf - just like when you make a 'heart' at Valentines Days. We talk briefly that leaves are all different shapes and their leaf needs to be 'leaf-like' but doesn't have to look like a specific type of leaf. Next, I explain that they must cut their leaf all in one big cut - no coming in off the sides to make it easier!!!
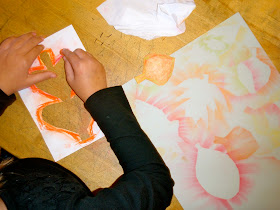
When I unfold the parts I explain that the leaf looking one is a positive shape and the hole it created is a negative shape. I again try and stress that if they don't start and end their leaves ON THE FOLD then their stencils won't work!
This next part is awesome - so I take the positive leaf shape and place it on the table - then I add chalk pastel around the edges, being fairly liberal but not neat about my coloring. I then place this stencil on a larger sheet of paper, take a kleenex and wipe the chalk dust off the end of the stencil onto the paper. At this point I generally hear 'oooo cool' - that is until I lift the stencil revealing a negative leaf space. This is when the kids get really excited. I then ask them if my positive leaf gave a negative picture - what do they think will happen when I add chalk to my negative stencil?! Most get it, some need to see it. So I repeat the process with the negative stencil. I wipe the chalk dust into the middle, lift the stencil and hear the gasps and exclaims of excitement. I quickly explain they can use multiple colors on a leaf and reuse their stencils with any colors and or color combinations. I also stress that they need to overlap their stencils.
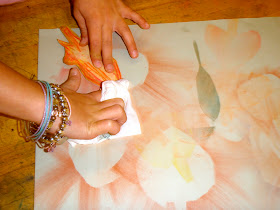
As students work I tell them they may borrow each others stencils and at the end of class they can donate their stencils to a bucket for other 3rd grade classes to use or they can keep theirs safe in their folder. I also stress no blue, purple or black leaves - I occasionally have a student that will challenge my purple leaf stance and if they can make a good case I'll let them do a few - but most purple leaves are not the color purple we have in chalk.
Depending on your students these take anywhere from 2 to 3 classes to complete. At one school I teach at kids were done with amazing results in 2 classes and my other building it's going to take 3 - thus is life between two schools!
Creating and teaching art requires a sense of humor and an understanding of organized chaos - as there is no way to create something original without spreading out supplies and getting a little messy.
Pages
▼
10.18.2011
10.14.2011
2nd Grade Pumpkin Print Compositions
This project was inspired by a lesson posted by a fellow art educator (we actually went to college together!). In her lesson they printed their pumpkins then focused on 'value' for the leaves - I kept the printing of the pumpkins and changed rest of it. It was a great lesson to leap from - thanks Jess!
On the board I have the symbol of a target and I always write our learning objective next to it for that class period. For this lesson the first day said, "Pumpkin Print Compositions". I don't tell them what this means, but instead we learn what it means by breaking down each word.
First we start with pumpkin - easy. The kids can tell me what pumpkins are with no problems. Then I ask them where they have heard the work "print" before. Many students raise their hand and talk about printing on a printer - that is where I spring board into explaining 'printmaking'. We can take the same image and print it over and over and over and it will still look the same.
Next, I ask if they know or have ever heard the word 'composition' before. This time I get less hands - I give some good wait time to see if students need a little more 'think time'. I call on a student and sometimes students will tell me they know about composition books. We quickly talk about what they do in a composition book - they compose a story or a report. They take DIFFERENT pieces of information and put it together to make sense to the reader. Then I ask about music class and if there are words close to "composition" often times I'll get "composer" or "conductor". We discuss how composers take all the DIFFERENT instruments, organize them and make a 'composition' or a piece of music. Last but not least I ask them to think about art - if all those 'compositions' take DIFFERENT elements and put them together - what might 'composition' mean in art?! Most of them can't make the connection right away, often times they over think it and make their answer far more complicated than needed. I simply draw a picture of the board with 3 or 4 things in it. I ask if it has DIFFERENT pieces to it - they say yes. Then I ask if it's organized for the viewer to understand - they say yes. So I ask if it's a composition - they say YES! I then ask them to give me a thumbs up or down if the next picture I draw is also a composition. I then drawn the same picture only organized differently. At this point I generally have half the class right on target and the rest still a little confused. I break it down again and ask if it had different elements, is it organized for the viewer? Light bulbs go off all over the room. I explain that every time they draw a picture they are composing a piece of artwork.
Now it's time to get into rest of the lesson. I tell them that they will be composing a picture with pumpkins in it - but that we will only do the pumpkins today, as they will need to dry. I do a quick demonstration on how to draw their pumpkin onto a piece of thin foam, cut it out, use a brayer to add ink, print it on their paper. They need to compose their pumpkins for rest of their picture.
Next class we talk about adding details and background to finish their compositions - but that they need to do it with quality. I have students brainstorm what quality should look like. 1) Do best work 2) Take your time 3) Color IN not over 4) Choose colors with purpose. Students and I quickly brainstorm ideas of what could be going on with their pumpkins - in space, haunted houses, bats, on hay bails, under the sea, scarecrows, etc. Now, being that it's October most of the pumpkins have ghouls, ghosts, bats, jack-o-lantern faces - but giving kids the option is really great especially if you have students who do not participate in Halloween.
That pumpkin has braces. |
First we start with pumpkin - easy. The kids can tell me what pumpkins are with no problems. Then I ask them where they have heard the work "print" before. Many students raise their hand and talk about printing on a printer - that is where I spring board into explaining 'printmaking'. We can take the same image and print it over and over and over and it will still look the same.
That pumpkin is a head! |
Scary face in the fence! |
Check out that bat in the moon! |
10.11.2011
1st Grade Pumpkin Patterns
The Novak Pumpkin Patch |
My sister and Miss Piggy |
I originally saw this lesson idea on pinterest, but it is actually from Adventures from an Art Teacher blog. It is a wonderful lesson for patterns as well as tying in student's interest and excitement for pumpkins!
Students and I first talk about patterns and when it means. They give me examples and I write them on the board. (big, small, big, small) After a few examples I write up a few harder ones and have them give me a "thumbs up" if it is a pattern and a "thumbs down" if it isn't. This gives me a good idea of who is struggling with patterns and who really understands. I then make a super simple pattern of "medium pumpkin" over and over and over. I ask them to give me a "thumbs up or down". I get a lot of confusion on this one - it stumps a lot of kids. Many say it's not a pattern - but we find out that it is a pattern! The same pumpkin is repeated over and over and over. I always have one student say, "but it's not a very good pattern" - exactly! Then we quickly talk about making it the best pattern then can!
After they draw their pumpkin pattern they have to decide where their pumpkins are - inside, outside, night time, day time, under the sea, in space, in candy land... etc.
When everything is drawn in pencil they Sharpie outline EVERYTHING. We of course discuss that sharpies are ONLY for paper and not fingers, tables, clothes - etc.
Now, normally I would have had students color these with crayon and watercolored over top of them - but being that I was hired only a couple of weeks ago I had not yet found watercolors while cleaning.... So, I had students color them with washable markers then 'paint' water overtop! WAH-LA! Pictures that look painted even though they were really colored! The kids really loved watching the marker change to 'paint'.
Radial Name Designs - EMPHASIS - 5th Grade
This is a project I use to do when I had 5th grade a few years ago - now that I have fifth grade again it was time to brush it off. I like this as a first project for 5th graders because, 1) The formatting stretches their brain at the beginning of the year, 2) It's complicatedly simple, and 3) Everyone can succeed with this AWESOME looking project and it sets them up for a good year.
To start out we talk about formatting - what does formatting mean? Where have they heard "format" before? Often I get students who say they have seen the word 'format' on the computer when they are writing in 'word'. We jump off that to explain what format means!
I explain to them that they will be formatting their name into a triangle - I show them with my name. I pass out triangles, pencils and send them on their way. Most students after a couple of tries can get it - a student or two may need some one on one help.
After they format their name into the triangle they trace it with a sharpie. Next, they get a square piece of paper (12in) and fold it in half, unfold, half the other way, unfold, then diagonal corners - if they do this correctly they will get 8 triangles the same size as their paper! So fancy how I planned that! ;)
This part is the longest part - they then trace their name into each triangle. After it is all traced they have to decide if they want a pattern, what colors, any designs?! I required them to have EMPHASIS on one of the triangles. I gave them relatively free reign on this project with the only requirements being: 1) one triangle had to have EMPHASIS and 2) the only white that is showing is where it's part of the design!
10.04.2011
"The Dot" by Peter Reynolds - Kindergarten Primary Color Theory
I love kinder art - there is something about their freedom of lines, not planning their marks, even down to how they write their names. They don't have a 'ground' yet, no real understanding of 'correct' direction - love them.
If you have never read 'The Dot" by Peter Reynolds - read it and see how these were inspired.
The students drew 10 dots, signed their paper like Vashti in the book, then used only primary colors to make more dots! Sure enough about 5 minutes into it I hear kids saying how they got green, orange, purple and sharing with their friends how to make those colors!
10.03.2011
Getting to Know You Getting to Know All About You
I am working really hard at not only helping students along with their projects during work time, but also getting to know their spunky, quirky, quiet personalities. Here is a conversation I had with a 3rd grade student today:
Student: Do you like Michigan State or Michigan?
Me: I don't follow either - I'm from Iowa.
Student: Who plays in Iowa?
Me: Hawkeyes and Cy-
Student: Hot-guys?! What are hot-guys?
Me: no no no- HAWK (flaps arms) like the bird and EYE (points to eye)
Student: Oooooh.
Oh, how I love my job! Things are never boring or dull.
10.02.2011
Holy Paintbrushes Batman!
As I have been teaching, between classes, before and after school, I have been trying to clean/organize my new classrooms so they are easy to use and also to know what supplies I have.
The other day I did my best to tackel anything that had to do with painting - so all the cupboards around the sink area, a LARGE grey cabinet and half of another cabinet were filled with brushes, acrylic paint, tempra paint, finger paint, watercolors, tempra cakes, washable paint... the list goes on.
I pulled out EVERYTHING and set it out on tables - trying to group like materials together. When I emptied out everything I found that I have the largest and most diverse set of paintbrushes I've ever seen in an elementary room before! It was a beautiful sight to see them all squished on the table together - most of them have never been used. The only SMALL issue with having this many paint brushes is where to put them all - okay so it wasn't the quantity that made it difficult to put way it was the different sizes. There were ALOT of long handled brushes that just wouldn't fit in the cupboard without me taking out the shelf, but if I took out the shelf then all the paintbrushes wouldn't fit in the same cupboard anyway. Alas, after much thinking and problem solving I put the most commonly used short handle brushes in the cupboards by the sink and put all the long handled brushes in another cupboard across the room. I really don't like to split up supplies, because I tend to forget I have them, but short of hauling the board home - chopping it in half then re-supporting it, I had no other choices.
Not only did I find copious amounts of brushes, but I found that a lot of my paint supply was ruined and had to be thrown out. Either some of the paint had frozen at one point or had been there sooooo long that the tempra and washable paints had not only separated, but the paint was a firm, almost dried out, hunk of paint. I did my best to try and remix it - but it didn't happen. So full, unopened paint was thrown into the trash - painful.
At the end of a few hours my cupboards looked clean, usable, and far less overwhelming. The one cupboard that is not open did not get cleaned out because a mouse had/has been living in there - poop EVERYWHERE and I just didn't feel the urge to clean it out at that moment. Another day, with some gloves and disinfectent.
The other day I did my best to tackel anything that had to do with painting - so all the cupboards around the sink area, a LARGE grey cabinet and half of another cabinet were filled with brushes, acrylic paint, tempra paint, finger paint, watercolors, tempra cakes, washable paint... the list goes on.
Ahh! Holy Paintbrushes Batman! |
I pulled out EVERYTHING and set it out on tables - trying to group like materials together. When I emptied out everything I found that I have the largest and most diverse set of paintbrushes I've ever seen in an elementary room before! It was a beautiful sight to see them all squished on the table together - most of them have never been used. The only SMALL issue with having this many paint brushes is where to put them all - okay so it wasn't the quantity that made it difficult to put way it was the different sizes. There were ALOT of long handled brushes that just wouldn't fit in the cupboard without me taking out the shelf, but if I took out the shelf then all the paintbrushes wouldn't fit in the same cupboard anyway. Alas, after much thinking and problem solving I put the most commonly used short handle brushes in the cupboards by the sink and put all the long handled brushes in another cupboard across the room. I really don't like to split up supplies, because I tend to forget I have them, but short of hauling the board home - chopping it in half then re-supporting it, I had no other choices.
Not only did I find copious amounts of brushes, but I found that a lot of my paint supply was ruined and had to be thrown out. Either some of the paint had frozen at one point or had been there sooooo long that the tempra and washable paints had not only separated, but the paint was a firm, almost dried out, hunk of paint. I did my best to try and remix it - but it didn't happen. So full, unopened paint was thrown into the trash - painful.
At the end of a few hours my cupboards looked clean, usable, and far less overwhelming. The one cupboard that is not open did not get cleaned out because a mouse had/has been living in there - poop EVERYWHERE and I just didn't feel the urge to clean it out at that moment. Another day, with some gloves and disinfectent.