Pages

12.16.2011

Kirigami - Whole School

Picture It's the week before Winter break and I had planned to tap into the kids excitement of snow for this project - but since it seems that December is determined to act more like spring than winter there is no extra 'snow excitement'.  I decided to stick with the project anyhow, knowing the kids would love it even if it was raining outside and 50 degrees.

I started out the lesson with the word "Kirigami" on the board and asked students to raise their hand if they thought they might have an idea of what "Kirigami" meant.  I asked them if it sounded like another word we already know.  At this point a bunch of hands flew into the air.

Most times someone would mention cutting paper - or said that maybe Kirigami was like a paper snowflake.  I proceeded to explain that like origami, kirigami is a Japanese word and art form.  The word Kirigami roughly translates to "kiru" = to cut and "kami" = paper.  Kirigami is paper that is folded and then cut - revealing a symmetrical design.

Picture
For the younger kids, k-2, we learned what symmetrical was and then 2-5th learned that sometimes  there can be more than one line of symmetry.  I proceeded to draw some basic shapes on the board and asked students to show me on their fingers how many lines of symmetry an equilateral triangle would have.  I then waited for all hands to show me a number before I had a student come up and draw a line of symmetry.  We repeated this with a square as well.  Students really got into trying to figure out how many ways you could divide a shape in half while still having it be the same on both sides! 

I transferred this idea back to their kirigami, by explaining that their kirigami would most likely have 2 or 4 lines of symmetry depending on how they cut it. 

Next we passed out square pieces of paper, folded the first one together, drew on shapes, cut out - and then the students had the rest of class to make as many snowflakes as they wanted.  I had the Kinders and 1st graders fold their paper into a mountain and then fold their mountain in half.  The 2-5th grade students did the same as the younger kids but then folded it one more time in half. 

During this lesson students learned and practiced:
1- Symmetry and lines of symmetry
2- cutting techniques
3- folding
4- visualization
5- problem solving
6- asking for help

For a few of the classes I drew "challenge" patterns on their papers -- they loved the challenge and their end snowflake!


12.08.2011

Whole School - Lines and Shapes for Snowflake Wrapping Paper

It's that time of year again - only two weeks before Winter vacation and students are excited!!  I decided last year to make wrapping paper with my students and it was a HIT!  Making wrapping paper taps into their excitement for the holidays without doing a "Christmas" project.

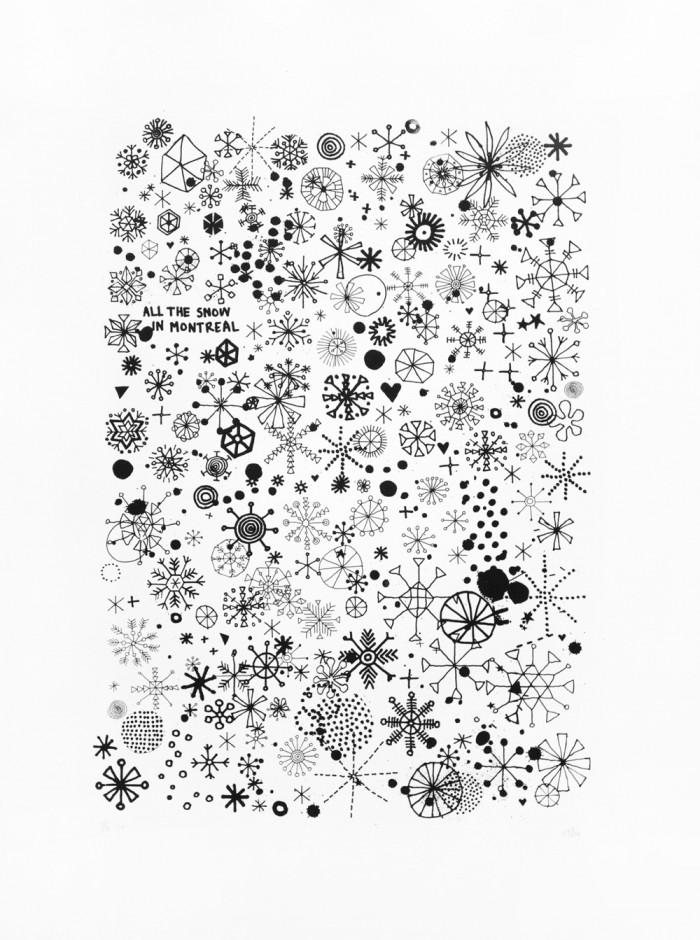
This year I thought about doing the same lessons as last year since I am in a new building - but a fellow Art teacher posted a picture by James Gulliver Hancock, "All the Snow in Montreal".  This picture was the perfect inspiration for our wrapping paper this year!


Students and I first made a few snowflakes are the board by them offering shapes for my base.(The 2nd Graders are studying symmetry in math after break - so I did a quick lesson about symmetry - what it is and how many lines of symmetry does each snowflake have?)

After a few snowflakes as a class they were ready for paper to make their own!

The rules were easy: no snowflakes could be the same!

I encouraged the older kids to think about colors and maybe keep a theme of colors or do all of them one color and then have one snowflake be a different color!

We rolled these up at the end of class with a chenille sticks and a note that says, "Please use my snowflake paper to wrap a gift this season".

Enjoy!


11.21.2011

K and 1st Grade - Friedensreich Hundertwasser

Friedensreich Hundertwasser is one of my favorite artists.  I honestly do not know much about his personal life, but I absolutely love his artwork - the lines, shapes, colors, rhythm, and repetition.

I needed a new kindergarten/1st grade lesson and I was coming up blank.  No ideas.  I thought and thought all weekend.

To hopefully stir up some inspiration I went traveling through my blog to see if there was an old project I had forgotten about and wanted to do.  Well, I did better than using an old project - I was inspired to create a new lesson all together!!!

A few years ago I was asked to make a piece of artwork with the students to auction off at a district event.  Kindergarten and I made original artwork inspired by Hundertwasser.  I decided to jump off this idea for my new lessons.

I went to the internet and searched images for Hundertwasser - originally looking for the artwork I used for my fundraising project.  Instead I found this beauty: Arche Noah.

It was not only beautiful but I could see my kiddos recreating this masterpiece with paper, texture plates, glue and scissors!  I had decided on the project, now to plan.

I could not decide if I wanted to have K do this project or 1st grade to do this project - in the end I decided to have both do it!  Often times when I create a new lesson I will try it out in different grade levels trying to figure out where it fits best.

First off I projected the image of Arche Noah and ask the students to raise their hand when they could tell me something they noticed - a color, a shape, something they see.  I wait until ALL hands are in the air.  Every single kiddo can tell me a color or a shape.  I call on kids until I see we have noticed a majority of the picture or the students are getting antsy.  I often get kids that will say they see lollipops and lots of circles.  On occasion I had a student who would notice the fence or the water running through the picture - but most times I would have to guide students to see those things.  I read them the text at the bottom - as most of my kids are still working on reading.  I ask the students if it would make sense for the bottom to talk about nature but have big lollipops - generally I hear light bulbs go off around the room as students' hands leap into the air and "trees!" is blurted from their mouths.

We then look for other clues that might tell us that they are indeed trees and not lollipops - they find the fence, the grass, the water - etc.  We talk about all the colors we see inside the concentric circles.  We talk about the textures we see on the ground....

Here is where it gets interesting.  I decided after teaching this to first grade that it was a little over the ability level of most of my kindergarten students - so for kindergarten I adapted the lesson for their abilities.

1st Graders:
I had the students gather around for a demonstration where I showed them how to add texture to their 'ground' by using different colored green crayons and texture plates.  After their WHOLE paper was covered in texture(s) they had to trace different sized circles on colored paper, cut them out and glue them down.  This lesson ended up not only being a lesson about Hundertwasser and concentric circles - but it also became a lesson about tracing, cutting, gluing, and placing the circles in size order -- something I realized I needed to stress halfway through my demonstration.


As an adult it is easy to forget that all skills are learned at one point - we aren't born knowing how to write, read, or how to put things in sequential order whether by number, size, color or any other qualitative element.

After a slightly longer than normal demonstration I sent the kids out and they got to work.  Most students only finished their background and part of their first "tree".

The next class period I quickly refreshed how to trace and cut - but that they needed to have 3,4, or 5 trees on their paper.  We observed and counted that Hundertwasser had 9 on his!  Once the students had their decided amount of trees they were to get strips of black paper for their "trunks" and a strip of color paper for their fence.

I explained and demonstrated how to add the trunks and the fence.  I showed the students how to make the fence by accordion folding - or "fan" folding as the students called it - then cutting off one tip at a diagonal.  This way when they unfolded their paper they had something that resembled a picket fence!

Magic I tell ya.

The kiddos were off and running!  My room was a mess and it was beautiful!

Now the adaptation for Kindergarten:
I realized that all the tracing and cutting was going to be too much for my beginner cutters so I changed my lesson slightly.  I had students pick if they wanted 3,4, or 5 trees on their paper.  I had them trace a large circle onto some extra tag board I had lying around, write their name in the circle and cut them out.  Once the students cut out their circles they took a white oil pastel and drew the concentric circles on the tag board.  Next I passed out Prang glitter watercolor - boy were the kids excited!  I made a BIG deal about using the TIPS of their paint brushes as many of them like to scrub with their brushes.  I explained that if they didn't use the paints the wait I taught them then they would not be able to use the glitter paint, but the normal kind.  I have never seen kids so gentle with paint before!


The paint beautifully added lots of deep colors to the tag board while resisting the white oil pastel.  At the end of class I had the students place their circles on a green sheet of paper and place it on the drying rack.

Next class the students finished up their projects much like 1st grade.  I had them color the background with green crayons and texture plates.  The students glued down their "trees", added trunks and a fence!

Both projects ended up being beautiful!  This lesson was engaging and interesting to students while also challenging their fine motor skills!  A lesson I will repeat in the future!

This one was done by a kinder that shows spectrum tendencies - got all the pieces!

11.17.2011

Organized Chaos

Whenever I am asked to describe my classroom - I generally chuckle and say "Organized Chaos".  My room is busy with color, kids, supplies, and energy!  The art room is often in a state of organized chaos - it is chaos that is under control and has purpose.  The first graders were working on a project today that was inspired by Friedensreich Hundertwasser - paper everywhere, glue, scissors, pencils, oil pastels - it was all everywhere and I couldn't help but to smile.  It was a picture perfect moment - everything an art room should be -- busy, cluttered, creative, productive -- if only I could have captured the sounds as well.

::happy sigh::


11.13.2011

"Movie" Posters - 4th Grade


The fourth graders at one of my buildings are creating their own fractured fairy tales in Drama class.  They took a fairy tale and altered it slightly to make a new story.  The students will be performing their creations in December and I thought, "Wouldn't it be neat if the students created movie posters to hang in the cafetorium during their show?"  So I took my idea to the drama teacher and she was really excited about the idea - so off to planning my lesson.

I created a slideshow with many kid friendly movies - Cloudy with a Chance of Meatballs, Goonies, Finding Nemo, Monsters Inc, the Emperor's New Groove, etc.  I asked the students to raise their hand when there was something they noticed that most of the movie posters had in common.  I gave them a round or two of watching the slideshow before I started to call on students.  I got great answers which I placed into two lists.  List one had things they would have to have on their poster and the other optional choices -- I did not label these lists just yet.  Students reported great observations - title, characters, background, dates, actor names, presented by, etc.

Once we had our lists I told the students that they have been working on something in another class that had a title, characters, a setting, and a date it would be presented to an audience -- sure enough the excitement in the room started to grow.  I then explained that they would be creating "movie posters" for their Fractured Fairy Tales.

For the first class each student was responsible for making a rough draft of a poster for their group - they could discuss titles and such next class.  So, each student created a version of their Fairy Tale on paper.

Next class I had the students get together in their Fairy Tale groups and discuss each other's rough drafts.  I gave examples of things I should hear, "I like the way you drew your letters, but I like this other title" or "I like where you placed the characters" or "I like your wolf and I like your pig" - After about 5 minutes of them discussing their work I handed out another piece of paper to be their 2nd rough draft.  I asked students to either re-draw or cut out pieces they liked from their papers and arrange them on their next draft.

The 3rd class I handed out their Final Draft paper - poster size.  The students then had to re-create their 2nd rough draft onto their final paper.

The classes worked really well together and I only had to help a couple of groups work through some issues -- mostly based on how they were talking to each other.  After helping them through their issues they were off and running!

A few classes later when I was talking with the Drama teacher about the project she mentioned that she wanted them to do backgrounds that we could project behind them while they were presenting.  I offered to have them do it in art!  The technical theatre person in me was so excited!

The following class I had the groups split up their teams - some students worked on their poster while the remaining people in the group worked on different backgrounds for their story.  Most groups are ending up with 2-5 background scenes!

The students are drawing their backgrounds with pencil, coloring with oil pastel and watercoloring overtop.  The depth of color in these are beautiful!  When they are complete I will be making a slide show of their backgrounds by taking pictures and entering them into the computer.  During their show we will sit with the script and as they change scenes I will be able to go to the next slide!


I am super excited for these shows and will post an update on how everything turns out!

11.11.2011

Quiet Mouse, Quiet Giraffe - Line Game

One of the hardest part about teaching art is waiting in line to leave - either I line them up early or their teacher is late picking them up.  Keeping young kids quiet in line is a tough task!  I learned thee lamest game at my last school, but the kids LOVE it.  I don't really understand why the kids love it and why they ask to play it for years -- but I guess I shouldn't complain because it keeps them making good choices in line. 

To play "Quite Mouse" (I've changed it to Quiet Giraffe for fun)
- Pick a student who is modeling how you want them to stand in line - facing forward, voice off, body parts under control.
- That student steps out of line and looks for the next student that is making good line choices and says their name or taps them on the shoulder.  The original quiet students steps back in their spot in line and the new student steps out.
- This repeats until the teacher arrives.

Students RACE up to me and ask to play this game - even my 5th graders find this game fun.  I, personally, don't get it.  I think this game is a small step above "the quiet game" - but the affirmation of being picked by a peer seems to have so much motivation that the line is straight, quiet, and ready to enter the hall.

10.18.2011

3rd Grade Chalk Leaf Stencils

I first saw a lesson like this way back in college when I was observing in an art classroom - I can no longer remember which teacher or what grade level did it originally.

I start out this lesson by showing a slide show of autumn leaves and ask the students to raise their hand when they can tell me a color or something else about the pictures.  Since they are 3rd graders and the pictures are really obvious I wait until EVERYONE has their hand in the air.  I call on a few kids and I get answers like, "they are fall leaves" "they all have different shapes" "fall leaf colors: red, yellow, orange, green, brown" "some leaves are multiple colors".  Most of the time I need to freeze the slideshow on a picture with lots of flat leaves and ask them a more guided questions to get to 'symmetrical'.  We talk about how leaves are not always perfectly symmetrical but they are often close.  I then explain that we will be making our own leaf stencils to make a leaf pile picture.

I gather the students around a table to do a demonstration.  I explain that the will fold a piece of card stock in half hamburger style.  Next, I make the biggest deal possible about starting and ending their leaf off the FOLD.  I draw a line off the folded edge a little from the top and another a little from the bottom.  I explain that we are going to draw HALF the leaf - just like when you make a 'heart' at Valentines Days.  We talk briefly that leaves are all different shapes and their leaf needs to be 'leaf-like' but doesn't have to look like a specific type of leaf.  Next, I explain that they must cut their leaf all in one big cut - no coming in off the sides to make it easier!!!

When I unfold the parts I explain that the leaf looking one is a positive shape and the hole it created is a negative shape.  I again try and stress that if they don't start and end their leaves ON THE FOLD then their stencils won't work!

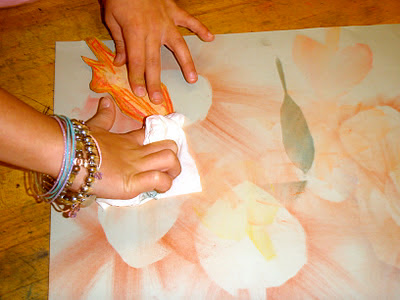
This next part is awesome - so I take the positive leaf shape and place it on the table - then I add chalk pastel around the edges, being fairly liberal but not neat about my coloring.  I then place this stencil on a larger sheet of paper, take a kleenex and wipe the chalk dust off the end of the stencil onto the paper.  At this point I generally hear 'oooo cool' - that is until I lift the stencil revealing a negative leaf space.  This is when the kids get really excited.  I then ask them if my positive leaf gave a negative picture - what do they think will happen when I add chalk to my negative stencil?!  Most get it, some need to see it.  So I repeat the process with the negative stencil.  I wipe the chalk dust into the middle, lift the stencil and hear the gasps and exclaims of excitement.  I quickly explain they can use multiple colors on a leaf and reuse their stencils with any colors and or color combinations.  I also stress that they need to overlap their stencils.

As students work I tell them they may borrow each others stencils and at the end of class they can donate their stencils to a bucket for other 3rd grade classes to use or they can keep theirs safe in their folder.  I also stress no blue, purple or black leaves - I occasionally have a student that will challenge my purple leaf stance and if they can make a good case I'll let them do a few - but most purple leaves are not the color purple we have in chalk.


Depending on your students these take anywhere from 2 to 3 classes to complete.  At one school I teach at kids were done with amazing results in 2 classes and my other building it's going to take 3 - thus is life between two schools!

10.14.2011

2nd Grade Pumpkin Print Compositions

This project was inspired by a lesson posted by a fellow art educator (we actually went to college together!).  In her lesson they printed their pumpkins then focused on 'value' for the leaves - I kept the printing of the pumpkins and changed rest of it.  It was a great lesson to leap from - thanks Jess!

That pumpkin has braces.
On the board I have the symbol of a target and I always write our learning objective next to it for that class period.  For this lesson the first day said, "Pumpkin Print Compositions".  I don't tell them what this means, but instead we learn what it means by breaking down each word.

 First we start with pumpkin - easy.  The kids can tell me what pumpkins are with no problems.  Then I ask them where they have heard the work "print" before.  Many students raise their hand and talk about printing on a printer - that is where I spring board into explaining 'printmaking'.  We can take the same image and print it over and over and over and it will still look the same.

That pumpkin is a head!
Next, I ask if they know or have ever heard the word 'composition' before.  This time I get less hands - I give some good wait time to see if students need a little more 'think time'.  I call on a student and sometimes students will tell me they know about composition books.  We quickly talk about what they do in a composition book - they compose a story or a report.  They take DIFFERENT pieces of information and put it together to make sense to the reader.  Then I ask about music class and if there are words close to "composition"  often times I'll get "composer" or "conductor".  We discuss how composers take all the DIFFERENT instruments, organize them and make a 'composition' or a piece of music.  Last but not least I ask them to think about art - if all those 'compositions' take DIFFERENT elements and put them together - what might 'composition' mean in art?!  Most of them can't make the connection right away, often times they over think it and make their answer far more complicated than needed.  I simply draw a picture of the board with 3 or 4 things in it.  I ask if it has DIFFERENT pieces to it - they say yes.  Then I ask if it's organized for the viewer to understand - they say yes.  So I ask if it's a composition - they say YES!  I then ask them to give me a thumbs up or down if the next picture I draw is also a composition.  I then drawn the same picture only organized differently.  At this point I generally have half the class right on target and the rest still a little confused.  I break it down again and ask if it had different elements, is it organized for the viewer?  Light bulbs go off all over the room.  I explain that every time they draw a picture they are composing a piece of artwork.

Scary face in the fence!
Now it's time to get into rest of the lesson.  I tell them that they will be composing a picture with pumpkins in it - but that we will only do the pumpkins today, as they will need to dry.  I do a quick demonstration on how to draw their pumpkin onto a piece of thin foam, cut it out, use a brayer to add ink, print it on their paper.  They need to compose their pumpkins for rest of their picture.


Check out that bat in the moon!
Next class we talk about adding details and background to finish their compositions - but that they need to do it with quality.  I have students brainstorm what quality should look like.  1) Do best work 2) Take your time 3) Color IN not over  4) Choose colors with purpose.  Students and I quickly brainstorm ideas of what could be going on with their pumpkins - in space, haunted houses, bats, on hay bails, under the sea, scarecrows, etc.  Now, being that it's October most of the pumpkins have ghouls, ghosts, bats, jack-o-lantern faces - but giving kids the option is really great especially if you have students who do not participate in Halloween.

10.11.2011

1st Grade Pumpkin Patterns

The Novak Pumpkin Patch
My sister and Miss Piggy
When I was little my grandparents had a pumpkin farm where every fall the family would harvest and sell pumpkins.  They had all sizes of pumpkins and all sorts of 'scarecrows' like Miss Piggy!!  Even though there are now houses in the field and there haven't been pumpkins grown there in over 20 years people still knock on Gram's door asking where the pumpkin farm of their youth is located.  For me, having pumpkins this time of year is not only an inspiration for my students, but holds a special place in my heart.

I originally saw this lesson idea on pinterest, but it is actually from Adventures from an Art Teacher blog.  It is a wonderful lesson for patterns as well as tying in student's interest and excitement for pumpkins!

Students and I first talk about patterns and when it means.  They give me examples and I write them on the board. (big, small, big, small)  After a few examples I write up a few harder ones and have them give me a "thumbs up" if it is a pattern and a "thumbs down" if it isn't.  This gives me a good idea of who is struggling with patterns and who really understands.  I then make a super simple pattern of "medium pumpkin" over and over and over.  I ask them to give me a "thumbs up or down".  I get a lot of confusion on this one - it stumps a lot of kids.  Many say it's not a pattern - but we find out that it is a pattern!  The same pumpkin is repeated over and over and over.  I always have one student say, "but it's not a very good pattern" - exactly!  Then we quickly talk about making it the best pattern then can!


After they draw their pumpkin pattern they have to decide where their pumpkins are - inside, outside, night time, day time, under the sea, in space, in candy land... etc.

When everything is drawn in pencil they Sharpie outline EVERYTHING.  We of course discuss that sharpies are ONLY for paper and not fingers, tables, clothes - etc.

Now, normally I would have had students color these with crayon and watercolored over top of them - but being that I was hired only a couple of weeks ago I had not yet found watercolors while cleaning.... So, I had students color them with washable markers then 'paint' water overtop!  WAH-LA!  Pictures that look painted even though they were really colored!  The kids really loved watching the marker change to 'paint'.


Radial Name Designs - EMPHASIS - 5th Grade

This is a project I use to do when I had 5th grade a few years ago - now that I have fifth grade again it was time to brush it off.  I like this as a first project for 5th graders because, 1) The formatting stretches their brain at the beginning of the year, 2) It's complicatedly simple, and 3) Everyone can succeed with this AWESOME looking project and it sets them up for a good year.

To start out we talk about formatting - what does formatting mean?  Where have they heard "format" before?  Often I get students who say they have seen the word 'format' on the computer when they are writing in 'word'.  We jump off that to explain what format means!

I explain to them that they will be formatting their name into a triangle - I show them with my name.  I pass out triangles, pencils and send them on their way.  Most students after a couple of tries can get it - a student or two may need some one on one help.

After they format their name into the triangle they trace it with a sharpie.  Next, they get a square piece of paper (12in) and fold it in half, unfold, half the other way, unfold, then diagonal corners - if they do this correctly they will get 8 triangles the same size as their paper!  So fancy how I planned that! ;)

This part is the longest part - they then trace their name into each triangle.  After it is all traced they have to decide if they want a pattern, what colors, any designs?!  I required them to have EMPHASIS on one of the triangles.  I gave them relatively free reign on this project with the only requirements being: 1) one triangle had to have EMPHASIS and 2) the only white that is showing is where it's part of the design!