Pages

Showing posts with label Life Inspiration. Show all posts

4.23.2013

5th Grade - Gothic Architecture

Okay- so this have got to be my FAVORITE new project of the year.

I saw someone post a picture on Pinterest from Artsonia where a CD was a rose window and then the Cathedral was drawn behind it.  I was like "DUH!!!! What a PERFECT project for using CD's! How have I not thought of this? GENIUS!"

I have been waiting for what feels like months for clay to be over and such to try out this idea.  I finally had the perfect moment to start this with a group of 5th graders!

I first spent about 45 minutes of planning the lesson trying to find an interesting/short/information video on Rose Windows to show my students.... man was that a task.  I could find short boring videos, or interesting documentaries - but nothing that fit my whole criteria... well, that is until I found this:


Okay - so it isn't exactly perfect and I managed to talk over the part where the guy says "bloody hell" and then I skip the part about the commission for a new rose window.  (I am okay with mentioning religion when it comes in context of art/architecture - but I didn't feel it was necessary to bring in the modern religious icons.)

The thing I love about the video, other than the accents, is that it shows rose windows, a brief history, and even a few ruins.

So, after the video (or before if I remember) I give a little history - set the scene for these mammoth buildings.  I try to explain to the kids that these are not 'just stained glass windows' but that these are THE WINDOWS.  It is hard to really explain a life to kids where there is no real visual stimulation - there were no billboards, signs, advertisements, ipads, tvs, photographs and such during the time when these were built.  People were not use to seeing images at all let alone on such a GRAND scale.  I then show some stills of these cathedrals and point out how little the people are, or the chairs on the inside.  It is hard to describe how LARGE these structures are without a point of reference.

After I get done talking at them (which I try not to do - but sometimes it is necessary), we discuss what they notice about the rose windows while looking at some still photographs. -- Round, symmetrical, colors, patterns go around the center.... etc.  I then explain to them that they are going to create their own Rose Window.

They can either:
A) Start right away - but there is NO erasing sharpie so they will have to problem solve their mistakes.
B) Get a scrap sheet of paper and practice a few designs.

I hand out CD's and Sharpies and let them go.

The next time they come we look at a slide show of Gothic Cathedrals - complete with Rose Windows.  After a few photos I put up the picture shown below with 6 Cathedrals side by side.  I ask the students to look at them.  Compare, contrast the different buildings.  What do they have in common, how are they different?  They discuss these things at their table, we share a few as a class -- 3 door sections, LOTS of arches, steeples (though not always symmetrical), rose window in the middle, 3 layers (doors, middle, steeple), recessed doors.

Next, I pass out 'stone' colored construction paper with a handout containing pictures of the Cathedrals we just looked at.  Students use these pictures to help them make their own Gothic structure.  They draw with pencil, trace with Sharpie.

Then, the last we do is some shading to give the Gothic structures some pizazz.  I explain about the sun making shadows and how that helps us understand depth and shape.  We discuss that depending on where our light source, the sun, is will determine where our shadows go.  I show them how to take a black colored pencil and draw a shadow on the left or right side every line on their paper (excluding where their building and sky meet).  (Some struggle with this idea more than others - but its all good).

At this point if students want to be done - okay.  If they want to go above and beyond I have them go in with a white oil pastel and do the same on the opposite side of each line and color the sky in with a sky color.

These are spectacular to look at!  I love how each one looks completely different.

Amazing!


4.18.2013

Winter Trees - 3rd Grade

I wanted to do these amazing trees last year - but alas, it NEVER snowed.  Well, this year we totally had snow and plenty of it.

I had third graders learn a new way to draw trees - now, I'm not a big proponent of teaching kids HOW to draw something - but I also know that getting kids to draw two sides of the branch instead of just one wasn't going to happen spontaniously.

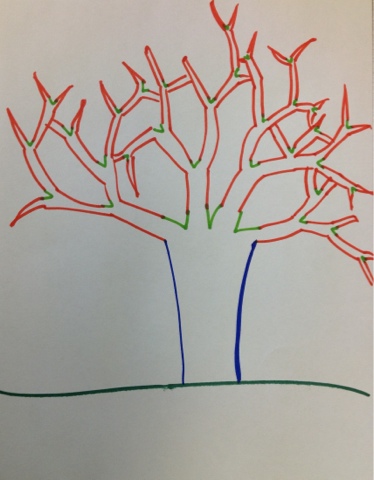
So, first I projected a picture of a winter tree and traced sections of it on the board for the kids - making sure to really drive the point that we are drawing the outside of the branches, not just the middle.

Next I showed students a pattern on my traced tree.  There is a "V" and that v grows longer into branches. (see picture).

We continued this pattern till we had a tree.

I explained to students that this pattern may make sense in their brains, but when they go to draw, it might be more difficult than they expected.  Most students poo-poo this and think "I got this Ms. Novak - it's EASY" and then when it comes to paper and pencil it is more "Uhh Ms Novak - I need help."

I have students practice trees on some scrap paper till they get the hang of it - then I let them pick out a color of construction paper and start on their final.

After their tree is finished, they color with brown oil pastel(or white if they want a birch tree - most stick with brown).  Once their tree is all colored we talk about how when it snows - the snow sticks to the top of each branch.  Students take a white oil pastel and color white on the top of each branch.  Now, some kids totally get this and others get lost in the idea that the top of EVERY branch is colored white - not just the top branches.  Students that get stuck on this idea often travel with me to a window and look at how the branches don't line up under each other - thus letting snow land on each one.


Last but not least, MY FAVORITE PART!!!! -- If students wish they may add some glue to the snowy parts of their trees/ground and add some white/clear glitter!  I know many art teachers and custodians HATE glitter -- I happen to love it.  I love how it sticks to everything and travels through the whole school.  It makes me feel like there are little art fairies bringing joy to all.

Despite the fact that I tell kids 'how' to draw a tree - they all end up as unique as the students that draw them.  Short of giving up on the project EVERYONE succeeds, because - well, all trees look different, no two trees look exactly the same so there is no "my tree doesn't look like a tree".

Yay!  High success!


3.22.2013

Pep Talk

I opened my school e-mail this morning to find this video from one of my Principals.


It was just what I needed.

It has been cold, snowy, cloudy outside along with spring break just a week away.  Our kids are nuts, our nerves are on the edge, March (which means CRAZYness in my schools), school is talking budget cuts (always stressful as an art teacher) - then on the radio I hear about an 8th grader who took his life in his school bathroom.

I certainly needed a pep talk today. 

11.27.2012

2nd Grade - Mock Batik

This is the project I did at the very beginning of the school year, with second grade.  As I have posted before I like to do name projects as our first projects, because it refreshes my memory and they can all write their own names - thus everyone succeeds!! Hooray!

First day we practice bubble letters - both normal bubble letters then FUNKY bubble letters.  Funky bubble letters are the same as normal bubble letters, only you use fun lines like zig-zag, castle top, curly, etc.

The next class students got a final paper in which they wrote their name - normal, funky, or a combination.  Then they traced their name with a black oil pastel and added 5 lines that started on one edge and went off a different edge.  (A few students needed to add a few more lines to break up the space).

Next, I explained what a batik was (I tried to find a good video, but found nothing - if you have one let me know!).  I told them that other countries mainly used batik to decorate fabric.  The artist/worker would take hot wax and draw pictures onto a piece of fabric, then dye the fabric a color -- wherever there was the wax no dye would stain.  This process would continue till everything was dyed as desired.  In the end the wax was washed off with hot water and a beautiful piece of fabric was ready to be used.  I showed students some batik cloth.

I explained that we wouldn't be adding hot wax to fabric, but instead we would use colored wax to color our pictures.  I asked students if they knew what crayons were made out of - WAX!  I instructed them to color their pictures by pressing SUPER HARD and coloring each section a different color.  (They could repeat colors, just not next to each other.)

After their WHOLE pictured was colored, and I was pretty picky about having very little white space.  I had students crumple their papers into really SMALL balls 3 times - flattening it out each time.

Next, students took their wrinkled, but flattened paper to the sink where there was a cup with watered down temp paint (I did some classes with black - some with blue).  Students painted over their whole papers with the paint - then rinsed off the paint with a gentle stream of water.

What was left was nothing short of magic - their papers had beautiful colored wax, and the paint stuck to all the creases they made when they crumpled it.

Students oooo-ed and ahhhh-ed and showed their friends!

 I even had a student bring in a batik stamp from a trip they went on!


11.05.2012

5th Grade Production is a PRODUCTION

Wow - where to start?  I didn't mean to take a break from this blog - it just kind of happened.  October was full of teaching my normal classes, 5th Grade production (it is a production in every sense of the word), collecting and organizing 5th grade production T-shirts (this included a crash course in Adobe Illustrator), finalizing and organizing a Spirit Wear order for the school, contacted a really awesome artist for a future visit, class collaboration art masterpieces for a district auction, grades, and I tried to squeeze in another fundraiser - Young Masters - this ended up having to be postponed...

So, I guess what I am trying to say - is that it has been, well, a bit busy!

Wool Pirate Hair
Let's start with 5th Grade Production.  I love 5th grade production in every single sense of the whole event - well maybe not the extra talking from students during rehearsals or loosing prep time on Tuesdays - okay... so I love mostly everything about production.  Production is hard to describe in words - production is a PRODUCTION.  Organizing 4 teacher visions for a show, with 84 5th graders --- it couldn't be anything less than a production.

Pirate Costume Party
I really enjoy that the students have a voice in our show, they share ideas and we try to incorporate as much of it as we can.  I had four students arrange one of their songs into a rap - we recorded it (thanks iPad).  I think it is super special that the students apply/try out for what they want to do: actor, musician, dancer, set design/chorus.  We are lucky to have a drama and dance teacher at this Elementary school - and they rock.

So, normally production starts in 4th grade with a gathering of ideas and characters.  Then the ARTs (dance, music, drama and myself) and 5th grade teachers mull over the student ideas to try and make a story/plot.  Last year our drama teacher wrote the script - it was AMAZING.  This year there was not time - so we bought a script based on the interest of our students.

Luckily the script stated we could alter the story, add songs, take things out - it was perfect.  We added some songs, took out others, let the musicians re-create some.  Students drew out ideas for backdrops in my room -- I took ideas from multiple papers to create the 3 backdrops for this show, which the students mostly painted.  Dancers created original movements and dances for songs.  Musicians composed original songs and sound effects for the show.  Actors memorized lines and blocking!


Our show this year was Treasure Island - so most of the kids would need some kind of pirate outfit.  I wasn't sure how to get kids to make a pirate-ish shirt, how to collect objects, how to deal them out.... Then, our Dance teacher had a brilliant idea - a costume party.  So, one day instead of having normal 'specials' during our 5th grade time - students went into a creative, surprisingly controlled costume making frenzy.  Students added paint, sparkle glue, buttons, leaves - they cut, sewed, and added bits and pieces to make their costumes all their own.  My favorite part was this awesome wool I happened upon on a donation to the high school - it looked just like dreads.  I cut and glued chunks together for 'pirate hair' - it was wickedly cool.

For the next 8 weeks, once a week for about 30 minutes students split up into their assigned jobs and we created a show.  We had 3 after school rehearsals to mesh all the acting, dancing, musicians and such together.  Then we had a full day TECH rehearsal so my kids could learn when to change the set, spots knew who to follow - what lines were sound cues for music.

Front of their T-shirt - 100% kid designed
Now, while production was happening on Tuesday mornings - during normal 5th grade art time students became Graphic Designers and designed their Production T-shirt.  In the end, the students voted it down to 3.  I combined those 3 ideas because the votes were so close.

It is a SHORT LONG 8 weeks.  In many ways the 8 weeks drags on, but then it never feels like enough time.

Somehow, no matter how far behind we feel, or how crunched for time - it all pulls together for an amazing show.

I am SUPER proud of my 5th graders for all their hard work.

8.08.2012

Summer In The City - Detroit

Even though, last summer, I was overwhelmed and stressed about finding a job, I felt a pull to do something in the community. I dreamed of finding a place that I could donate my time, make a difference, but still take vacation without issue, and to do this all during the week.  I wanted to have my cake and eat it too. 

Needless to say I didn't search for anything along those lines my first summer in Detroit - blame it on being lazy, stressed, or convinced there was nothing of the sort.

Fast forward a year. My second summer in Detroit and that nagging feeling returns - perhaps out of boredom, perhaps out of a need to be more... more.... more than just me?

In any case, I was surfing Detroit websites and somehow ( I can't seem to recreate how I got there) stumbled upon Summer In The City. It was everything I was looking for: volunteering during the weekdays, painting, planting, playing, and only a day to day commitment.

I immediately registered to be a volunteer. I realized as I was filling out the online registration that clearly this organization is geared at people younger than I (mostly high school). I like youth and figured why not- the website said they had volunteers as young as 40.

My first few days were..... different. Not bad, but different. Somehow I thought that it was going to be like a Disney movie. I was going to go the first day and be moved to tears about all the good I was doing. I think, without knowing it, I was expecting some kind of music montage.... None of this happened. Instead I was someone who showed up amongst many, many high schoolers. I did not volunteer with anyone I knew- so, me being the shy person I am at first, I only had a few introductions to main crew people and did as I was told.

Even though my first few days were a little lack-luster - I kept going. I don't know if this was out of boredom, or if I knew somewhere inside that I needed to be there - for me. (It also had to do with Ben and Liz - who pretty much called or texted me the first few days telling me where to go and introducing me to people.)

Fast forward, again, to this evening:
It has been a few weeks of volunteering at multiple paint sites around Detroit and I finally get it. I finally get why I kept going back, why I am growing to love Summer In The City.

Before Summer In The City
Currently, it is not for the friends (as I am still getting to know people and I am still pretty quiet)- it isn't for the amazing bright paint we use (which is pretty cheerful). I keep going back because I am learning about Detroit.

I am learning about a truer side of Detroit, a side the news doesn't show, a side the burned out buildings can't show. I am learning about a side of Detroit that only people willing to feel can understand.

During/After Summer In the City
I started Summer In The City very cautious of where I was going - afraid of the neighborhoods. I actually remember wondering what I would do if someone showed they were mad I was painting over their tag.....

Instead of being presented with hostile neighbors, as I somehow expected - I have had nothing but positive comments and interactions.

People drive by and honk and shout things like, "great work" "keep it up" "looks awesome" "thank you" "keep up the fight"..... It goes on.

People stop by and ask how to get involved or who we are. More than once in the last few weeks people have made on the spot cash donations, brought water or snacks.

I am learning about a side of Detroit that is hard to explain with words. The people in the neighborhoods are passionate about the city and want it to be beautiful and safe - these people are strongly passionate, but in a completely different way than I expected.

I keep returning to Summer In The City because it is bigger than me, it is bigger than the paint- it is a small step in helping people reclaim their city. The bright murals help people smile, which helps people have hope, which then leads people to care. I keep going to get over my fear and assumptions of the city- to meet people in the neighborhoods that I am changing.

Summer In The City is becoming more than a place to spend my extra summer time - it will be a place I will return to each summer for years to come.

Thank you Summer In The City for being awesome and welcoming me so earnestly and freely.

4.20.2012

Tornado Safety - 1st Grade

I originally found this lesson while browsing "Adventures of an Art Teacher".  I pinned her tornado safety pictures to my 'Art Lesson' board on Pinterest.  I have since been eagerly waiting for spring to try my spin on this idea.

The very first day we didn't discuss tornadoes at all - instead I had the students close their eyes and imagine they were driving up to their home.  I asked them to think and look at their home and proceeded to help them think through what their home looked like:
- is it a house?
- is it an apartment?
- do you live in a condo?
- do you live in a trailer?
- How many windows do you see?
- How many doors?
- Where are the windows and doors?
- What color is your home?
- What shape is your home? - tall and skinny? short and flat? square? rectangle?
- Are there shutters by the windows?
- Is there a chimney?

After this I asked students to draw their home LARGE on a sheet of paper.  They then outlined with sharpie and colored it with crayons.  I did my best to stress they color their house the color it is - apparently there are some rainbow and duel colored homes out there. ::wink wink:: If students got this far then they cut out their house and glued it to a piece of dark grey construction paper.

Next class students and I discussed Tornadoes - what are they, how do they form, what to do to stay safe during a Tornado.  This discussion was pretty informative for them and for me.  After we talked for a bit I explained the plan for the day.

After a quick demonstration on tearing paper  - We pass out their homes, black paper for the tornado, sentences about how to stay safe around tornadoes, and oil pastels.  Students ripped their construction paper, glued it down.  Next, they cut their sentence to fit in the tornado, being careful to read the sentence back before gluing it down.  After this was completed students used oil pastels to finish out details.  Again, we are working on making color choices that make sense - ie: magenta clouds aren't very tornado like. 

Most of these turned out AWESOME and I love the diversity in homes, tornadoes and even details that got added in later! 

Thanks for the idea Adventures in Art!

1.06.2012

This Week in Organized Chaos

The break was wonderful, and it's nice to be back.  This weeks was a week full of new beginnings in the art room - lots of painting, drawing, brainstorming, and critical thinking!
Picture
Kindergarten students were introduced to "printmaking" this week.  We broke the word down into "print" and "make".  The students agreed they know how to "make" things without a problem.  I then asked them about "print".  Students told me that they print things off the computer and they print with stamps.  We talked a little bit more about how both those things are used to create the same image over and over again!  I explained that is exactly what printmaking is - making the same print or picture over and over!

I did a quick demonstration on how to load the brayer with paint, roll it on pre-cut pieces of bubble warp, and 'print' the bubble wrap on their paper.  You would think I was performing magic the way they responded to the print!  I then explained a few more things including procedures for clean up and sent them off to their seats!

These turned out beautiful!  I have no idea what we are going to do with them, if anything.  I had originally thought to use them in a collage next class, but I am also thinking of leaving them the way they are.  I will have this all figured out by next class.
Picture


1st Graders learned about "profile portraits".  We started out by looking a short slideshow filled with examples of profile portraits.  I asked the students to raise their hand when they could tell me something ALL the pictures had in common.  The students then told me that all the people were facing off to the side.  So, next I asked how they knew they were facing sideways.  You could almost hear the gears turning in their heads with quizzical looks on their faces trying to figure out both how they knew that and how to explain it.  Sure enough, they needed a little help.  I asked them to show me on their fingers how many eyes they SEE.  I told them to count the eyes they SEE.  Most kids had one little finger up, a couple of two.  We then counted the eye together - sure enough there was one!  I asked them if the person was real and they turned to face the class how many eyes would they see? -- TWO!  an Ah-ha moment for sure.

We talked a little longer about profiles - I traced one of the faces on the board to show that the nose points off the face in the direction it is facing, along with only seeing half the mouth.  I had the students do some guided practice by drawing a series of pictures on the board and the students showed me on their fingers which one picture,out of three, had a correct profile.

There was a lot of excitement when the students learned their profile portrait was going on a tooth fairy!  I will post the whole lesson after the pictures are done!
Picture


2nd Graders are working on using visual texture in their artwork.

We started out by reading the book "Where the Wild Things Are".  I told the students that their job during the story was to pay close attention to the wild things!  At the end of the book I had the students share what they noticed - quickly they share that each wild thing is made up of different types of animals!  We then discussed how the scaly body looked bumpy, but the page didn't feel bumpy.  Ah-hah - visual texture!

This book was the inspiration for their own "Wild Thing" - more to come.
3rd Graders did some serious critical thinking this week.  As soon as they walked in I told them I was going to write a question on the board and I wanted them to think about it - not talk, but think.  They needed to decide yes or no as their current answer.

I wrote on the board, "Can people who are blind understand color?"

I asked them to think about if they had never, ever seen any type of color - could they understand that an orange was orange, or that the sky was blue, or their favorite color was green?

I let them mull it over, had them put down their heads and we took a quick poll.  In most of my classes it was overwhelming "No".  Students that wanted to share their reasons were allowed (well at least for a while - we only get 50 minutes!).  Next, I asked them if someone was deaf could they understand music?!  Students jumped all over using other sense to understand music - reading it, watching it, feeling it.  Slowly they started to connect that maybe if a deaf person could use other senses to understand music - maybe, just maybe someone who was blind could use other senses to understand colors.

Next, my favorite part, we conducted a little experiment.  I told students I would need a volunteer that would be willing to be blindfolded, then handed an object that they needed to report the color on.  It always amazes me how many kids want to try this infront of the class!  I do my best to pick equal numbers of boys and girls, though not everyone gets a chance.

The first students come up, I blindfold them. I ask them to make sure they can't see - it won't work if they can see!  Then I tell the class that the only way it will work is if the WHOLE class can stay quiet!  If someone blurts something out or makes a comment it might ruin the experiment.  Next, I hand my blindfolded student an orange.  Almost immediately they can tell me that it is an orange and it is the color orange.  I asked who they figured it out so quick -- they generally said the shape, texture, and the smell!  We continued this for a few rounds making the materials harder and harder to guess!

We then read an awesome story called "The Black Book of Colors" in which a child who is blind, Thomas, describes colors to us using his senses.  All the pictures are on black paper and have no color - but instead can by felt by the finger tips.  The story is also written in brail across the top of each page.

After the book I told students we were making our own "Black book of Colors".

The next steps proved to stretch the thinking of the third graders as they were asked to describes colors through - taste, smell, sound, and touch.

I will post more when we are further in the project!

Picture


4th Graders decorated paper for collages we will be starting!

This summer I was walking the streets at Royal Oak's "Arts Beats Eats" and found an artist that I was fascinated with.  I came home and found her website knowing I wanted to do a project inspired by her work.

Students used pre-picked color groups to make their papers.  I asked them to layer their paint and experiment with paint brushes, texture boards, toothbrushes, combs, and q-tips.  The results are BEAUTIFUL!


5th Graders are pumped out their project!  We first looked at a slideshow of Logos.  I had the students tally on their hands how many of the logos they knew - of course they knew them all!

I had a slide with a few different companies and how their logo has changed over the years - more simple and more unique at the same time thanks to computer graphics!

Next, I explained they were going to make their own logos, personal logos made out of their initials.  The 5th graders were PUMPED!  I originally did this lesson with 8th grade students, and these 5th graders blew my socks off with their ideas.

I passed out a brainstorming sheet that helped them create different forms of their letters, thus helping them create something completely original and personal.