Pages

Showing posts with label 3 Grade. Show all posts

12.19.2014

Upper Elementary Guided Sketchbooks

So, earlier this year I mentioned that I was going to do guided sketchbooks with my upper elementary students (3-5).  So far I LOVE it!  The goal of the sketchbooks was to review skills, introduce skills, and even have some fun.  I wanted the sketchbooks to be an activity we did to warm up the creative sides of their brains - much like warming up your voice in music, warming up your body in dance or P.E.  I am not sure if it actually warms up the creative side of their brain - but I have noticed it totally focuses the kids.

For the first 4 minutes of every art class the students sit at their seats with low lighting, a sketchbook page and no talking.  I decided to have this silent to help their brain switch over, but also to help them focus on doing one task for only a few moments.

When the time is up students attached their newest page to their sketchbook and prepare for instructions.

While some kids love it and some tolerate it - I have found that these simple four minutes do A LOT for the kids and for me that I never intended.  For many students that four minutes helps to reset their day/mood.  On more than one occasion I have had a student come in hot-to-trot or in tears - whether from a rough day or moment -- those four minutes in low light without talking and doing something creative will often calm them down.  It also seems to focus the class as a whole when it is time to work on the current project - they are still themselves, but not quite as revved.

These small four minutes at the beginning of class also provides me with some time to breathe.  My classes are back to back - no 5 minutes between classes here, so when one class leaves, another is at my door.  While I do my best to prep for the day - sometimes it just doesn't get done, or it can't sit out all day.... blah blah blah.  So these few minutes provide me with a second to finish prepping paint, switch out the board with class objectives, or simply take a deep breath.

The sketchbooks have also been great on limiting the amount of free draw paper my students consume!  They may freedraw on the backs of the sketchbook pages, or work on old pages.

OH! Also, having this 4 minutes at the beginning of class is great for kids who NEVER finish their projects.  Instead of having them do a sketchbook page, they work on their project for those 4 minutes without talking! It is amazing how much they accomplish.

So, how does this all work?  Well I started gathering ideas on Pinterest this summer.  Then the tough part - how I am going to have time to do all of this?!?! I went back and forth on a few ideas that ranged from pre-done books to index cards -- nothing was going to be fast and cheep.  Then from somewhere in the universe the idea came to me.  Use normal paper and cut it in half!  I wanted to make sure the students had enough room to draw on the same side as the instructions so I cut each paper in half the long way.  In word I turned my paper landscape, copy and pasted images from my sketchbook idea page, turned them sideways, and put two on each page.  This way I could easily print them from either school.  I print what I need for the week, use the automatic 3 hole paper puncher in the lounge (that way the holes always line up), cut in half -DONE.  I did have to spend a few dollars at each school buying enough one inch binder rings to hold the whole thing together -- but it seems to work fine.


1.26.2014

If You're Not Prepared to be Wrong....

A very eloquent and wise man, Sir Kenneth Robinson, once said, "If you're not prepared to be wrong, you will never come up with anything original".

Not only do I feel this statement is very much true - but it happened in my classes the other day.  I was working with my 2nd and 3rd graders on their piece of artwork for Young Masters.  I always do projects that are high success, but also highly original - I decided that 2nd and 3rd graders would be doing zentangles this year.  I know all my students can create with lines and shapes, but this would be one of the first times I would not be allowing pencil first - but straight to Sharpie.

To get my students creativity warmed up for this project I showed them part of a zentangle video on youtube.  I asked them questions like, "What are they drawing?" -- I would get a laundry list of answers like: scales, hills, bumps..... I then would ask the question again.  The students seemed confused.  I would wait a few seconds and there was always one kid that would see through the design and realize they are actually drawing curved lines which then remind us of things like hills, scales, bumps... 

So we go on with the video and notice they use squares, circles, dots, straight lines, coloring in spaces and leaving other spaces open.  We discuss pattern and rhythm in each section.  I then asked the students if they know how to draw straight lines, curved lines, squares, circles -- etc.  They agree they know how and are starting to get real excited.

I then explain that they will be doing a warm up zentangle on a post-it.  They will be doing it with a Sharpie and any 'mistakes' they make will need to be problem solved and pulled into their design.  

This is where it got interesting.  

At one of my school the kids were excited and ready for the challenge.  In fact I had to wait multiple times for them to stop talking so I could finish my instructions - they were so excited they couldn't wait to share their ideas!  They were jumping at the bit to skip pencil and use sharpie straight away!

So then at the end of the week I went to my other school and these kids panicked.  Full out, panicked.  They were almost arguing with me to use pencils or to get an extra paper incase they messed up.  I spent far more time with these kids building up their confidence and convincing them they would be fine.  The post it note was just practice and it was okay if they didn't like it in the end.

Whats the difference between the schools?  Socioeconomic? Atmosphere? Personal relationships?

There are many small differences between the schools - but they are mostly the same.  My kids at the school that panicked are often better at following rules and expectations, but their socioeconomic status is similar to the other school, and most of the kids, at both schools, I have had 2 or 3 years -- so our relationship is pretty strong.  I personally believe that the reason I had students in one school panic and the others not is due to the fact that non-panic school is a school of the arts.

My school that is a school of the arts is NOT a fine arts school.  We are not a school that trains kids in the arts - we have no band or dance troupe.  Instead we infuse arts into the whole educational system.  Students transfer and connect ideas between classes - they learn about texture and patterns - they are asked to compare relationships, look for symbols...etc across disciplines.  These students also have dance and drama in addition to their 'normal' special schedule.  

Kids that come to the school for the arts are continuously asked to take chances, take risks, throw out an idea, perform in a small skit, join in conversation, think about something from a different point of view, problem solve and critically think about questions.  Students at this school are prepared to be wrong, to make mistakes.  Students at this school are encouraged to take a chance, and are supported through their thinking/exploration.  While music and art provide this -- dance and drama really help to drive these concepts and ideas home.  Asking kindergarteners to act out simple fairy tales, teaching 3rd graders to do improv -- it not only enforces their reading/writing skills -- but teaches them to 'prepare to be wrong'.  In dance they are asked to come up with movements that inspire or represent a concept/word/idea.  Students at this school are asked to explore answers instead of giving the correct one.

Now, lets take a moment and realize that my other elementary school is VERY supportive of their students.  Students feel safe and get a an amazing education there.  Students are very thoughtful and take learning risks there as well -- but in a different fashion.  

I truly believe that both my schools offer an exceptional education to students and the point of this post is not to give more props to one over the other, but to try and understand why two similar groups of kids would respond so differently to the same project.

Back to the project.  As the students were doing their warm up post-its.  I had them work silently for 5 minutes.  I wanted the to really concentrate on their visual thinking and felt talking would be too distracting.

After the 5 minutes was up - I let them share their ideas from their tables, then bring them to me.  I put them on the board and we quickly discussed that when they were working on their 'final' paper that if they needed some inspiration that they could come look at their class's thinking for ideas.  

It is important to note that after the warm up both schools were ready and raring to go, and that their warm up thinking/solutions were very comparable.  The warm up provided my traditional elementary school students with the chance to be wrong and when they worked through those mistakes without an eraser or a new paper - they had the confidence to be original, just like my school of the arts kids.

So in the end both sets of students had the same outcome - but that initial jump into a project was so very different.  As much as working at two buildings can be frustrating - moments like these, I find fascinating.  

11.20.2013

Rectangular Prisms (3-D Buildings) and Making Thinking Visible

Okay - so I have been thinking about updating this blog for weeks now - but I have been SO busy, that by the time I get home, I just don't have any energy to write a coherent blog message.  Which is kind of hilarious because it is currently 9:30 pm.  I was at school at 7:50 this morning and left tonight at 9:00...... one word:  conferences.

Anyhow, something amazing happened today in my room and I just need to share!

I have posted on here about my exploration into Making Thinking Visible - my struggles and ideas of how awesome it is.  Today I didn't do a thinking routine, but the thinking routines gave me the foundations for a discussion we had today in third grade.

Lets back up a minute:

Last week we reviewed 3-D shapes: sphere, pyramid, triangular prism, cone, cylinder, rectangular prism, and cube.  After we reviewed shapes I told them we were going to draw rectangular prisms - but from the corner and we were going to pretend that they were VERY tall so we couldn't see the top.  This means we would see the front corner, two flat sides, two far corners and the top edges but not the top itself.  (I got this idea for this project here).

I had the kids draw a bunch of arrows - varying in height and size.  Next we drew straight lines down from the tips of the arrows - if the line touched another arrow then it stopped.  Low and behold tall rectangular prisms.  We then decided to add windows and doors to our shapes to make them into buildings!

Back to the present:

So this week we are painting their buildings.  I first thought about making them use certain colors to help them with their color theory - but at the last minute I just let them paint.  We talked briefly about colors that work better together and having a high contrast between the buildings and the sky.  As students worked it seemed more that they just painted with colors they liked and didn't really plan ahead.

This was a little frustrating, but I also had told them to paint however they felt moved to paint, so I couldn't be too upset.  (The only rule I really put on them was that they needed to paint IN their picture and not over.)

So, TODAY is where it got really interesting!  Instead of telling the kids about contrast and how different colors work together - I wanted them to find it on their own.  This is where my new foundation in Making ThinkingVisible helped out!

I took three paintings from yesterday's class (a different class) and hung them on the board before my new group came in, making sure to cover the names. (I also waited till the class left to take them down).  I wanted to make sure students could participate without fear or worry about someone critiquing their work.

I started by asking the kids to pick their favorite one.  No voices, no comments - just look and decide which one they liked best.  Then I asked them 'What made you pick that one?".  This time when they had an answer I wanted them to raise their hand.  When most hands were in the air I asked them to share with an elbow partner.


Next I asked them "Which is your least favorite?" then "What makes you like it the least?"  - I had them share.

Then we went through each picture and students raised their hand if it was their favorite - I then called on a few kids to share why.  For the same picture I asked who liked that one the least.  I, again, asked for students to share what made them decide that.  It was great to hear that some students like number one because of all the colors, but others didn't like it because they found the colors to be too much.  We repeated this for the next two.

While we were doing this I learned A LOT!  Turns out third graders enjoy lots of color - almost the whole class picked the first one as their favorite.  Interesting enough students didn't like three as much because the sky was green and not 'real' (which is also why it was the favorite for some kids).  I then pointed out that number one doesn't have a real sky either.  Hmmmm.....

So as we were doing this I realize that the whole reason I was asking these questions was to see if they could notice which buildings were easier to see - but no one was headed that way.  Most of the kids liked the pictures based on colors or craftsmanship.  This in itself was interesting.  Sometimes I forget that kids are kids and have a different aesthetic on art than I do.  I look at the pictures and find the contrast to be more pleasing, even though I love lots of bright colors.  It was helpful for me to learn this information about my students to see that their color choices were indeed choices and not as haphazard as I originally thought.

I then asked them two more questions:

1) Which one has the best craftsmanship? What makes you say that?

2) Which one is it easiest to see the buildings on?  What makes you say that?

This got even MORE interesting.  Students were all over the place for craftsmanship.  Some decided having white spots made it have poor craftsmanship, while others based it on how much the paint bled into other colors.  Ahh the lens of a 3rd grader.

I was expecting students to pick their favorite cities for the one you could see the buildings best in - being that those they already had a bias to.  Interestingly enough almost every kid in the class picked number two as being able to see the buildings the easiest.

We then spent some time exploring why number two was easier to see -- they all had buildings, all windows, all had doors, and all had the same kind of sky.  Number two had less colors and was most like number three - but number three was still kind of hard to see the buildings.  Students started to talk about light colors and dark colors and how the orange was a lighter color and blue more medium or dark.... this is where I jumped in and we talked about having high CONTRAST.  Colors opposite on the color wheel have a higher contrast and stand out against each other.  Colors on the color wheel that are close to each other have a lower contrast, meaning the colors are more similar.  So the third picture has yellow buildings and a green sky -- yellow and green are close to each other and have a low contrast.  Blue and orange in number two have a high contrast because they are across from each other on the wheel.  The first one uses the same colors on the building as in the sky so it all blends together.

At this point we talked about actively choosing the colors they wanted for their desired outcome.  Did they want LOTS of colors all over, but see the buildings less?  Did they want to be able to see the buildings easier?  I even had a kid pipe up and say that you could use cold colors on the sky and hot on their buildings because they are different.  Totally!

The class today I think had a better idea of what contrast means and what it looks like - I have no idea what their papers will look like... they didn't have a tone of time to paint today.  It will be interesting to see if there are more high contrasted pictures or more color everywhere.

10.18.2013

Art and the MEAP (Michigan Educational Assessment Program)

Wow!  How has it been almost a month since I posted last?!  Time flies when you are having fun!

The last few weeks have been packed with craziness - I was sick for a bit, field trips, National Testing for the upper grade levels - it's honestly been kind of a mess.

I halted all 3rd, 4th and 5th grade projects for the last two cycles due to MEAP tests.  I realized that their brains were complete toast by the time they got to me and we needed to do some relaxing, other side of the brain thinking in art.  My goal was to not only rest the one side of their brain, but to re-energize and almost reset their day.

My fourth graders were finishing up their collages from their visiting artist and while this is a 'simple' enough task - it wasn't the kind of way I wanted them to use their brains.  Instead we worked on a value project where they needed to mix colors and paint - much more therapeutic. 

We started out by BRIEFLY looking at pictures of the moon at night.  (*Normally I would make the observation part longer, but it is not what the kids needed this week.  Also, the kids are observing the moon in science!  Who knew!).  We talked about what they saw - the colors, the sky... etc.  Next, I showed them how to use a safety compass.  (Honestly, best compasses EVER!).  They drew concentric circles.

At this point some classes were done for the day because I only saw them for 20 minutes - other classes got a chance to get to the paint.  I set out trays with white, black, blue, and purple.  The students painted their moon white, the first ring was their sky color with white, then after that they added a little bit of black for each circle till it got darker and darker and darker.

Students went from loud and squirrel-y to mellow and focused.  I asked the group how their brains felt - many replied with a sigh and a 'much better'.

This lead me to realize that I could help out the grade level teachers as well as the kids.  I sent out an e-mail to the teachers suggesting that they do a little bit of art after their testing.  It wouldn't need to be much 10-20 minutes and it could be as easy as coloring a geometric coloring page.  The rhythm of coloring/painting helps to calm and refocus the brain.  I know that in college during finals I would put out a stack of coloring books and all my crayons in the common area.  Almost everyday I would find the majority of my suit mates bent over coloring books after long bouts of studying or tests.  They would exclaim how much better and more relaxed they felt.

After I sent out my e-mail offering to print some coloring pages - one of the 4th grade teachers e-mailed me back.  She said that their writing assignment that day had to do with some characterization and instead of jumping right into the writing she had them spend some time drawing their character - she said the lesson went smoothly and the students produced a lot of information about their characters!

---------

My third graders have been hard at work exploring landscapes (horizon lines, foreground, middle ground, back ground... etc).  So, again, I decided that wasn't quite the way I wanted to exercise their brains after a morning of MEAP testing.  So, we took a break and did chalk leaf piles.  I have done this lesson for quite a few years now - and they always turn out beautiful.  The students fold a piece of card stock in half, draw half a leaf, cut out the leaf in one long cut!  They should have two stencils - a positive and a negative.  (Sometimes it takes kids a few tries to get it.)  Next they charge their stencil with leaf colored chalk, place the stencil on their paper, smear the chalk from the stencil to their paper.  The students repeat this process with both stencils and then with each others stencils until their paper is filled - overlapped leaves and leaves that go off the edge.


Again, students start out loud and a little over the top - by the time they start using chalk the energy and noise level evens out.


--------
5th grade was a little bit different.  They were finishing some 2-point perspective words and then starting their t-shirt designs for 5th grade production.  So, while I didn't restructure their lessons like the other two grades - their assignments already focused on using their brain more creatively.


9.07.2013

First Project

This student went to Germany and Austria!
I have tried multiple types of 'first projects' over the year - names, portraits, just jumping into projects and others.....

I *think* I may have found a solution - a project I really love for the first day of art class.

This is the 3rd year at these two schools and I really do love all my kids - so much that it bothers me I can't talk with each and everyone about how awesome their summers were.  Which inspired this years first art project - well that and pinterest.

This student went to a water park (I love how he started off the page)


I found this awesome project on pinterest, and while the page is in German - the pictures explain enough.  Each student gets a square piece of paper with a quarter circle on it, they then decorate it and when assembled together the quarter circles form a large circle.

I used the pinterest idea and made my squares with a quarter circle on them.  Then in class I spent 5-10 minutes calling on kids and having them tell me something about their summers.  I wrote it down on a LARGE word web on the board.  It was fun to see what states they went to, what water/amusement parks and all sorts of other cool things.

I then explained that I was going to give them a square with a quarter circle.  I asked them to rotate their paper till the arch would work with their assignment.  Their goals were 1) FILL the space  2) Use pictures that represent their summer  3) use colors that make sense.  The catch is that they needed to USE the arch in their picture and not just draw over it.  They also only had that one first class to finish it - which turned out to be anywhere from 10-20 minutes.  I encouraged them to either pick one totally awesome thing to draw or combine as many things as they wanted!!!

The braces this student got over the summer is the sun!
This project was totally awesome!  Not only did I hear highlights from my kiddo's summers, then get to hear even more while I walked around - but ALL kids succeeded in their very first art project.  There was no, 'I can't do this' 'this is stupid' blah blah blah.  All the kids were excited to draw about their summer.  It also provided me with a quick glimpse on abilities of my new students, how attitudes have changed over the summer, and the work habits of the students.

At the end of class I made sure to have students write their name and teacher on the back - then I put them on a bulletin board.  I love that there is already artwork up in the halls, and MANY teachers stopped to look and express their happiness of having artwork up as well!!!

Top Left: A baseball game  Top Right: One of those scary funnel water rides and camping.  Bottom Left: Plane rides and amusement parks.  Bottom Right: The Zoo and Mackinaw Bridge.


5.06.2013

1-5th Grades -- Stop Motion Animation (Week 1)

I have always wanted to do a stop motion animation project with students but was overwhelmed the the amount of equipment I would need -- cameras, tripods, computers, computer software, a computer lab.... times however many groups I would have.

Then came iPads and iPad apps.  Sometime during the summer or fall I found an app called 'Stop Motion'.  It's a .99 cent app that is super user friendly that creates stop motion animation -- you can do all sorts of things directly in this app to have a full video of awesomeness.

Now that I found the app I just needed enough iPads - which was almost as overwhelming as needing ALL the extra equipment.  Lucky for me our building purchased a few iPads for teacher/student use.  I claimed the iPads for two weeks in May to try out stop motion animation!

I waited.  I planned.

May came and suddenly it was time to load up the iPads with Stop Motion and pray to the art teaching gods that my lesson plan would work.

The week before I drew out some backgrounds on some old file folders and asked students to color them when they were finished with work.

I also took some GIANT white paper, an iPad, and a ruler to grid out the sight lines of the camera.  I had students color this grey.  

The day came to put all my planning to the test - about 20 minutes before my first class walked in I tried to download the .99 app only to find no way to purchase the app and download it on each iPad.  (rightfully so, the school ipads did not come with a credit card on file).  I started to panic.  Would I really need to buy 10.00 gift cards for each one for a 99 cent app?!!?  Then I got smart.  I gifted Stop Motion to myself 4 times and redeemed them on each ipad.  WHEW.  That was close.


How I set it up:
3-5 kids in a group depending on how many students are in class (I had 6 stations)
1 Large white paper with grey trapizoid
1 background
1 iPad loaded with Stop Motion
Pattern blocks
1 ruler to angle iPad

I explained how the app worked, their job, how to rotate through being the director, and stressed as much as I could to NOT MOVE THE IPAD OR THE BACKGROUND.


One student is the Director at a time.  The director's job is to make sure all body parts are out of the shot- take the picture - then tell group to move pieces.  I set a timer for 2 or 3 minutes (depending on group size).  When the timer goes off directors change.  The director doesn't get to boss around what the movers do - their only job is to clear the picture of body parts and take the picture.  The group works together to make ONE long video - the video DOES NOT change when the director does.

The lesson worked even better than I expected.  The kids used the app with little help or instruction.  I did find that the older students did a better job being patient and moving pieces a little at a time - the younger kids seemed to get excited and make larger movements between pictures.

Towards the end of class I have groups clean up their stations while I collect their iPads and turn on the projector.  When everyone is cleaned up we watch their movies on the digital projector.  (All you need is an adapter that goes from your iPad to VGA cable for the projector).

Overall the lesson was a complete success - I have parents e-mailing asking what app it is, students are begging to do it again next time (which I already have planned!)


5.02.2013

3rd and 4th Grade -- CD weavings

Last year at the end of the year our building Tech came to me with a box of CD's asking if I could use them.

SURE! I said.

Fast forward to this year and suddenly CD weavings are popping up everywhere - Pinterest, other art teachers in my district, blogs.  I decided to jump on the band wagon and give it a try!

I started kids out with a CD, or rather their LOOM.  Next, I gave them a piece of warp thread - it was my wingspan,  about 5 ft.  Students put the warp thread through the middle of the loom and tied a TIGHT square knot on the back.  Next, students wrapped the remaining thread through the middle, then around the outside edge, until they ran out of thread.  Then, students counted how many strings they had on the front - they needed to have an ODD number (most had 11 or 13, a few 9).

IMPORTANT: The tighter the warp thread is on the loom the easier it will be to weave.

Next class I showed students how to measure a piece of yarn using their arms as a measuring stick - finger tips to shoulder, then how to thread the yarn on a tapestry needle. (HINT: my mom taught me this-- don't use the end of the string, instead make a little loop, pinch the top of the loop to make a bump, put the eye of the needle on the bump, wiggle the bump a little and it will slide right into the eye!).  Do not tie on the needle.  Students learn quickly to pull the thread not the needle when pulling weft thread tight.

Students then pick a spot on their warp thread, put the needle under, over, under, PULL - pull till the end of the string almost goes under that first warp thread.  Hold down the end of the weft thread while you continue with the needle all the way around - over, under, over, under.... when you get back to the beginning the weft string will overlap the end and hold it in place.  Weave till you run out of string.  When the string runs out - end it on an 'under' movement.  Measure new string, start where the last string ended and keep going!  (video to come)

The first couple of strings were the most thought provoking for the students - but after that they CRUISED!  In fact students would beg to take them home to work on them and would exclaim with excitement when they would return to finish them!

To be done students could either weave to the very edge or stop about an inch short and color with Sharpies.

I will totally do these again!

***NOTES***
- Make warp thread TIGHT.
- Make sure there are an odd number of warp threads.
- Make students thread their own needles.
- Don't let students tie on their needles (unless absolutely needed)


5.01.2013

Paper Weavings (k,1,3,4)

Weaving was one of the classes in college that made me realize that I wanted to be an art teacher.


Weird, right?


Weaving was the first class where everything made sense.  It was the first class I had ever had that I didn't struggle to understand processes, concepts, or anything else.  In my entire school career it was the first class I had where I felt smart.  I have some learning disabilities that make retaining oral information difficult for me - so most classes are tough and lectures were a nightmare.  Weaving was the first class where everything was explained with examples and showing/doing it -- it totally made sense to me.  It was in my weaving class where I realized that other kids who learn just like me are actually smart and they need a space to feel smart - where it doesn't matter if letters move, or you can't read fast, or if numbers just don't make sense.   Art is for everyone, but especially for those kids who aren't 'smart' based on their state test scores.

I could go on -- but back to our weavings.

So, for as much as I LOVE weaving - I have never woven with students.  The idea seemed overwhelming to me.  I struggled with how to organize the materials and be available to help students as they had questions and needed assessment.

At last I decided to jump in and see how it went.

It went WAY BETTER than I expected.

Kids are born weavers.

Kids that I expected to struggle with weaving because the struggled with other art skills -- SOARED and kids that I expected to breeze through it struggled a bit.  Why?  I am not completely sure.  I think it has something to do with the combination of fine motor skills, ability to recognize patterns, willingness to correct mistakes, and other crazy brain functions I can only pretend to know about.

For the Kinders and 1st grade kids I made very simple looms.  I provided students with their "warp thread" precut and attached at the top.  I gave them strips of paper they needed to weave over, under, over, under until they filled their paper.  We then either glued down the flaps or I taped the flaps on the back. Students LOVED seeing their weavings get longer - many even made patterns with the paper they picked.

For the 3rd graders - I had them make their warp threads.  We spent a class with rules and pencils to make sure their warp threads were even and in the right spaces.  A few students had to redo theirs when they quit and did it halfway trying to take the easy way out -- instead they had to do twice as much work.  Once their loom was done I left them pick which design they wanted from some patterns.  I showed them how to read the pattern one line at a time, then weave it -- next line and so on.  Many students caught on after a couple of lines, a few students needed some extra help.  They did GREAT!

4th graders made their own looms as well, but instead of weaving a pre-made pattern, I had them create their own.  Each student got a sheet of paper with 3 grids on it.  Students colored in full squares to make their designs.  Once all three designs were complete, students picked their favorite to weave.  Again, I showed students how to read their patterns one row at a time - off they went.

Now, after our first rounds of weaving I have decided that I love doing paper weavings with the younger kids and yarn weaving with the older kids.  While the grid weavings are neat - they were frustrating for many students because the paper moves around a lot, causing their patterns to distort. I had students glue them down in the end - but it was hard to glue flat without warping their weaving.  Although, I have to admit that the students had very little issue with the grid weaving concept because of Minecraft.  I had TONS of creepers woven.


4.18.2013

Winter Trees - 3rd Grade

I wanted to do these amazing trees last year - but alas, it NEVER snowed.  Well, this year we totally had snow and plenty of it.

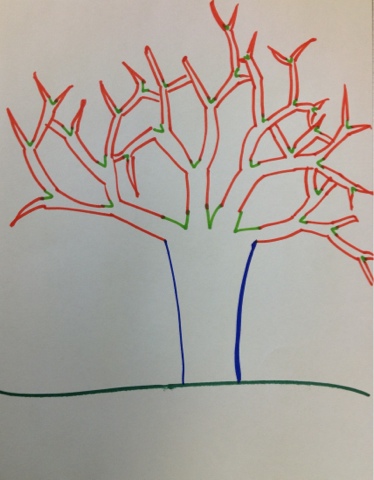
I had third graders learn a new way to draw trees - now, I'm not a big proponent of teaching kids HOW to draw something - but I also know that getting kids to draw two sides of the branch instead of just one wasn't going to happen spontaniously.

So, first I projected a picture of a winter tree and traced sections of it on the board for the kids - making sure to really drive the point that we are drawing the outside of the branches, not just the middle.

Next I showed students a pattern on my traced tree.  There is a "V" and that v grows longer into branches. (see picture).

We continued this pattern till we had a tree.

I explained to students that this pattern may make sense in their brains, but when they go to draw, it might be more difficult than they expected.  Most students poo-poo this and think "I got this Ms. Novak - it's EASY" and then when it comes to paper and pencil it is more "Uhh Ms Novak - I need help."

I have students practice trees on some scrap paper till they get the hang of it - then I let them pick out a color of construction paper and start on their final.

After their tree is finished, they color with brown oil pastel(or white if they want a birch tree - most stick with brown).  Once their tree is all colored we talk about how when it snows - the snow sticks to the top of each branch.  Students take a white oil pastel and color white on the top of each branch.  Now, some kids totally get this and others get lost in the idea that the top of EVERY branch is colored white - not just the top branches.  Students that get stuck on this idea often travel with me to a window and look at how the branches don't line up under each other - thus letting snow land on each one.


Last but not least, MY FAVORITE PART!!!! -- If students wish they may add some glue to the snowy parts of their trees/ground and add some white/clear glitter!  I know many art teachers and custodians HATE glitter -- I happen to love it.  I love how it sticks to everything and travels through the whole school.  It makes me feel like there are little art fairies bringing joy to all.

Despite the fact that I tell kids 'how' to draw a tree - they all end up as unique as the students that draw them.  Short of giving up on the project EVERYONE succeeds, because - well, all trees look different, no two trees look exactly the same so there is no "my tree doesn't look like a tree".

Yay!  High success!


1.30.2013

2nd-5th Grade Mad-Lib Style Pictures!

Hahahaha!

Okay so the project born out of a few necessities. First, this idea came to me years ago when I was in a 3rd grade room and the teacher had a box with three different compartments. Each section had sticks with words on them - one had things, one locations, and the other an action. This box was for students that had trouble coming up with writing ideas. I took this idea to the art room for kids that struggle with what to draw when they free draw.

T-Rex playing cards in Canada

So, normally this activity is in my "done" activity center - but I needed a silly/fun project while students wait for their clay to be fired.

I started by making a list of things, actions, and places - I tried to make sure my places were generic enough for all students to be able to draw. For one class I had the class make the list - but that took up most of the class period - whoops.

Ice skate drawing at MSU
After I had my lists I cut them and put them in buckets. Students take one slip from each, create a silly sentence and draw that picture.

I have found that this is a great exercise in creative problem solving. If a sentence says "A broom running in the grocery store" - Students have to figure out how to make a broom run!

These are HILARIOUS- students have as much fun drawing them as they do comparing sentences. If you don't repeat words on your lists - every sentence, and every picture will be different.

Eagle baking cupcakes in Atlantis. 
The first day they were only allowed to draw with pencil because I wanted them to focus on the details. I didn't want them to do a quick drawing - but really think about the location, how to show the action, and make their picture make as much "sense" as possible.

Bahahahahaha. I laugh whenever I look at them!!!!


12.21.2012

Origami Star Box -- 3rd Grade

I did Origami star boxes with 3rd grade this year - a couple of the folds are tricky for them, but everyone succeeds in the end!


9.30.2012

3rd Grade Reflection Names


This project has gone through a few changes - I started it a couple of years ago and was never really happy with how it turned out, until now.

Most years I have the kids decorate their letters instead of the background - but their letters often ended up narrow and small leaving LARGE open, untouched, white spaces.  This year I opted to have them leave their letters white - AMAZING difference.

Here is how we did them.
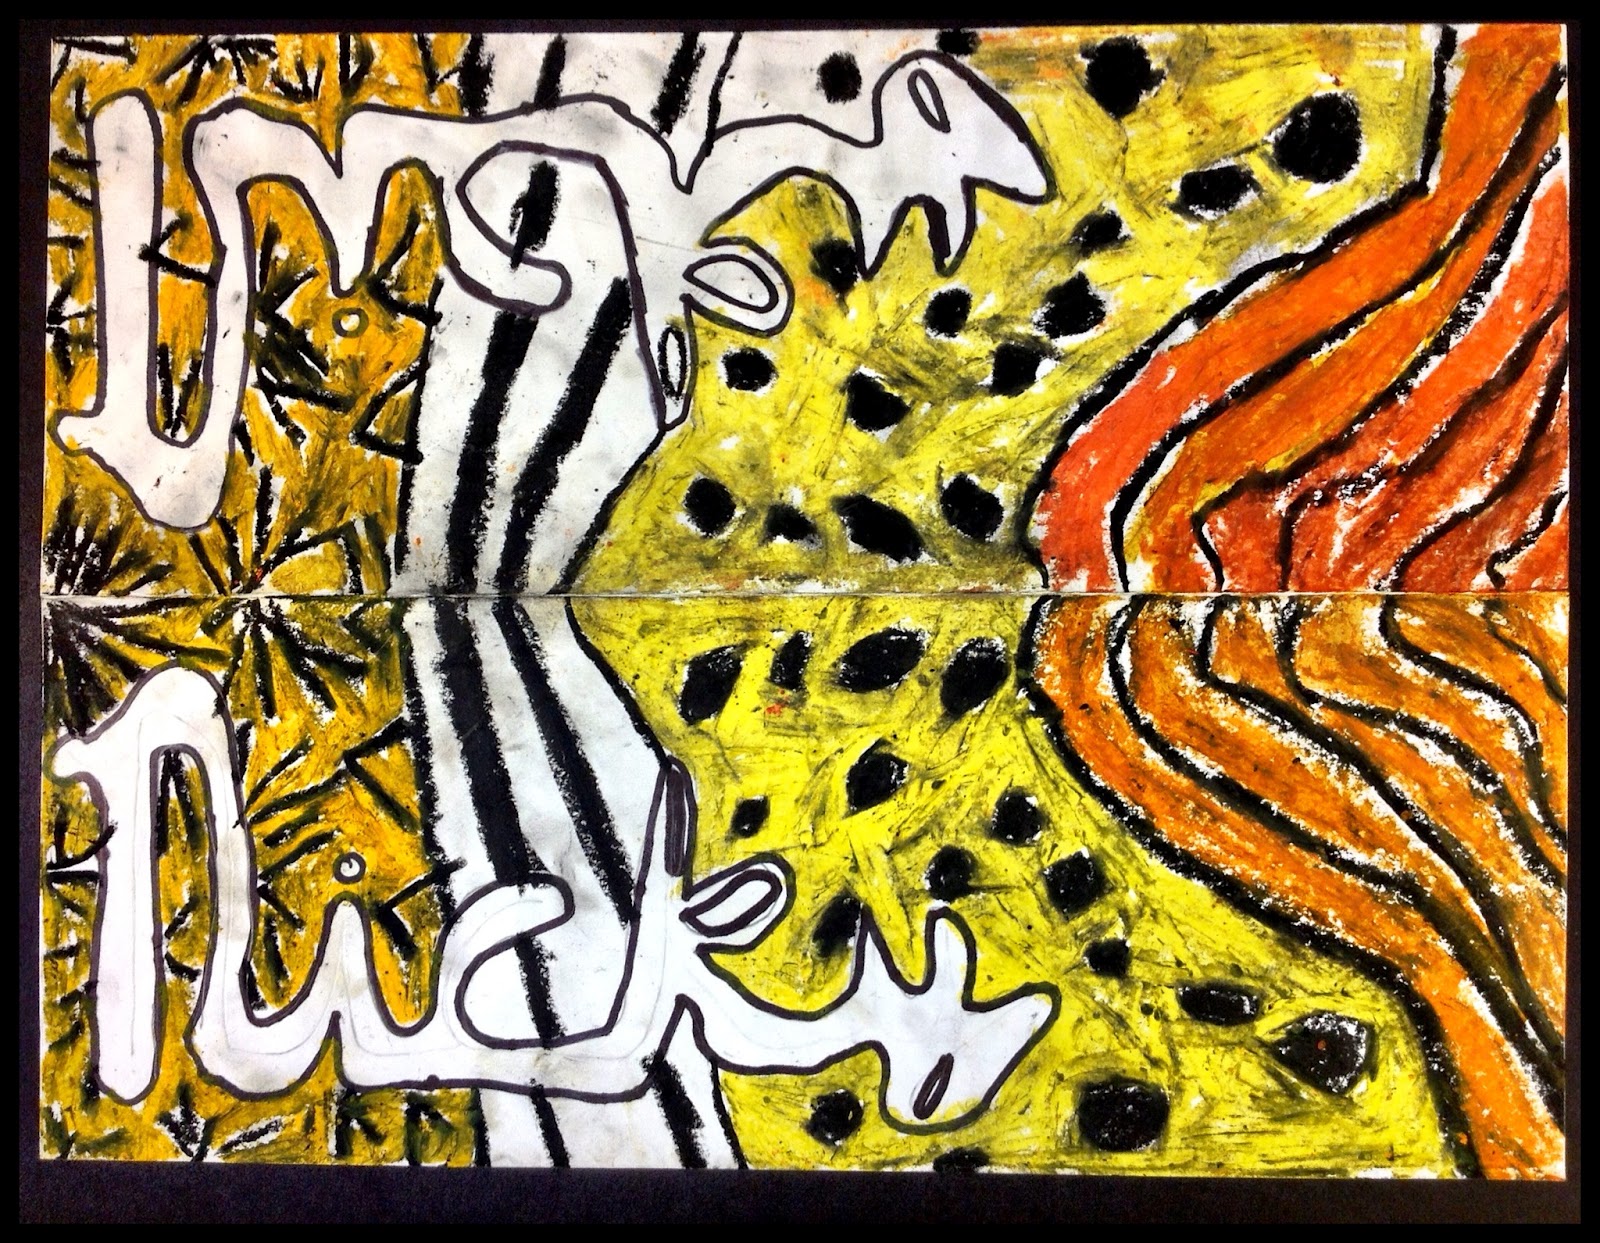
1) Fold 9 x 12 paper in half hot dog style.
2) Leave folded and draw name in BIG bubble letters -- normal or funky (using different kinds of lines)
3) Sharpie trace name.
4) Go to window/light table and place NAME on surface so the blank side is facing you.
5) Trace name through paper using a pencil - name will be backwards - it's okay, it should be. (this is the hardest part for students to do - it is hard for them to do it backwards)
6) Sharpie backwards name.  (you could skip the pencil on the backwards name, but 3rd graders tend to sneeze or bump each other and want to start over.)
7) Pick ONE side of paper and use a black oil pastel to draw SIMPLE designs.
8) Fold paper backwards so that the names touch each other.
9) RUB paper while folded - rub hard.
10) Open.  The oil pastel will transfer lightly to the other side - trace these marks with black oil pastel.
11) Time to color.  I tell the student to turn their paper vertical/portrait style.  It tricks their brain into see the patterns they drew instead of their names.  Then I tell them to start at the fold and work their way out.  Whatever they do to one side of the fold needs to be done to the other side.
12) Continue till finished!

These took use about 3 50 minutes classes.  We talked a lot about reflections -what they are, where we see them, how they work - why when we look in the mirror the words on our shirt look backwards - etc.

The kids had to trust the instructions on this proceses, as many of them couldn't visualize where it was headed.  When it was done or close to be done they were mesmerized and thrilled at the results (I was too).


This project is great at the beginning of the year because it helps me to re-learn names, see how they have grown over the summer, and how our year will go.


5.25.2012

Pre and Post Self Portaits -- 3rd Grade

I started this project a couple of years ago and loved it so much, I just keep on doing it.

Day 1: The very first day I hand out paper and ask students to draw their very best self-portraits.  I ask they to draw their heads large, show a their neck and shoulders.  I stress that students can't let other students draw parts of their face for them - even if they like how someone else draws eyes over their own.

The next few classes we spend practicing different sections of the face.

Day 2: I show a slide show of real eyes - close up.  I ask them to notice the shapes, colors, patterns, textures.  We pause it on one eye and break it all down - shape of the eye, shape of the colored part - do we see the whole part of the colored part?!  (I stress that ALL eyes are different - some people see the whole colored part, but most only see part).  Then we talk about the pupil - what is the purpose, what happens when we go from BRIGHT light to DARK and reverse.  The kids get a kick out of learning why it hurts to turn on lights in a dark space.  We then talk about the colored part - what does it really look like?!  Is it one solid color?!  Does it change?! 

Rest of the class we practiced drawing different eye shapes, colored part, pupil and such.  I asked the students to practice finding the combination of colored pencils/crayons that made their own eye color.

I passed out mirrors to help them observe their true eye color.

Day 3: We reviewed their eyes, talked about where eyes go on their head.  I projected pictures of me when I was little onto the white board.  I trace my head, trace my eyes and ask where my eyes are at on my head.  I then cover the projector and ask again.  I almost always get "Ooooh! - In the middle!"  I then do this again with an older picture of myself and my older brother - trying to prove to them that their eyes are indeed in the middle of their head.  Mirrors were provided.

http://www.pencildreams.com/2011/03/drawing-nose.html
Next, I ask the students to start their final head, put their eyes in the middle, color them.  If, when, they get done with this step they get a sheet that has practice noses on it.  I ask the students to doodle noses for the rest of class.  I explain that I will no longer accept "b, d, c, L," or any version of those letters for noses.  The sheet I pass out is very cartoon-y, but it still gets them to start doodling noses with some nose-like shapes and lines. 

Day 4: We practice some more noses - talk about where their nose goes on their paper (nose starts between the eyes and ends halfway between their eyes and chin).  Final noses go on paper.  Students the practice lips for the remainder of the class.  Mirrors were provided.

Day 5:  Students review/practice lips and draw their lips halfway between their nose and chin.  Next, I explain how to do their hair.  We look at common mistakes boys and girls make -- creating weird bald spots.  They giggle and explain why it looks wrong.  I then have students draw their hair line (not their hair), show it to me and they start to color!  Most kids can finish coloring this class period, but some need another day.  I really stress to them that they need to get colors as close to real as possible - that meant A LOT of students had to layer colors for their skin color and their lip color.  Mirrors were provided.

END:  I have students compare and contrast their pre and post drawings.  It is great to see these side by side - the students often are wide eyed at their before picture. 

5.12.2012

Sign Language Hands - 3rd Grade

This lesson is one of my favorites for 3rd grade -- it is difficult, but also very rewarding for the students. 

I came up with this lesson in my very first year of teaching as my class was coming in.  It was the time of year when snow storms, ice storms, and ridiculously cold days had chopped up our weeks and projects due to days off.  I was teaching my day like normal when BAM it hit me as my kids were walking in - I had no project for them.  Nothing.  Zip. They finished what everyone else was working on finishing -- my mind was reeling!  What on earth was I going to do with a classroom full of 3rd graders for art?!?!?  Then just as fast as I realized I had nothing BAM - an idea. 

I will have them write words in sign language.

I quickly went to the internet, found a sign language alphabet and printed off copies while the class was settling.  As my trustworthy student went to get the copies I explain to the class that this next project was going to be tough - that it might be frustrating.  I asked them if it was okay to be frustrated - they said, "Yes".  I asked if it was okay to give up - they said, "No".  I explained that I would help, but I wouldn't do it for them, and that sometimes they would have to wait for my help.

Once we covered that and students seemed in the right mind set I told them our plan was to draw letters using sign language to spell a word.  Most students became excited, a few winced, a few flashes of fear.  We went through the alphabet as a class - making each letter on our hand (this seemed to help those that winced and panicked).

Next, I did a demonstration where I drew some of the letters - thinking out loud while I looked at my hand and back to my paper.  I also did a couple where I only looked at the print out.

I reminded the kids that it might be harder than they expect, but to just keep trying!

Expectations:
- Pick a word between 4 and 6 letters.
- Draw the hands life size or bigger.
- No giving up.

I passed out papers and let the kids go.  The first day tends to be the most frustrating day, as it is harder than they expect.  The second day it is a lot easier for the kids and they tend to take off!  Make sure on the second day to review where the fingernails and wrinkles go, as many tend to get happy about putting them on.

When they are done with their drawing they come to me to approve - I make sure fingernails are in the correct locations.  Next, they outline with Sharpie.  If there is still time that day they look through magazines for letters to glue above each hand.

When these are complete the kids beam at their final project.  They are often very proud and ready to show them off!