Pages

Showing posts with label Collage. Show all posts

9.21.2013

Visiting Artist: Elizabeth St. Hilaire Nelson of Paper Paintings

Her cows are my favorite!
Total awesomeness!  Elizabeth St. Hilaire Nelson of Paper Paintings came to one of my schools and talked with my fourth graders!!!

Okay, lets back up to before the awesome visit and talk about how we prepared for the event!

A couple of weeks before Mrs. Nelson came I passed out a bunch of pictures (from a calendar) of her work and asked students to look at them - notice them.  We then talked about things they noticed, what the pictures had in common, what was different and even came up with some questions for the artist.


Next we watched this short video:


After the video the kids were pumped and we set off to decorated some collage papers with crayons, tempera paint and watercolor.  I assigned tables a specific color so that we had the correct color combinations when we went to collage later.

The following week we watched a DVD that Mrs. Nelson sent me.  In the DVD she went through her process from beginning to end - making papers, sketching, under painting, and then collaging.  After the video students did their own "sketching" and under painting.  Normally I am against making all the students do the same exact thing, but this time I decided the students needed to focus on the visiting artist along with the collage process - so I decided they would do our school logo.  We have a die-cut of our logo in two sizes, so I made a bunch and let my students pick which size and where to place it on their 6" square pieces of wood.


Back to the amazing visit:

Mrs. Nelson began by talking my students about her love of art, her journey to where she is now with art, and specific techniques to her collage style - and maybe most importantly she explained that making art is her job, she gets paid to make art! After her powerpoint she demonstrated how she works - she impressed the kids with her ability to work on her artwork on planes, in doctor offices and anywhere she can sit for a few minutes! The students "ooo-ed" "aww-ed" and whispered "this is awesome" "so cool" "best day of art ever"!

So, after Mrs. Nelson demonstrated how to directional rip, placing glue UNDER and OVER each piece, correct mistakes, and all sorts of other tips and strategies - we passed out glue, paint brushes, collage papers and their block of wood.

The students TOOK OFF! It was AMAZING to watch them work.  They totally understood and went for it.  Some students used too much glue, others too little - but everyone learned by trial and error and their projects look amazing.  When we had to clean up all I heard were complaints and moans - which is always a good sign.

I think one of the best things about the day was how much my students loved her right from the beginning.  They brought paper for autographs and gave hugs left and right.  Hopefully Mrs. Nelson had a great day just like my students and I did.


12.04.2012

2nd Grade - Assemblage Sculptures

Louise Nevelson - Assemblage Sculptor
So, I had BOXES, I mean BOXES of just stuff -- milk bottle caps, empty thread spools, wooden spools, cedar chunks, other wood chunks, styrofoam balls, and all sorts of other things.  I was sick of having them stacked in a closet in my room.  I decided it was time to come up with a project I could use it all for.  Then I remembered seeing a picture of this cool sculpture at some point in my life - where there was a lot of rhythm and texture but no color -- everything was one color.

So, aimed with the knowledge of sculptures that were busy and all one color, I searched and searched till I found it, or rather - her.  Louise Nevelson.  Louise is known for her assemblage sculptures full of texture, rhythms, objects, and always painted a solid color.

I had prepared a slide show with some of Louise's work.  I asked the students to look at them and raise their hand when they could tell me something they noticed.  I then had the students pair share what they noticed.  After a few minutes of further discovery we talked as a class.  We talked about what we thought they were made of, what individual pieces they saw, the rhythms and NOT patterns, layering, shadows, lights - we even discussed why they thought she painted her work all one color.

Next I handed each kid a piece of mat board and let them start their own assemblage sculpture.  I did put a few rules on the project -- layers and no taller than their own hand.  Students tend to want to build towers with these, and I wanted them to layer - so thus the height rule.

Kids used wood glue and hot glue to assemble their projects.  (Yes, 2nd grade used hot glue. We talked about safety and how hot glue is HOT -etc.)  It took us a good two classes to get everything glued they way they wanted.  Then the third class, students got to pick what color they wanted to paint their projects.  I reminded them that they needed to be ALL one color.  When kids were  'done' we got down at eye level and turned their project all the way around to make sure they really got it all painted!

I then took their projects and hung them on the bulletin board by color so that they kind of mimic Louise Nevelson and her rhythm of rectangle boxes.


4.20.2012

Tornado Safety - 1st Grade

I originally found this lesson while browsing "Adventures of an Art Teacher".  I pinned her tornado safety pictures to my 'Art Lesson' board on Pinterest.  I have since been eagerly waiting for spring to try my spin on this idea.

The very first day we didn't discuss tornadoes at all - instead I had the students close their eyes and imagine they were driving up to their home.  I asked them to think and look at their home and proceeded to help them think through what their home looked like:
- is it a house?
- is it an apartment?
- do you live in a condo?
- do you live in a trailer?
- How many windows do you see?
- How many doors?
- Where are the windows and doors?
- What color is your home?
- What shape is your home? - tall and skinny? short and flat? square? rectangle?
- Are there shutters by the windows?
- Is there a chimney?

After this I asked students to draw their home LARGE on a sheet of paper.  They then outlined with sharpie and colored it with crayons.  I did my best to stress they color their house the color it is - apparently there are some rainbow and duel colored homes out there. ::wink wink:: If students got this far then they cut out their house and glued it to a piece of dark grey construction paper.

Next class students and I discussed Tornadoes - what are they, how do they form, what to do to stay safe during a Tornado.  This discussion was pretty informative for them and for me.  After we talked for a bit I explained the plan for the day.

After a quick demonstration on tearing paper  - We pass out their homes, black paper for the tornado, sentences about how to stay safe around tornadoes, and oil pastels.  Students ripped their construction paper, glued it down.  Next, they cut their sentence to fit in the tornado, being careful to read the sentence back before gluing it down.  After this was completed students used oil pastels to finish out details.  Again, we are working on making color choices that make sense - ie: magenta clouds aren't very tornado like. 

Most of these turned out AWESOME and I love the diversity in homes, tornadoes and even details that got added in later! 

Thanks for the idea Adventures in Art!

11.21.2011

K and 1st Grade - Friedensreich Hundertwasser

Friedensreich Hundertwasser is one of my favorite artists.  I honestly do not know much about his personal life, but I absolutely love his artwork - the lines, shapes, colors, rhythm, and repetition.

I needed a new kindergarten/1st grade lesson and I was coming up blank.  No ideas.  I thought and thought all weekend.

To hopefully stir up some inspiration I went traveling through my blog to see if there was an old project I had forgotten about and wanted to do.  Well, I did better than using an old project - I was inspired to create a new lesson all together!!!

A few years ago I was asked to make a piece of artwork with the students to auction off at a district event.  Kindergarten and I made original artwork inspired by Hundertwasser.  I decided to jump off this idea for my new lessons.

I went to the internet and searched images for Hundertwasser - originally looking for the artwork I used for my fundraising project.  Instead I found this beauty: Arche Noah.

It was not only beautiful but I could see my kiddos recreating this masterpiece with paper, texture plates, glue and scissors!  I had decided on the project, now to plan.

I could not decide if I wanted to have K do this project or 1st grade to do this project - in the end I decided to have both do it!  Often times when I create a new lesson I will try it out in different grade levels trying to figure out where it fits best.

First off I projected the image of Arche Noah and ask the students to raise their hand when they could tell me something they noticed - a color, a shape, something they see.  I wait until ALL hands are in the air.  Every single kiddo can tell me a color or a shape.  I call on kids until I see we have noticed a majority of the picture or the students are getting antsy.  I often get kids that will say they see lollipops and lots of circles.  On occasion I had a student who would notice the fence or the water running through the picture - but most times I would have to guide students to see those things.  I read them the text at the bottom - as most of my kids are still working on reading.  I ask the students if it would make sense for the bottom to talk about nature but have big lollipops - generally I hear light bulbs go off around the room as students' hands leap into the air and "trees!" is blurted from their mouths.

We then look for other clues that might tell us that they are indeed trees and not lollipops - they find the fence, the grass, the water - etc.  We talk about all the colors we see inside the concentric circles.  We talk about the textures we see on the ground....

Here is where it gets interesting.  I decided after teaching this to first grade that it was a little over the ability level of most of my kindergarten students - so for kindergarten I adapted the lesson for their abilities.

1st Graders:
I had the students gather around for a demonstration where I showed them how to add texture to their 'ground' by using different colored green crayons and texture plates.  After their WHOLE paper was covered in texture(s) they had to trace different sized circles on colored paper, cut them out and glue them down.  This lesson ended up not only being a lesson about Hundertwasser and concentric circles - but it also became a lesson about tracing, cutting, gluing, and placing the circles in size order -- something I realized I needed to stress halfway through my demonstration.


As an adult it is easy to forget that all skills are learned at one point - we aren't born knowing how to write, read, or how to put things in sequential order whether by number, size, color or any other qualitative element.

After a slightly longer than normal demonstration I sent the kids out and they got to work.  Most students only finished their background and part of their first "tree".

The next class period I quickly refreshed how to trace and cut - but that they needed to have 3,4, or 5 trees on their paper.  We observed and counted that Hundertwasser had 9 on his!  Once the students had their decided amount of trees they were to get strips of black paper for their "trunks" and a strip of color paper for their fence.

I explained and demonstrated how to add the trunks and the fence.  I showed the students how to make the fence by accordion folding - or "fan" folding as the students called it - then cutting off one tip at a diagonal.  This way when they unfolded their paper they had something that resembled a picket fence!

Magic I tell ya.

The kiddos were off and running!  My room was a mess and it was beautiful!

Now the adaptation for Kindergarten:
I realized that all the tracing and cutting was going to be too much for my beginner cutters so I changed my lesson slightly.  I had students pick if they wanted 3,4, or 5 trees on their paper.  I had them trace a large circle onto some extra tag board I had lying around, write their name in the circle and cut them out.  Once the students cut out their circles they took a white oil pastel and drew the concentric circles on the tag board.  Next I passed out Prang glitter watercolor - boy were the kids excited!  I made a BIG deal about using the TIPS of their paint brushes as many of them like to scrub with their brushes.  I explained that if they didn't use the paints the wait I taught them then they would not be able to use the glitter paint, but the normal kind.  I have never seen kids so gentle with paint before!


The paint beautifully added lots of deep colors to the tag board while resisting the white oil pastel.  At the end of class I had the students place their circles on a green sheet of paper and place it on the drying rack.

Next class the students finished up their projects much like 1st grade.  I had them color the background with green crayons and texture plates.  The students glued down their "trees", added trunks and a fence!

Both projects ended up being beautiful!  This lesson was engaging and interesting to students while also challenging their fine motor skills!  A lesson I will repeat in the future!

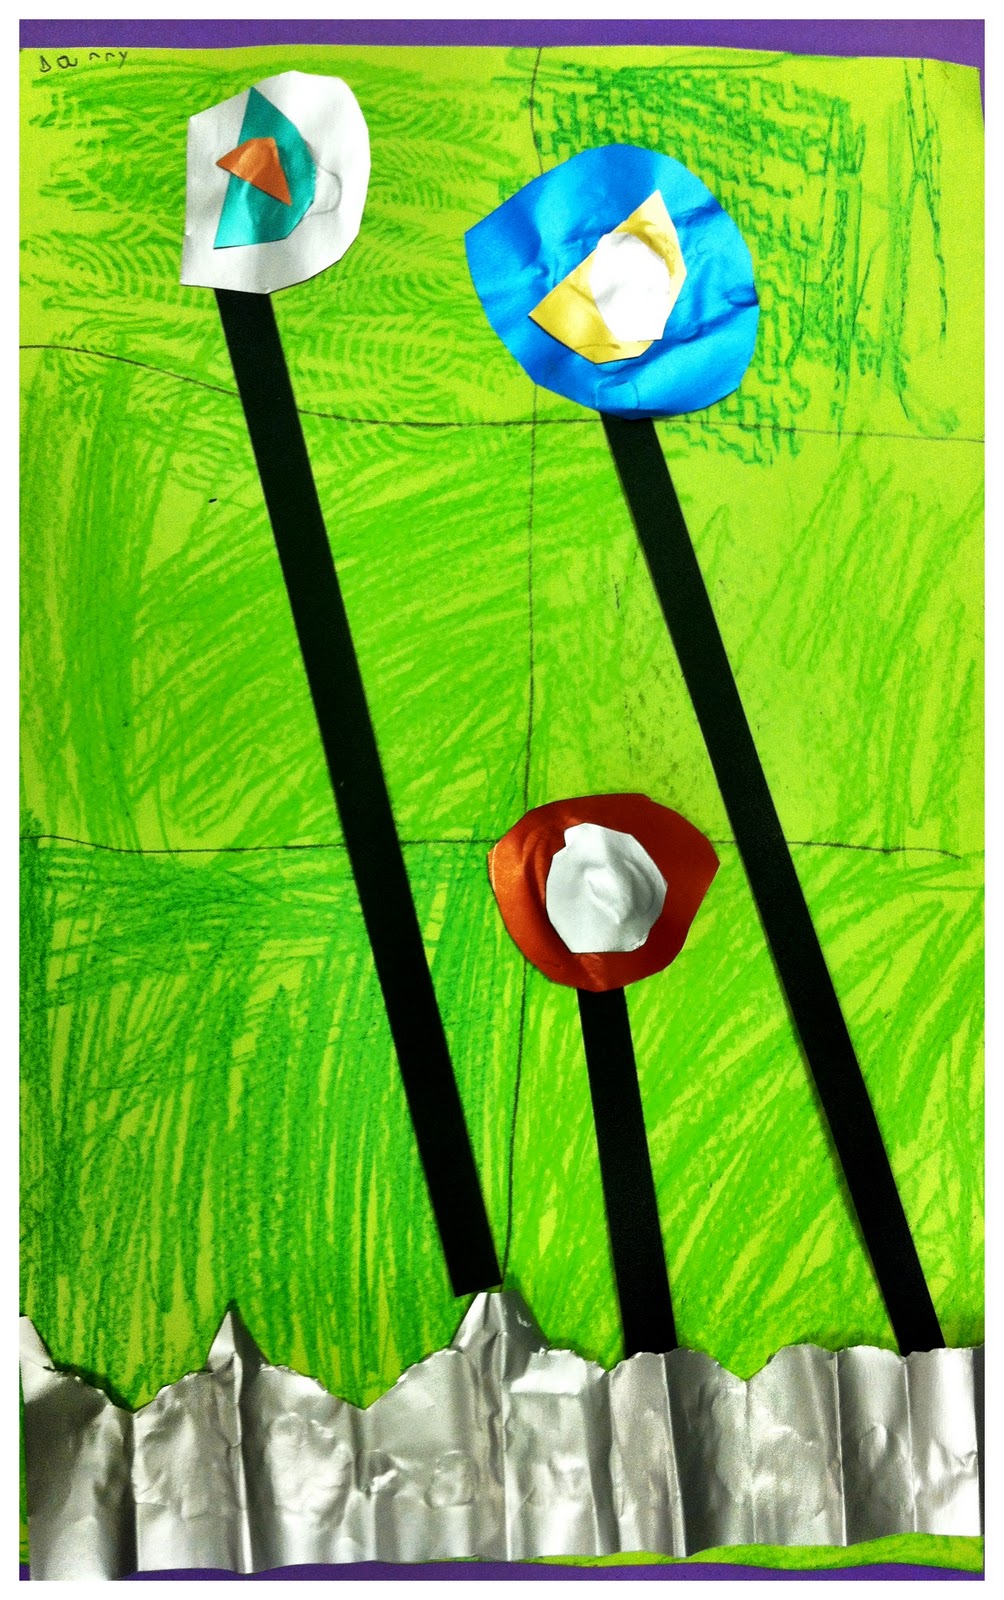
This one was done by a kinder that shows spectrum tendencies - got all the pieces!

2.10.2011

ARRRRRG! 2nd Grade Torn Paper Pirate Collages

I did this lesson years ago with 3rd grade students, but felt that my 2nd graders could handle the skills and creativity needed.

First day we read part of the book "How I Became a Pirate" by Melinda Long and Illustrated by David Shannon -- I love to read the pirate parts with my best pirate voice!  We only read the first half because otherwise they don't get enough time to work.  While I read the book their job is to look at the pirates - their hair, hats, ears, noses, beards, clothes.... etc.

After the book is over we briefly talk about how the pirates are all different - different shapes, some have hair some are bald some have hats some have handkerchiefs, some have earrings, some have eye patches... and so on.

I do a quick demonstration on how to fold their paper for their head in half then tear it -- stressing that they need to tear slow and if it isn't perfect it's okay!  In fact most of the time the heads that are imperfect are the best!  During my demonstration I also talk with them about thinking about all the other pieces they need as shapes - they are not going to tear a full eye patch from one piece of paper, but instead can tear a triangular shape for the patch and long rectangles for the strap around the head.

The students then pick the color they want for their head out of many skin tones and their background color and off they go!

I spend the class encouraging the ideas and problem solving that my students do.


The next class the students finish up their pirates - giving necks and shoulders, sometimes whole bodies!  After their done tearing the paper the students then use oil pastels to give the final details on the pirate and the background - giving the pirate some place to be.
This is the pirates ship driving license picture!


I have a few students who are not allowed to do fantasy or pirates - so they collaged a person instead of a pirate.

1.24.2011

1st Grade Snowman Collages

It is the middle of January here in the midwest which mean lots of cold weather and snow.  I took this opportunity to have the students be inspired by the weather and their imagination to make snowmen collage pictures.  First we read two of my favorite snowmen books:  "Snowmen All Year" and "Snowmen at Night" both books are by author Caralyn Buehner.  The students task was to start thinking about their snowmen pictures - what their snowmen were going to do!


After the books I gave a quick demonstration about tearing paper to make a snowy ground and then how to make the snowmen for their pictures!  The main focus of my demonstration was to remind and encourage them that their snowmen will not be perfect circles.  We tore the paper instead of cutting to give it a more snow-like affect.

The second class period the students added all the colored details - scarves, hats, kites, leashes, sleds, fishing poles -- whatever they needed to add to make their picture make sense!
Fishing 

Snowball Fight
Flying a Kite
The range of snowmen activities was both intriguing and humorous.  A project I will repeat!

1.05.2011

Kindergarten Collage Monsters


This is a great project for the beginning of the year!  Students of all abilities can easily succeed at this project.  Before the students and I listen to the book, "There was an Old Monster" I give them a mission - a mission to pay close attention to the monster - what do the eyes look like, hair, fur, colors.....etc.  We listen to the story as we look at the pictures.  When it is over the students and I brainstorm about monsters - we compare and contrast the monster with other monsters (Monsters Inc, Sesame Street..etc).  The students often come up with the idea that monsters could be anything made up!  It could have lots of eyes, or teeth, arms, legs, spots, fur, wings.... etc.

At this point they are pretty excited.  We move onto a demonstration about how to cut paper or tear it depending on what they need to work on - also a refresher course on how to use glue.

I pass out scrap paper buckets to each table and let their creativity soar.

Students Learn/Review:
-How to use scissors
-How to use glue
-How to tear paper
-Problem solving/critical thinking
-Creativity

5.14.2008

Torn Paper Pirate Collage (3rd)


Students Practiced/Learned
--Tearing
--Collage
--Layering
--Glue
--Creating
--Problem Solving
--Listening
We first read the book, 'How I Became A Pirate' by Melinda Long. We then discussed what pirates look like -- what they wear, if they are clean, hats, bandannas... etc.
The students then choose their background color and dug in the scrap drawer for pieces to make their pirate. The students weren't too sure about tearing right at first, but really took off after they ripped a few pieces. Once they were done with their pirate they drew a background!

4.19.2008

Sign Language Hand Collage (3rd)


My third grade students requested to do a drawing assignment after completing their radial designs. I decided having them do a contour drawing would be best.

Students Learned/Practiced:
--Contour (outline) drawing
--Observation
--Patients
--Sign language letters
--Cutting
--Gluing

We started by practicing the sign language alphabet as a class. I then showed them the easiest way to draw the outline of their hand. I prepared them to be frustrated, but that this lesson is all about trying and doing your best -- many of the students really gave it their all and did an amazing job!

The students either drew on the final paper or on scratch paper 3-5 letters making up a work or initials. Once the students drew their letters they used magazines or drawings to collage the background in a way that represented the word/initials that they drew.

The two examples shown: The first says 'Austin' and is collaged with things he likes. The second spells 'LOL' (laugh out loud) and there are pictures of people smiling and laughing!

Eric Carle Bugs (2nd)


After the ice trees my students really wanted to do something that didn't require them to draw. So we made bug collages inspired by Eric Carle!

Students Learned/Practiced:
--Decorating paper (cause and effect)
--Sharing
--Creating
--Critical thinking/problem solving (which shapes for what part to make the bug)
--Tracing (fine motor skill)
--Cutting (fine motor skill/hand eye coordination)
--Gluing
--Composition

We first looked at pictures from books of Eric Carle -- careful to look at the colors and textures of each shape -- and how those shapes made up an animal. Next the students used different centers to make different kinds of paper. One station required students to blow bubbles in a container fill with soap, water, and a little bit of paint. Once they blew bubbles up over the edge they placed their paper on the bubbles and wham they had a really neat texture on their paper! Another station had students use different kinds of texture plates to do crayon rubbings. The students then used watercolor to go over these crayon patterns!

All the paper the students made went into a community pile. I explained before we started that these papers we would share and there was a good chance that students would not get their paper back. We talked about how interesting it would be if we only had one type of paper in comparison to many -- we compared it to having an ice cream sundae and how most of us would want lots of flavors.

When it came time to make the collages students picked out their paper and were given the option of using shape stencils to trace and cut out or to make up their own shapes to make their bugs. We looked at shapes and imagined what part of the bug it would be for -- this really helped give the students a jump start.

They then were set loose to create their very own bugs!