A few days after BLVisual's visit to my fourth graders - they sent me this video. It really captures the excitement, awe, and pure awesome from the day.
When talking with my classes this last week many of them said, "If I had to score 1-10, I would say 100!"
Showing posts with label Artist Inspired. Show all posts
Showing posts with label Artist Inspired. Show all posts
11.21.2014
11.14.2014
4th Grade Visiting Artist: BLVisuals
 I can not come close to expressing in words the amount of joy, wonder, and excitement that filled my room yesterday afternoon. BLVisuals let each student pick their own colors for a bandana - swirl them as desired and help dip, rinse and dry.
While students were waiting for their turn at dipping or simply trying to be patient while their creation dried - the group at BLVisuals brought along some fancy glasses that order colors in your depth of field. Hot colors in the front (closer to you) and cold colors in the back (further from you) giving anything with hot and cold colors an element of 3-D! It was amazing! Students loved looking at posters and their bandanas with the glasses.
Students were also excited and encouraged to take their tapestry/bandanas and hold them in front of color changing lights - which in turn, magically, changed the colors on their bandanas!
 Every year each of the arts teachers in my building are in charge of bringing in an artist from our field. Our AMAZING PTO sponsors these visiting artists and their workshops for our kids.
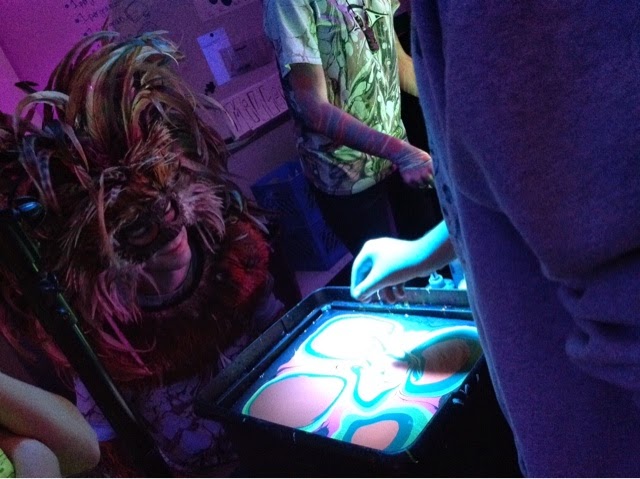


Pretty sure my students would describe the visit as "Best Day Ever".


It was a truly awesome day.
9.21.2013
Visiting Artist: Elizabeth St. Hilaire Nelson of Paper Paintings
 |
| Her cows are my favorite! |
Okay, lets back up to before the awesome visit and talk about how we prepared for the event!
 A couple of weeks before Mrs. Nelson came I passed out a bunch of pictures (from a calendar) of her work and asked students to look at them - notice them. We then talked about things they noticed, what the pictures had in common, what was different and even came up with some questions for the artist.
 Next we watched this short video:

After the video the kids were pumped and we set off to decorated some collage papers with crayons, tempera paint and watercolor. I assigned tables a specific color so that we had the correct color combinations when we went to collage later.
 The following week we watched a DVD that Mrs. Nelson sent me. In the DVD she went through her process from beginning to end - making papers, sketching, under painting, and then collaging. After the video students did their own "sketching" and under painting. Normally I am against making all the students do the same exact thing, but this time I decided the students needed to focus on the visiting artist along with the collage process - so I decided they would do our school logo. We have a die-cut of our logo in two sizes, so I made a bunch and let my students pick which size and where to place it on their 6" square pieces of wood.
 Back to the amazing visit:
Mrs. Nelson began by talking my students about her love of art, her journey to where she is now with art, and specific techniques to her collage style - and maybe most importantly she explained that making art is her job, she gets paid to make art! After her powerpoint she demonstrated how she works - she impressed the kids with her ability to work on her artwork on planes, in doctor offices and anywhere she can sit for a few minutes! The students "ooo-ed" "aww-ed" and whispered "this is awesome" "so cool" "best day of art ever"!

 The students TOOK OFF! It was AMAZING to watch them work. They totally understood and went for it. Some students used too much glue, others too little - but everyone learned by trial and error and their projects look amazing. When we had to clean up all I heard were complaints and moans - which is always a good sign.
 I think one of the best things about the day was how much my students loved her right from the beginning. They brought paper for autographs and gave hugs left and right. Hopefully Mrs. Nelson had a great day just like my students and I did.
5.06.2013
2nd Grade -- Jasper John meets Dr. Martin Luther King Jr.
Back, way back in the year right around Dr. Martin Luther King Jr. day I had 2nd graders combine the positive ideas of Dr. King with the amazing paintings of the Jasper Johns.
We started of by watching part of Dr. King's "I Have a Dream" speech.
Next, we brainstormed words that were positive.

Students then picked a word and wrote it in thick bubble letters on a piece of paper. The thicker the bubble letters the better, if the letters are too skinny it will be hard to read.
The next class we looked at paintings by Jasper John and I asked them, "How can we see his numbers even though his paintings are messy and he doesn't outline?" It took kids a while to figure out how to explain what they were seeing. Once students voiced the idea that he used different colors on the edges - so the inside edge might be yellow but the outside is blue.

 I passed out primary colors with white and showed students how to freely paint by double or triple dipping their paint brush. I tried to stress that they needed to make the background different than their letter so we could read them.
Honestly, this lesson didn't turn out exactly how I had planned - but students LOVED it. They really got into making different colors and painting making it hard to read many of their words. Even though the end product wasn't exactly what I had envisioned, the project taught more than I expected.

We started of by watching part of Dr. King's "I Have a Dream" speech.
Next, we brainstormed words that were positive.

Students then picked a word and wrote it in thick bubble letters on a piece of paper. The thicker the bubble letters the better, if the letters are too skinny it will be hard to read.
The next class we looked at paintings by Jasper John and I asked them, "How can we see his numbers even though his paintings are messy and he doesn't outline?" It took kids a while to figure out how to explain what they were seeing. Once students voiced the idea that he used different colors on the edges - so the inside edge might be yellow but the outside is blue.
 |
| Jasper Johns |

 I passed out primary colors with white and showed students how to freely paint by double or triple dipping their paint brush. I tried to stress that they needed to make the background different than their letter so we could read them.
Honestly, this lesson didn't turn out exactly how I had planned - but students LOVED it. They really got into making different colors and painting making it hard to read many of their words. Even though the end product wasn't exactly what I had envisioned, the project taught more than I expected.
4.22.2013
Rain Rain Go Away
 I don't know about your area of the world, but mine has been filled with grey skies and rain for the last WEEK! It has rained almost nonstop since Monday. I am feeling drained and slow moving.
Since spring has decided to take the longest drink of water, I decided to try and jump start it with some Van Gogh inspired flower pots.
This lesson is not new, but is a GREAT one day project to fill the hallways with spring.
We started by learning a little bit about Van Gogh - looked at his paintings, discovered his small brush strokes and use of multiple tints/shades of a color in one area.
I had the kids make a flower - any flower, could be real, made up, or even from Super Mario brothers as long as it looked flower-like. Many of my boys took advantage of this and drew man eating plants, or ice flowers. All my girls were excited to draw roses and lilies. Ha!

I showed them how to draw a simple sunflower (circle and then triangles around the edge, add a stem!) Then we talked about using short strokes and multiple colors for each spot.
While students were working I drew and painted a pot sitting on a table. When students were done cutting out their flowers I would arrange them in the vases.
I have received MANY compliments on how much people love them. I think everyone needs a little sunshine.
12.04.2012
2nd Grade - Assemblage Sculptures
 |
| Louise Nevelson - Assemblage Sculptor |
 So, I had BOXES, I mean BOXES of just stuff -- milk bottle caps, empty thread spools, wooden spools, cedar chunks, other wood chunks, styrofoam balls, and all sorts of other things. I was sick of having them stacked in a closet in my room. I decided it was time to come up with a project I could use it all for. Then I remembered seeing a picture of this cool sculpture at some point in my life - where there was a lot of rhythm and texture but no color -- everything was one color.
So, aimed with the knowledge of sculptures that were busy and all one color, I searched and searched till I found it, or rather - her. Louise Nevelson. Louise is known for her assemblage sculptures full of texture, rhythms, objects, and always painted a solid color.
I had prepared a slide show with some of Louise's work. I asked the students to look at them and raise their hand when they could tell me something they noticed. I then had the students pair share what they noticed. After a few minutes of further discovery we talked as a class. We talked about what we thought they were made of, what individual pieces they saw, the rhythms and NOT patterns, layering, shadows, lights - we even discussed why they thought she painted her work all one color.

Kids used wood glue and hot glue to assemble their projects. (Yes, 2nd grade used hot glue. We talked about safety and how hot glue is HOT -etc.) It took us a good two classes to get everything glued they way they wanted. Then the third class, students got to pick what color they wanted to paint their projects. I reminded them that they needed to be ALL one color. When kids were 'done' we got down at eye level and turned their project all the way around to make sure they really got it all painted!
I then took their projects and hung them on the bulletin board by color so that they kind of mimic Louise Nevelson and her rhythm of rectangle boxes.

5.06.2012
K and 1 - Piet Mondrian
This lesson started out for one of my Kindergarten classes that tends to work a lot faster then rest of my Kinders. I needed a lesson that had merit, but that wouldn't take weeks to complete. I had not originally planned on having other classes do this project until it was clearly a fun and impressive project for the kids.
We started out by watching a video while looking for shapes and colors.
Immediately after watching this video I projects some of Piet Mondrian's paintings. I asked the kids to raise their hand when they could tell me a color and a shape. Once all the kids had their hands in the air I asked them to whisper their ideas to their table mates. I then brought all their attention back and I asked them silly questions about there being triangles or octagons - oranges and purples.

Next I gathered the kids around the table for a demonstration. I showed the kids how to use their ruler (straight edge) by holding it down and keeping their fingers out of the way to draw a line with their Sharpie. We problem solved if the ruler moved or if their fingers got in the way - because you can't erase Sharpie. I split up my paper into squares and rectangles until it was 'right'. I asked the students if there was a special number of squares and rectangles to make it 'right' - they said no. I asked if theirs had to be like mine to be 'right' - they said no (quite enthusiastically I might add).
.JPG)
 When my paper was split up I was ready to paint with primary colors. I asked a student to pick what color they wanted me to start with. I painted all the shapes I wanted that color without washing out my brush. When I wanted to change colors I showed/reviewed how to clean out my brush, dry my brush, and start with a new color. Before I sent the kids back to their seats we problem solved common issues with tempra paint -- brush not cleaned out all the way, not drying the brush, water too dirty.
I then sent the kids back to their seats and passed out paper, Sharpies, rulers, water, and primary tempra paints.
When the students were done they put them on the drying rack! The next class we outlined their Sharpie with black tempra paint.
These turned out very Piet Mondrian while still being very unique.
4.30.2012
4th Grade - Surrealism Collages
 I absolutely LOVE this project - though it does take a specific group of kids to be able to wrap their brains around something you can't really understand.
I start off the lesson by asking if anyone knows anything about surrealism - have they heard of it, or can anyone give any examples. I rarely get many students who can tell me anything, though most of them can recognize Dali's "Persistence of Memory". So, next I introduce them to a short slideshow of handpicked surrealistic works - some 'classical' and other more modern. I let the slideshow run through first and ask for students to report what they saw - what they noticed.
This is an interesting process, because students sometimes struggle to explain what they see. They see one thing, but their brain has a hard time understanding it, so it is hard to describe. Many descriptions will include that, things don't make sense in the picture, objects are put together or near each other that don't make sense.
So, next we go on to define some surrealism vocabulary to help them with these difficult descriptions. We talk about:
- Levitation: things/objects floating in space that shouldn't.
- Juxtaposition: Placing things near each other that don't make sense.
- Scale: Objects that are unusually small or large in comparison to the picture.
- Transformation: Objects that start as one thing but transform, or change, into another.
- Transparency: The idea of seeing through something that should be solid.
While we talk about these we go back through the slideshow and try and find these words - most times this helps students to connect what they saw and now how to explain it.
 Next, we start their collage, by gathering pictures from magazines. I pull all the kids around for a demonstration/think aloud. I have the students use National Geographic because of the colors and diversity of pictures and there are never pieces about who looked best in what dress or who is dating who. I do give a speech to the kids about how National Geographic travels ALL around the world and goes to places where people dress VERY differently, and by differently I mean no clothes. Most students are okay with this, a few giggle. I remind them that our culture has clothes and our climate demands clothing - but in the jungle or out in the desert, clothing would be more harmful then helpful. I explain that these other places are not wrong or gross - but just different. They are to simply turn the page - no giggling, no elbowing a neighbor - nothing more than turning the page. I explain that if they can't handle the magazines they don't get to use them. I think in my hundreds of kids I have had to enforce this consequence ONCE.
 I then proceed to thumb through the magazine thinking out loud as I pause at pictures, move on, decide on pictures I think are unique or funny. I proceed to rip out the whole page and set aside. I tell them that I also need a background - but that my background needs to have a lot of options, not just be pretty. So a busy square, street, or landscape will work - but a pretty picture of leaves won't give me enough options.
 As I do my think aloud I do my best to use our surrealism vocabulary words as I try and get my new objects to interact and appear apart of new picture.
The first day students mostly collect pictures that interest them. The next class we cut out and do some brainstorming and start gluing pictures together.
The students really enjoy getting these to work and it's fun to watch them problem solve and think through their unique pictures.
Staff and students have enjoyed looking at them in the hallway as well. I have heard 1st graders find funny things about the pictures and talk about what they see!
Pictures I used for my slideshow -- there are literally hundreds of great examples to use. I picked these mostly because I like them and they represented the vocabulary well.
Vladimir Kush -- Fauna in La Mancha
Unknown -- Surrealism iPad Wallpaper
Rene Magritte -- The Empire of Light
Rene Magritte -- The Song of Love
Salvador Dali -- Reflecting Elephans
2.13.2012
Jim Dine -- All Grades

Due to my district's schedule and a snow day - my Monday kids are a WHOLE unit behind everyone else, so I am filling my Friday schedule with some quality one day art lessons. I hadn't really planned on using Jim Dine, but he kept popping up on art blogs and pinterest that I couldn't ignore his amazing hearts any longer!
So, off I went to google to find and save images of Jim Dine's many marvelous hearts to make a slide show. I talked a little bit about the Pop Artist before the slide show, and explained to the students that their job during the slideshow was to find something about his work and raise their hand. They could raise their hand when they knew a color, a texture, what the subject was, something all the pictures had in common, something the pictures didn't have in common or anything they observed. I made sure to wait till ALL hands had something to share. I called on students until anyone that wanted to share got to share at least once.

Next, I explained their job was to create their own version of a Jim Dine heart. I broke down and wrote on the board what choices they needed to make:
1) How many hearts? (We talked about any number they were willing to color: 1,3,7,59)
2) What colors? (random, hot/cold, favorite, sport team colors, school colors)
Then we discussed what they needed to have no matter the number of hearts or colors:
1) Whole paper filled with color.
2) Coloring with purpose and not scribbling in whole thing.
3) Using the TIP of the oil pastel and NOT the side (sides don't have as much color and the coloring goes far too fast)
 I passed out paper and oil pastels and let them to it. I let students get pencils if needed, but I encouraged them to jump in with oil pastels.
These turned out great! I had some students struggle with the freedom of this project, but most of them loved doing it and asked to do more than one.
Now, in classes that had more time to work I offered another step to students that wanted it. I let them "batik" their papers. Now, this isn't a true batik as we didn't use wax resist and plan out our colors lightest to darkest. Instead it is more of a inspired look from batiking. Those that wanted to crumpled their paper into a ball, then smoothed it back out - they did this 3 times. On the their crumple students kept it in a ball, dunked it in watered down black paint, rinsed it in the sink, blotted it dry.
 I let students pick if they wanted to do the last step because the idea of crumpling your work is too much for some students to handle - though MOST of my students were excited about being a little rebellious.
1.06.2012
This Week in Organized Chaos
The
break was wonderful, and it's nice to be back. This weeks was a week
full of new beginnings in the art room - lots of painting, drawing,
brainstorming, and critical thinking!

Kindergarten
students were introduced to "printmaking" this week. We broke the word
down into "print" and "make". The students agreed they know how to
"make" things without a problem. I then asked them about "print".
Students told me that they print things off the computer and they print
with stamps. We talked a little bit more about how both those things
are used to create the same image over and over again! I explained that
is exactly what printmaking is - making the same print or picture over
and over!
 I did a quick demonstration on how to load the brayer
with paint, roll it on pre-cut pieces of bubble warp, and 'print' the
bubble wrap on their paper. You would think I was performing magic the
way they responded to the print! I then explained a few more things
including procedures for clean up and sent them off to their seats!
I did a quick demonstration on how to load the brayer
with paint, roll it on pre-cut pieces of bubble warp, and 'print' the
bubble wrap on their paper. You would think I was performing magic the
way they responded to the print! I then explained a few more things
including procedures for clean up and sent them off to their seats!
These turned out beautiful! I have no idea what we are going to do with them, if anything. I had originally thought to use them in a collage next class, but I am also thinking of leaving them the way they are. I will have this all figured out by next class.
I did a quick demonstration on how to load the brayer
with paint, roll it on pre-cut pieces of bubble warp, and 'print' the
bubble wrap on their paper. You would think I was performing magic the
way they responded to the print! I then explained a few more things
including procedures for clean up and sent them off to their seats!These turned out beautiful! I have no idea what we are going to do with them, if anything. I had originally thought to use them in a collage next class, but I am also thinking of leaving them the way they are. I will have this all figured out by next class.

1st Graders learned about "profile portraits". We started out by looking a short slideshow filled with examples of profile portraits. I asked the students to raise their hand when they could tell me something ALL the pictures had in common. The students then told me that all the people were facing off to the side. So, next I asked how they knew they were facing sideways. You could almost hear the gears turning in their heads with quizzical looks on their faces trying to figure out both how they knew that and how to explain it. Sure enough, they needed a little help. I asked them to show me on their fingers how many eyes they SEE. I told them to count the eyes they SEE. Most kids had one little finger up, a couple of two. We then counted the eye together - sure enough there was one! I asked them if the person was real and they turned to face the class how many eyes would they see? -- TWO! an Ah-ha moment for sure.
We talked a little longer about profiles - I traced one of the faces on the board to show that the nose points off the face in the direction it is facing, along with only seeing half the mouth. I had the students do some guided practice by drawing a series of pictures on the board and the students showed me on their fingers which one picture,out of three, had a correct profile.
There was a lot of excitement when the students learned their profile portrait was going on a tooth fairy! I will post the whole lesson after the pictures are done!

2nd Graders are working on using visual texture in their artwork.
We started out by reading the book "Where the Wild Things Are". I told the students that their job during the story was to pay close attention to the wild things! At the end of the book I had the students share what they noticed - quickly they share that each wild thing is made up of different types of animals! We then discussed how the scaly body looked bumpy, but the page didn't feel bumpy. Ah-hah - visual texture!
This book was the inspiration for their own "Wild Thing" - more to come.
3rd Graders did some serious critical thinking
this week. As soon as they walked in I told them I was going to write a
question on the board and I wanted them to think about it - not talk,
but think. They needed to decide yes or no as their current answer.
I wrote on the board, "Can people who are blind understand color?"
I asked them to think about if they had never, ever seen any type of color - could they understand that an orange was orange, or that the sky was blue, or their favorite color was green?
I let them mull it over, had them put down their heads and we took a quick poll. In most of my classes it was overwhelming "No". Students that wanted to share their reasons were allowed (well at least for a while - we only get 50 minutes!). Next, I asked them if someone was deaf could they understand music?! Students jumped all over using other sense to understand music - reading it, watching it, feeling it. Slowly they started to connect that maybe if a deaf person could use other senses to understand music - maybe, just maybe someone who was blind could use other senses to understand colors.
Next, my favorite part, we conducted a little experiment. I told students I would need a volunteer that would be willing to be blindfolded, then handed an object that they needed to report the color on. It always amazes me how many kids want to try this infront of the class! I do my best to pick equal numbers of boys and girls, though not everyone gets a chance.

The first students come up, I blindfold them. I ask them to make sure they can't see - it won't work if they can see! Then I tell the class that the only way it will work is if the WHOLE class can stay quiet! If someone blurts something out or makes a comment it might ruin the experiment. Next, I hand my blindfolded student an orange. Almost immediately they can tell me that it is an orange and it is the color orange. I asked who they figured it out so quick -- they generally said the shape, texture, and the smell! We continued this for a few rounds making the materials harder and harder to guess!
We then read an awesome story called "The Black Book of Colors" in which a child who is blind, Thomas, describes colors to us using his senses. All the pictures are on black paper and have no color - but instead can by felt by the finger tips. The story is also written in brail across the top of each page.
After the book I told students we were making our own "Black book of Colors".
The next steps proved to stretch the thinking of the third graders as they were asked to describes colors through - taste, smell, sound, and touch.
I will post more when we are further in the project!

4th Graders decorated paper for collages we will be starting!
This summer I was walking the streets at Royal Oak's "Arts Beats Eats" and found an artist that I was fascinated with. I came home and found her website knowing I wanted to do a project inspired by her work.
Students used pre-picked color groups to make their papers. I asked them to layer their paint and experiment with paint brushes, texture boards, toothbrushes, combs, and q-tips. The results are BEAUTIFUL!
5th Graders are pumped out their project! We first looked at a slideshow of Logos. I had the students tally on their hands how many of the logos they knew - of course they knew them all!
I had a slide with a few different companies and how their logo has changed over the years - more simple and more unique at the same time thanks to computer graphics!
Next, I explained they were going to make their own logos, personal logos made out of their initials. The 5th graders were PUMPED! I originally did this lesson with 8th grade students, and these 5th graders blew my socks off with their ideas.
I passed out a brainstorming sheet that helped them create different forms of their letters, thus helping them create something completely original and personal.
I wrote on the board, "Can people who are blind understand color?"
I asked them to think about if they had never, ever seen any type of color - could they understand that an orange was orange, or that the sky was blue, or their favorite color was green?
I let them mull it over, had them put down their heads and we took a quick poll. In most of my classes it was overwhelming "No". Students that wanted to share their reasons were allowed (well at least for a while - we only get 50 minutes!). Next, I asked them if someone was deaf could they understand music?! Students jumped all over using other sense to understand music - reading it, watching it, feeling it. Slowly they started to connect that maybe if a deaf person could use other senses to understand music - maybe, just maybe someone who was blind could use other senses to understand colors.
Next, my favorite part, we conducted a little experiment. I told students I would need a volunteer that would be willing to be blindfolded, then handed an object that they needed to report the color on. It always amazes me how many kids want to try this infront of the class! I do my best to pick equal numbers of boys and girls, though not everyone gets a chance.
The first students come up, I blindfold them. I ask them to make sure they can't see - it won't work if they can see! Then I tell the class that the only way it will work is if the WHOLE class can stay quiet! If someone blurts something out or makes a comment it might ruin the experiment. Next, I hand my blindfolded student an orange. Almost immediately they can tell me that it is an orange and it is the color orange. I asked who they figured it out so quick -- they generally said the shape, texture, and the smell! We continued this for a few rounds making the materials harder and harder to guess!
We then read an awesome story called "The Black Book of Colors" in which a child who is blind, Thomas, describes colors to us using his senses. All the pictures are on black paper and have no color - but instead can by felt by the finger tips. The story is also written in brail across the top of each page.
After the book I told students we were making our own "Black book of Colors".
The next steps proved to stretch the thinking of the third graders as they were asked to describes colors through - taste, smell, sound, and touch.
I will post more when we are further in the project!
4th Graders decorated paper for collages we will be starting!
This summer I was walking the streets at Royal Oak's "Arts Beats Eats" and found an artist that I was fascinated with. I came home and found her website knowing I wanted to do a project inspired by her work.
Students used pre-picked color groups to make their papers. I asked them to layer their paint and experiment with paint brushes, texture boards, toothbrushes, combs, and q-tips. The results are BEAUTIFUL!
5th Graders are pumped out their project! We first looked at a slideshow of Logos. I had the students tally on their hands how many of the logos they knew - of course they knew them all!
I had a slide with a few different companies and how their logo has changed over the years - more simple and more unique at the same time thanks to computer graphics!
Next, I explained they were going to make their own logos, personal logos made out of their initials. The 5th graders were PUMPED! I originally did this lesson with 8th grade students, and these 5th graders blew my socks off with their ideas.
I passed out a brainstorming sheet that helped them create different forms of their letters, thus helping them create something completely original and personal.
Subscribe to:
Posts (Atom)