Pages

5.13.2013

ArtShow2013

ArtShow2013 was a huge success!


I don't even know where to start.

I like to have students pick their best work from the year to display at art show - but I don't have the room to keep portfolios for 500 or so kids and I don't like keep artwork instead of sending it home.  So, what I do is this:  When we have completed two projects I have the kids pick which one they did better on and send the other home.  We do this all year so that we always have something picked out for art show, but artwork also goes home. Often times students pick artwork that I don't feel is their best work - and if I ask them why they pick it, their choice is clear.  Students that pick a project that has an end product that is less than their best often pick those because of the process - which is just as important.

I love doing it this way because it creates a great variety of work for ArtShow - giving both parents and I a year review of what has been happening in the art room. 

When we get about a month out from art show we start finalizing projects, signing labels, double and triple checking class lists.  It takes about a month to gather all the projects because kids are sick, at Dr. appointments, on vacation, and any other reason for missing art.

Once projects are finalized I added signed labels and QR codes to each and every project.

Yes QR codes on each project.  Why? Other than because I'm crazy - I am always trying to advocate for my program, reaching out to parents in anyway possible.  Each QR code leads parents to this blog, and specifically to the blog post about that particular project.  I could have made it easier and put the same generic QR code on each project, but that seemed pointless.  My goal was, and is, to communicate to parents about the lessons behind the projects - so to make it easy on them each QR code was specialized.

QR codes are EASY to make.  Goggle "QR code generator" and you'll get LOTS of hits and websites to make the codes for free.  Put in your desired URL (or other info), generate the QR code, download - simple!

Now, I tried to make this as easy as possible on myself and opened Microsoft Word, downloaded a return address label template, imported the QR code - copy and pasted putting two QR codes on each label.  I did this for either a full sheet or half a sheet depending on how many I thought I would need.

Then I sat on the floor in my house, cut and stuck QR codes to each corresponding project.  My cat Phineas was so helpful in this process!

The day arrived to set up ArtShow2013.  This year I got to be in the Cafetorium, because 2nd grade production was done earlier in the year.  I LOVED being in the Cafetorium.  I had WAY more room.  I spent the day putting up grids, clipping artwork, setting out clay pieces on their own labels.

It looked AWESOME.

After everything was set out I then needed to set up my light graffiti booth and my stop motion animation area.  I asked two teachers with teenage daughters if they would be willing to volunteer sometime to art show.  They both agreed and I was thrilled!  I had one daughter on the stage, in the dark with an iPad, flashlights, ghost light, and an iPad app called, "Slow Shutter".  Here families could make light graffiti together.  When I told students there was light graffiti on the stage - their eyes got wide and immediately they were dragging their families to the stage.  I used this app instead of a camera because it allowed families to e-mail themselves the photo right after it was made.  This way I didn't have to try and figure out which went with what family.

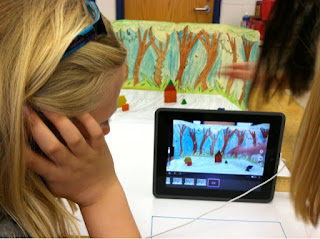
I also had a table in the corner set up with Stop Motion animation.  Students were introduced to it the week of ArtShow and were eager to share with their parents how it worked.  Families worked together through out the night to create the video below. 


5.06.2013

Kindergarten People

Every year with kinders I use drawing people as my way to see how the kids are progressing.

The 2nd or 3rd project in the year I have students draw the best people they can without any pre-teaching.  I use this to see if they are at a scribble stage, cookie people stage..... etc.  The next class I ask the students to color in their people - I look to see who selects colors, who colors in, who colors over, who sticks with one color crayon.... etc.


Then midway through the year we draw people again.  This time I ask them to draw people with their heads at the top of their paper and toes at the bottom.  We do an example drawing where students help me fill in eyes, nose, hair, ears, mouth, fingers.... on and on.  The students do another drawing and color the next class.  I specifically ask students to pick colors on purpose and to color IN their picture instead of over.  At this point most students have graduated past cookie people and have full bodies -- and most will color IN their picture, but many still pick random colors.


At the end of the year we read "Giraffes Can't Dance" and talk about how they know the animals in the pictures are dancing since the pictures don't move.  It is really interesting to listen to kids try and explain what they see.  After the book we have our own freeze dance party!!!  I play different types of music and the kids dance around - when the music pauses so do the kids.  I have them look around at how they are standing -- bent arms, bent legs, tilted heads....

Then I have the students draw people again - I ask them to draw at least one arm and one leg to be bent.      Next class, just like before, students color IN with colors that make sense.

At this point in the year I am looking for better motor control, the ability to use their favorite color on shirts/pants/shoes instead of faces and hair.

1-5th Grades -- Stop Motion Animation (Week 1)

I have always wanted to do a stop motion animation project with students but was overwhelmed the the amount of equipment I would need -- cameras, tripods, computers, computer software, a computer lab.... times however many groups I would have.

Then came iPads and iPad apps.  Sometime during the summer or fall I found an app called 'Stop Motion'.  It's a .99 cent app that is super user friendly that creates stop motion animation -- you can do all sorts of things directly in this app to have a full video of awesomeness.

Now that I found the app I just needed enough iPads - which was almost as overwhelming as needing ALL the extra equipment.  Lucky for me our building purchased a few iPads for teacher/student use.  I claimed the iPads for two weeks in May to try out stop motion animation!

I waited.  I planned.

May came and suddenly it was time to load up the iPads with Stop Motion and pray to the art teaching gods that my lesson plan would work.

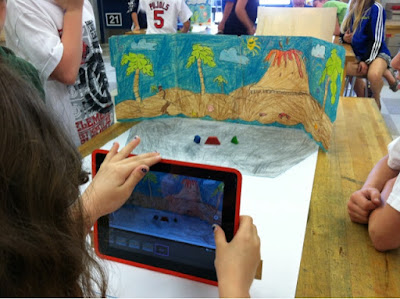
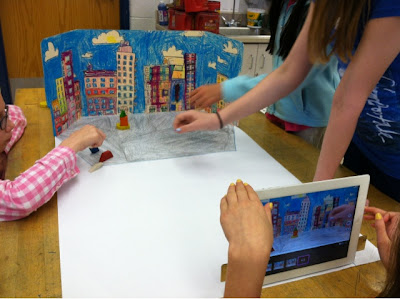
The week before I drew out some backgrounds on some old file folders and asked students to color them when they were finished with work.

I also took some GIANT white paper, an iPad, and a ruler to grid out the sight lines of the camera.  I had students color this grey.  

The day came to put all my planning to the test - about 20 minutes before my first class walked in I tried to download the .99 app only to find no way to purchase the app and download it on each iPad.  (rightfully so, the school ipads did not come with a credit card on file).  I started to panic.  Would I really need to buy 10.00 gift cards for each one for a 99 cent app?!!?  Then I got smart.  I gifted Stop Motion to myself 4 times and redeemed them on each ipad.  WHEW.  That was close.


How I set it up:
3-5 kids in a group depending on how many students are in class (I had 6 stations)
1 Large white paper with grey trapizoid
1 background
1 iPad loaded with Stop Motion
Pattern blocks
1 ruler to angle iPad

I explained how the app worked, their job, how to rotate through being the director, and stressed as much as I could to NOT MOVE THE IPAD OR THE BACKGROUND.


One student is the Director at a time.  The director's job is to make sure all body parts are out of the shot- take the picture - then tell group to move pieces.  I set a timer for 2 or 3 minutes (depending on group size).  When the timer goes off directors change.  The director doesn't get to boss around what the movers do - their only job is to clear the picture of body parts and take the picture.  The group works together to make ONE long video - the video DOES NOT change when the director does.

The lesson worked even better than I expected.  The kids used the app with little help or instruction.  I did find that the older students did a better job being patient and moving pieces a little at a time - the younger kids seemed to get excited and make larger movements between pictures.

Towards the end of class I have groups clean up their stations while I collect their iPads and turn on the projector.  When everyone is cleaned up we watch their movies on the digital projector.  (All you need is an adapter that goes from your iPad to VGA cable for the projector).

Overall the lesson was a complete success - I have parents e-mailing asking what app it is, students are begging to do it again next time (which I already have planned!)


2nd Grade -- Jasper John meets Dr. Martin Luther King Jr.

Back, way back in the year right around Dr. Martin Luther King Jr. day I had 2nd graders combine the positive ideas of Dr. King with the amazing paintings of the Jasper Johns.

We started of by watching part of Dr. King's "I Have a Dream" speech.


Next, we brainstormed words that were positive.


Students then picked a word and wrote it in thick bubble letters on a piece of paper.  The thicker the bubble letters the better, if the letters are too skinny it will be hard to read.

The next class we looked at paintings by Jasper John and I asked them, "How can we see his numbers even though his paintings are messy and he doesn't outline?"  It took kids a while to figure out how to explain what they were seeing.  Once students voiced the idea that he used different colors on the edges - so the inside edge might be yellow but the outside is blue.
Jasper Johns

I passed out primary colors with white and showed students how to freely paint by double or triple dipping their paint brush.  I tried to stress that they needed to make the background different than their letter so we could read them.

Honestly, this lesson didn't turn out exactly how I had planned - but students LOVED it.  They really got into making different colors and painting making it hard to read many of their words.  Even though the end product wasn't exactly what I had envisioned, the project taught more than I expected.


2nd Grade -- Fall Collage Scenes

5.02.2013

3rd and 4th Grade -- CD weavings

Last year at the end of the year our building Tech came to me with a box of CD's asking if I could use them.

SURE! I said.

Fast forward to this year and suddenly CD weavings are popping up everywhere - Pinterest, other art teachers in my district, blogs.  I decided to jump on the band wagon and give it a try!

I started kids out with a CD, or rather their LOOM.  Next, I gave them a piece of warp thread - it was my wingspan,  about 5 ft.  Students put the warp thread through the middle of the loom and tied a TIGHT square knot on the back.  Next, students wrapped the remaining thread through the middle, then around the outside edge, until they ran out of thread.  Then, students counted how many strings they had on the front - they needed to have an ODD number (most had 11 or 13, a few 9).

IMPORTANT: The tighter the warp thread is on the loom the easier it will be to weave.

Next class I showed students how to measure a piece of yarn using their arms as a measuring stick - finger tips to shoulder, then how to thread the yarn on a tapestry needle. (HINT: my mom taught me this-- don't use the end of the string, instead make a little loop, pinch the top of the loop to make a bump, put the eye of the needle on the bump, wiggle the bump a little and it will slide right into the eye!).  Do not tie on the needle.  Students learn quickly to pull the thread not the needle when pulling weft thread tight.

Students then pick a spot on their warp thread, put the needle under, over, under, PULL - pull till the end of the string almost goes under that first warp thread.  Hold down the end of the weft thread while you continue with the needle all the way around - over, under, over, under.... when you get back to the beginning the weft string will overlap the end and hold it in place.  Weave till you run out of string.  When the string runs out - end it on an 'under' movement.  Measure new string, start where the last string ended and keep going!  (video to come)

The first couple of strings were the most thought provoking for the students - but after that they CRUISED!  In fact students would beg to take them home to work on them and would exclaim with excitement when they would return to finish them!

To be done students could either weave to the very edge or stop about an inch short and color with Sharpies.

I will totally do these again!

***NOTES***
- Make warp thread TIGHT.
- Make sure there are an odd number of warp threads.
- Make students thread their own needles.
- Don't let students tie on their needles (unless absolutely needed)


4th Grade - I Am Poems

I originally saw this project either on Pinterest or a blog.... I can't remember anymore.  The original post was with a 1st grade class where the kids painted the background, a candid picture was taken, and a sentence was added.  I LOVED the personality of these and decided to make it a little harder.  In my old district the 3rd graders created these fantastic poems based off the book "I am America" that I decided would be PERFECT for my project.

So, the first day I had students watercolor their paper using liquid watercolors and salt.  I asked that they do abstract paintings - using only lines and shapes, no smiley faces, no Michigan S, no suns, no hearts (I realize hearts are a shape), and so on.  The students were so intrigued by what the salt did to their paintings that they didn't even think about adding cute-sy images.

Day two I had the kids write down 15 things about themselves on a piece of paper - I gave them 10 minutes to do this.  I asked them to write a word or two for each thing, no sentences.  (Have you ever watched a 4th grader compose a sentence?!? oh boy.)

Next I read them "I am America".

After we talked about patterns in the book - how it was worded.  Does it make sense to say, "I am blue jeans?"  -- What does that mean?  Does it actually mean the person is made of blue jeans?!  We discuss and when I felt like the kids got it I introduced the next part.

On the back of their paper students write 10 sentences combining their ideas about themselves and the wording from "I am America".  So, for example if I wrote, "green" on the front, on the back I might right, "I am bright green fresh cut grass."  Or if I wrote, "cheese pizza" on the front, on the back I might right, "I am gooey hot cheese pizza".

My goal was to get students to stretch their sentences to be more than "I like pizza".  Most students enjoyed coming up with words like, dazzling  shimmering, bold, loud, awesome... etc.

The next time I saw students I booked the computer lab and I had students type their 10 sentences.  I figured this would take 15-20 minutes.. BOY WAS I WRONG!!  Have you ever watched 4th graders type?!?!?!  WoW.  It took them a full 50 minutes and even then some were finishing up.

I had students type all 10 sentences first, THEN if they had time students were allowed to go back and change fonts, colors, and sizes of their text.  We printed them out and kept them till next class.

The very last day of this project I printed out pictures I took of them, handed them their poem and asked them to cut neatly!  Then they arranged their poem AND their picture to make a unique composition.  Last but not least - it all got glued down.

These are breathtaking to look at.  The contrast between the bright background and their black and white pictures are perfect.

This project took many classes to do, but the end product was well worth it.

**NOTE** To protect images of my students the pictures presented are cropped and do not show full project.


5.01.2013

Principal Fires Security Detail to Higher Arts Teachers

If I could embed this video/story I TOTALLY would.  If you have been following Organized Chaos over the years, I am pretty passionate about the important of the Arts - that the Arts are a fundamental part of humanity.  I feel as though I am always trying to convince and prove that what I do is more than cutting and gluing.  Here is another real world story where the ARTS are saving students, where people are finding themselves and their futures in ARTS education.

CHECK OUT THE AWESOMENESS!

Principal Fires Security to Higher Arts Teachers


Paper Weavings (k,1,3,4)

Weaving was one of the classes in college that made me realize that I wanted to be an art teacher.


Weird, right?


Weaving was the first class where everything made sense.  It was the first class I had ever had that I didn't struggle to understand processes, concepts, or anything else.  In my entire school career it was the first class I had where I felt smart.  I have some learning disabilities that make retaining oral information difficult for me - so most classes are tough and lectures were a nightmare.  Weaving was the first class where everything was explained with examples and showing/doing it -- it totally made sense to me.  It was in my weaving class where I realized that other kids who learn just like me are actually smart and they need a space to feel smart - where it doesn't matter if letters move, or you can't read fast, or if numbers just don't make sense.   Art is for everyone, but especially for those kids who aren't 'smart' based on their state test scores.

I could go on -- but back to our weavings.

So, for as much as I LOVE weaving - I have never woven with students.  The idea seemed overwhelming to me.  I struggled with how to organize the materials and be available to help students as they had questions and needed assessment.

At last I decided to jump in and see how it went.

It went WAY BETTER than I expected.

Kids are born weavers.

Kids that I expected to struggle with weaving because the struggled with other art skills -- SOARED and kids that I expected to breeze through it struggled a bit.  Why?  I am not completely sure.  I think it has something to do with the combination of fine motor skills, ability to recognize patterns, willingness to correct mistakes, and other crazy brain functions I can only pretend to know about.

For the Kinders and 1st grade kids I made very simple looms.  I provided students with their "warp thread" precut and attached at the top.  I gave them strips of paper they needed to weave over, under, over, under until they filled their paper.  We then either glued down the flaps or I taped the flaps on the back. Students LOVED seeing their weavings get longer - many even made patterns with the paper they picked.

For the 3rd graders - I had them make their warp threads.  We spent a class with rules and pencils to make sure their warp threads were even and in the right spaces.  A few students had to redo theirs when they quit and did it halfway trying to take the easy way out -- instead they had to do twice as much work.  Once their loom was done I left them pick which design they wanted from some patterns.  I showed them how to read the pattern one line at a time, then weave it -- next line and so on.  Many students caught on after a couple of lines, a few students needed some extra help.  They did GREAT!

4th graders made their own looms as well, but instead of weaving a pre-made pattern, I had them create their own.  Each student got a sheet of paper with 3 grids on it.  Students colored in full squares to make their designs.  Once all three designs were complete, students picked their favorite to weave.  Again, I showed students how to read their patterns one row at a time - off they went.

Now, after our first rounds of weaving I have decided that I love doing paper weavings with the younger kids and yarn weaving with the older kids.  While the grid weavings are neat - they were frustrating for many students because the paper moves around a lot, causing their patterns to distort. I had students glue them down in the end - but it was hard to glue flat without warping their weaving.  Although, I have to admit that the students had very little issue with the grid weaving concept because of Minecraft.  I had TONS of creepers woven.