Pages

Showing posts with label Book Inspiration. Show all posts

12.12.2014

2nd Grade: Wild Things

For years I have been doing a project based on "Where the Wild Things Are".  We talk about texture - real and applied.  Some years I have the kids use chalk, other times colored pencils and while I always repeated the project, I was never really happy with it.  I always felt that it was more flat than I wanted.

Well, problem solved.  I am not sure how or when the idea came to me, but BAM there it was.  The students would make their "wild things" on  aluminum and create their habitat on a background paper with bright colors and ideas!

So here we go - first off we watched this fabulous and slightly corny video I found through Pinterest  -- careful it's catchy and will get stuck in your head for the ENTIRE day:


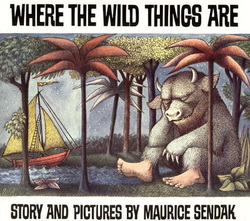
Next, we read "Where the Wild Things Are", the beloved classic.  After we read the book we went back and took a long hard look at the Wild Things.  We discussed their implied textures and how it looked like it felt a certain way.  There is always ONE kid in every class that shares how each wild thing is made up of different animals which is a great segway into the project.
"It's a cat and a fish - get it? It's a catfish" - Aiden

As I send students back to their seats I ask them to think of an animal and raise their hand.  Next, students help me build an original wild thing using four or more animals.  The kids tend to get real excited and a bit rowdy at this point - who can blame them when there is a tiger, turtle, wolf, snail, dragon on the board!?!?

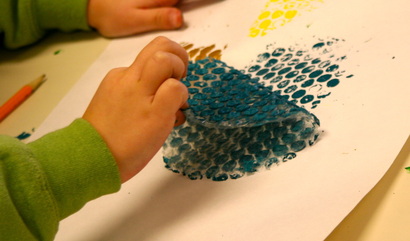
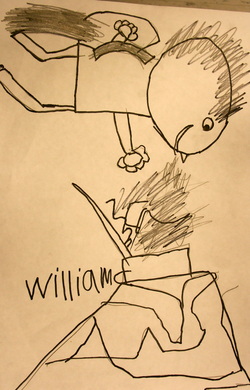
Next, the kids draw their own wild things using their own idea on a piece of paper.  They need to make sure to draw their implied textures!  When they are done I tape their papers onto a piece of aluminum, hand them a magazine and tell them to trace their wild thing really hard on top of the magazine.  I don't tell them why, I want them to discover it themselves.  Sure enough, about two seconds into tracing they figure it out - one by one and its a beautiful sight.  The students realize that as they are tracing their pictures, it is transferring to the metal and you can ACTUALLY feel it - their implied texture is now actual texture. 

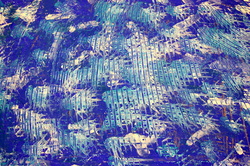
After their wild things are traced I show them how to tool their metal by pushing parts with either their pencil or a capped marker.  We discuss how you have to visualize what you want and then think it through - for example: "If I want my tiger stripes to pop out on the front I need to push them in from the back" or "If I want my scales to sink into my animal, I need to push them in from the front".  There is some serious visualized and planning during this step.  You can almost see the gears in their brain moving as they increase their spacial thinking.

After they are tooled to the students liking they color accordingly with permanent markers, which is a treat within itself.  Then, once they are colored, students cut them out - CAREFULLY.  I told them to cut off extra if it got in their way and to be careful because the metal can be sharp.

LASTLY, students created an original habitat for their wild thing to live.  Their habitat could be based on a real place: forest, jungle, volcano - or could be made up: candy land, new planet, an island made of cookies.  The goal for their habitat was to use their drawing and coloring skills to communicate to the audience what/where the habitat was.  So, if they did make candy land, then they would need to figure out what kind of shapes and colors they would use to communicate that to a viewer.

After they drew their habitats with a black oil pastel, they colored it in with chalk pastel.  I ask the students to channel "Goldilocks" from the three bears when they color.  This comment gets a variety of gut reactions from the kids that range from giggles to pure confusion.  Quickly I ask them about the porridge - too hot, too cold and just right.  The beds - too hard, too soft, just right.  I explain that they need to color not too hard, not too light, but just right.  Then they understand.

In their final class students blend their habitats starting at the lightest color to the darkest.  Students bring me their habitat and wild things and show me where to hot glue their wild thing.

I absolutely LOVE this project.  Students get to be as original as possible while also learning some great technique and skills.  For most of my classes this whole thing from start to end took about three 50 minute sessions. (Day one: intro and transferring wild thing to metal.  Day two: start habitat. Day three: finish habitat, finish wild thing)

Forgive the pictures - the pictures no where near capture the awesomeness of this project - metal is really hard to photograph!


11.30.2012

My Mind is Blown!

I have to be honest - I feel like my head might explode, in a good way.

So yesterday I read the book "The Artistic Edge" which is aimed at talking about 7 skills kids can learn through the arts to be successful in life.  While this book isn't exactly what I thought it was going to be - it brought me to "Artful Thinking" which then took me to "Visual Thinking" - something my Principal has introduced to my Elementary School of the Arts.

I feel like singing "it's a small world after all".  I have decided that no only have I not given enough effort into understanding 'Visual Thinking' - but that I may have found something that will truly impact my teaching and hopefully my students.

I am personally sick of having the word 'assessment' shoved in my face.  I agree that we need to always assess things:  How is this lesson going? Are the kids understanding? Are they making connections? Did I give them too much information/not enough? Did a create a lesson that has higher level thinking?  Who is confused?  Who has it?  -- These are all assessments that happen while I am teaching a lesson and conferencing with kids as I walk around.  I really despise having to write stuff like this down or create less open assignments so that they can fit into an 'assessment' to show growth.  Kids don't 'show' growth in a concrete way in art -- which is EXACTLY what Visual Thinking, Artful Thinking, and The Artistic Edge talk about in kind of a round about fashion.

These programs/studies/books all STRESS that kids learn HOW to think, not WHAT to think when they are involved in the Arts.  I have been saying for years on this site and to anyone that will listen that my job is not just finger painting and paper gluing -- kids actually learn VALUABLE skills when they come to my room. They learn how to problem solve, critically think, reflect, ask for help, preserver - and so much more.

I am super excited about these programs/books, because I had no idea they were even out there.  Where have these been all my years of teaching?  I wrote a post a few months back how I felt stuck in my own learning - that any type of conference was too expensive and out of my budget -- but this, this I can do.   My building is learning it on a smaller scale and I am so excited to learn more about it that I can barely decide where to start!  I am overwhelmed with the information and studies and such that are out there!  WHO KNEW?!

It is also nice to see actual studies, papers, programs that are aimed at what I have always believed to be true - that yes, academics (math, reading, writing) are super important but it is also valuable to know HOW to think - just not WHAT to think.  Most kids in math learn what to think in math (a few who really get it and love it ask "how") - they learn the equations and plug in numbers.  In good art programs kids are given parameters and told to create something original. 

In The Artistic Edge - there is a section devoted to kids that have low self-esteem when it comes to academics.  It is easier to refuse to do math, than to try and ALWAYS be wrong - because there is a right and wrong answer.  I tried to be that kid, my mom and tutor wouldn't let me off the hook -- bless them.  In art the only 'right' and 'wrong' are if you followed the parameters -- otherwise every answer is correct.  It is easier and 'safer' for kids with low academic-esteem to try in art classes because there is a HUGE grey area where they can succeed and grow with their confidence.

AH!  I have so many more things running through my brain - like how arts help kids communicate (talked about in The Artistic Edge) how the arts can save kids (a stories in The Element, The Artistic Edge - and seen in a few of my own students) how the arts can teach life lessons - like asking for help.

So much information!  So much to learn!  My brain is going to get stretched here soon and it may not always feel great, but soon enough I will have some new ways to help my students grow as THINKERS!

Check out this List of Project Zero's Research Projects.
Making Thinking Visual - The Book


** I should state that it is the COMBINATION of these things that make me super excited.  The book "The Artistic Edge" is interesting, but I found nothing ground breaking it in.  I had hoped for more examples of how the arts help students learn the skills she talks about, but instead there is a lot of talk and then just - kids learn this in the arts, with little examples and of the examples given are mostly Theatre based.  I agree with her points and her message, but I was hoping for more of a book I could hand skeptics and say, "read this" - but it doesn't have that kind of 'aha' factor -- at least it didn't for me.


5.12.2012

Textured Wild Things - 2nd Grade

I have been doing this project with 2nd graders for a few years now.  We did these a few months ago, but I am just now getting around to putting them on the blog - seems odd that I waited to post these, and now Mr. Sendak is no longer with us.

Day 1:
We start out this project by reading the wonderful book "Where the Wild Things Are" by Maurice Sendak.  I tell the kids that their mission is to pay close attention to the Wild Things.  When the book is over we discuss what they noticed about the Wild Things.  Most of the time students catch on quickly to the idea that the Wild Things are made up of different animals.  Slowly through guided questions, we discover that the Wild Things are made up of all sorts of visual texture.  We know that the feet are bird feet because of the shape AND the texture.  I ask the students what different textures we see should feel like: bumpy, sharp, soft, coarse.  I then feel the paper and tell them that the paper feels smooth - so how is it that we see a texture we can't feel.  This takes a few moments for them to think, to find words to describe what they know.  

After a few students explain their thoughts I put words to their explanations - visual texture: texture we can only see.  

While the students are transitioning back to their seats I ask them to think of one animal and raise their hand.  When most people have their hands in the air I start calling on students to tell me animals.  One animal at a time I build a class Wild Thing.  The kids start rolling with laughter when we have a giraffe head, with bat wings, octopus legs, dinosaur tail, and a shark body.  I do one in portrait and a different one in landscape - showing how different animals fit better in either picture.  I then proceed to make sure I draw on some visual texture for fur, scales, etc.  


Next, the students get to start.  
The expectations:
- 5 or more animals to make Wild Thing
- Visual Texture
- Habitat


Day 2: On day two students finish up from day one, outlining with Sharpie and getting ready to color.  I do a quick demonstration with some tips on how to color the texture so it looks even more bumpy or sharp.  Instead of coloring OVER the texture, I show how to color the edges or ends one color and then change to a lighter or darker for the rest.  I got lots of 'ooo's' and 'ahhh's' from the kids when they saw the difference.  I explained that it wasn't about adding stripes to your work, but layering colors together.  (Some students really got this and others really struggled with the idea of layering vs. stripes)  For some of the more difficult textures I let students rummage the texture plate drawer to find textures for their Wild Thing and background.  I really loved seeing what they came up with.


Students colored their wild things with crayons and colored pencils - which ever gave them the best color choices at the moment.  I then had them watercolor large background areas if they wanted/needed.


Day 3: Finishing up visual textures and habitats.


Red Fish Blue Fish -- Kindergarten

This lesson would have been perfect for Dr. Seuss's Birthday - I, however, was in the middle of another lesson.

I got this lesson from another art teacher in my district (we actually share one of the other Elementary schools).  She had then up in the hallway and I just couldn't pass up the idea to incorporate Dr. Seuss and primary colors!

Day One:
We read the very first 6ish pages of Dr. Seuss's "One Fish Two Fish Red Fish Blue Fish".  We then took a few moments to really look at the details of the fish - some fish had two eyes, some had one - the kids informed me it was because one fish was looking forward and the other sideways. (I was so proud).  Then we noticed the top and bottom fins along with the tail fins.

I pulled the kids around a table with a large sheet of paper, pencil, and primary colors.  I first asked for a student to decide if our fish should face forward or sideways.  I then drew my fish filling most of my paper.  Next I asked a student to pick the color of my fish and I painted it.  I then took it to the drying rack, but first EMPHASIZING that my name should be on it.

I then asked the students to come to me to receive another piece of paper.  I asked another student to pick a color (could be same or different) and then asked yet a different student for a type of line.  I drew that kind of line a couple of times and asked for another type of line.  The lines went ALL the way across the paper either the long or short way.  This also went on the drying rack with their name.

Day Two:
We looked, again, at the Dr. Seuss fish.  This time we looked at their face -- eyes and mouth.  Turns out Dr. Seuss fish have big eyes, complete with eyelashes and their mouths are smiling.  I showed the kids how to use a white oil pastel for the eye - then use a black oil pastel to outline the eye, give eyelashes, a pupil and a smile.  I then also outlined my fish with the black oil pastel.  Next I cut out my fish showing the kids some strategies for cutting out such a BIG piece of paper.  I showed them how to cut off extra scrap it was in the way and how to 'rough' cut, then go in and cut out the details.  Some students chose to use these techniques and others cut it out in one big cut.

Next, we glued the fish to the background - made sure the name was still visible and put it back on the drying rack.

1.06.2012

This Week in Organized Chaos

The break was wonderful, and it's nice to be back.  This weeks was a week full of new beginnings in the art room - lots of painting, drawing, brainstorming, and critical thinking!
Picture
Kindergarten students were introduced to "printmaking" this week.  We broke the word down into "print" and "make".  The students agreed they know how to "make" things without a problem.  I then asked them about "print".  Students told me that they print things off the computer and they print with stamps.  We talked a little bit more about how both those things are used to create the same image over and over again!  I explained that is exactly what printmaking is - making the same print or picture over and over!

I did a quick demonstration on how to load the brayer with paint, roll it on pre-cut pieces of bubble warp, and 'print' the bubble wrap on their paper.  You would think I was performing magic the way they responded to the print!  I then explained a few more things including procedures for clean up and sent them off to their seats!

These turned out beautiful!  I have no idea what we are going to do with them, if anything.  I had originally thought to use them in a collage next class, but I am also thinking of leaving them the way they are.  I will have this all figured out by next class.
Picture


1st Graders learned about "profile portraits".  We started out by looking a short slideshow filled with examples of profile portraits.  I asked the students to raise their hand when they could tell me something ALL the pictures had in common.  The students then told me that all the people were facing off to the side.  So, next I asked how they knew they were facing sideways.  You could almost hear the gears turning in their heads with quizzical looks on their faces trying to figure out both how they knew that and how to explain it.  Sure enough, they needed a little help.  I asked them to show me on their fingers how many eyes they SEE.  I told them to count the eyes they SEE.  Most kids had one little finger up, a couple of two.  We then counted the eye together - sure enough there was one!  I asked them if the person was real and they turned to face the class how many eyes would they see? -- TWO!  an Ah-ha moment for sure.

We talked a little longer about profiles - I traced one of the faces on the board to show that the nose points off the face in the direction it is facing, along with only seeing half the mouth.  I had the students do some guided practice by drawing a series of pictures on the board and the students showed me on their fingers which one picture,out of three, had a correct profile.

There was a lot of excitement when the students learned their profile portrait was going on a tooth fairy!  I will post the whole lesson after the pictures are done!
Picture


2nd Graders are working on using visual texture in their artwork.

We started out by reading the book "Where the Wild Things Are".  I told the students that their job during the story was to pay close attention to the wild things!  At the end of the book I had the students share what they noticed - quickly they share that each wild thing is made up of different types of animals!  We then discussed how the scaly body looked bumpy, but the page didn't feel bumpy.  Ah-hah - visual texture!

This book was the inspiration for their own "Wild Thing" - more to come.
3rd Graders did some serious critical thinking this week.  As soon as they walked in I told them I was going to write a question on the board and I wanted them to think about it - not talk, but think.  They needed to decide yes or no as their current answer.

I wrote on the board, "Can people who are blind understand color?"

I asked them to think about if they had never, ever seen any type of color - could they understand that an orange was orange, or that the sky was blue, or their favorite color was green?

I let them mull it over, had them put down their heads and we took a quick poll.  In most of my classes it was overwhelming "No".  Students that wanted to share their reasons were allowed (well at least for a while - we only get 50 minutes!).  Next, I asked them if someone was deaf could they understand music?!  Students jumped all over using other sense to understand music - reading it, watching it, feeling it.  Slowly they started to connect that maybe if a deaf person could use other senses to understand music - maybe, just maybe someone who was blind could use other senses to understand colors.

Next, my favorite part, we conducted a little experiment.  I told students I would need a volunteer that would be willing to be blindfolded, then handed an object that they needed to report the color on.  It always amazes me how many kids want to try this infront of the class!  I do my best to pick equal numbers of boys and girls, though not everyone gets a chance.

The first students come up, I blindfold them. I ask them to make sure they can't see - it won't work if they can see!  Then I tell the class that the only way it will work is if the WHOLE class can stay quiet!  If someone blurts something out or makes a comment it might ruin the experiment.  Next, I hand my blindfolded student an orange.  Almost immediately they can tell me that it is an orange and it is the color orange.  I asked who they figured it out so quick -- they generally said the shape, texture, and the smell!  We continued this for a few rounds making the materials harder and harder to guess!

We then read an awesome story called "The Black Book of Colors" in which a child who is blind, Thomas, describes colors to us using his senses.  All the pictures are on black paper and have no color - but instead can by felt by the finger tips.  The story is also written in brail across the top of each page.

After the book I told students we were making our own "Black book of Colors".

The next steps proved to stretch the thinking of the third graders as they were asked to describes colors through - taste, smell, sound, and touch.

I will post more when we are further in the project!

Picture


4th Graders decorated paper for collages we will be starting!

This summer I was walking the streets at Royal Oak's "Arts Beats Eats" and found an artist that I was fascinated with.  I came home and found her website knowing I wanted to do a project inspired by her work.

Students used pre-picked color groups to make their papers.  I asked them to layer their paint and experiment with paint brushes, texture boards, toothbrushes, combs, and q-tips.  The results are BEAUTIFUL!


5th Graders are pumped out their project!  We first looked at a slideshow of Logos.  I had the students tally on their hands how many of the logos they knew - of course they knew them all!

I had a slide with a few different companies and how their logo has changed over the years - more simple and more unique at the same time thanks to computer graphics!

Next, I explained they were going to make their own logos, personal logos made out of their initials.  The 5th graders were PUMPED!  I originally did this lesson with 8th grade students, and these 5th graders blew my socks off with their ideas.

I passed out a brainstorming sheet that helped them create different forms of their letters, thus helping them create something completely original and personal.