Pages

Showing posts with label Self Portrait. Show all posts

5.25.2012

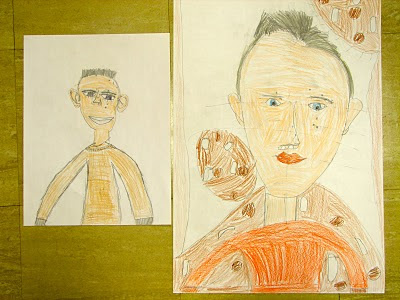
Pre and Post Self Portaits -- 3rd Grade

I started this project a couple of years ago and loved it so much, I just keep on doing it.

Day 1: The very first day I hand out paper and ask students to draw their very best self-portraits.  I ask they to draw their heads large, show a their neck and shoulders.  I stress that students can't let other students draw parts of their face for them - even if they like how someone else draws eyes over their own.

The next few classes we spend practicing different sections of the face.

Day 2: I show a slide show of real eyes - close up.  I ask them to notice the shapes, colors, patterns, textures.  We pause it on one eye and break it all down - shape of the eye, shape of the colored part - do we see the whole part of the colored part?!  (I stress that ALL eyes are different - some people see the whole colored part, but most only see part).  Then we talk about the pupil - what is the purpose, what happens when we go from BRIGHT light to DARK and reverse.  The kids get a kick out of learning why it hurts to turn on lights in a dark space.  We then talk about the colored part - what does it really look like?!  Is it one solid color?!  Does it change?! 

Rest of the class we practiced drawing different eye shapes, colored part, pupil and such.  I asked the students to practice finding the combination of colored pencils/crayons that made their own eye color.

I passed out mirrors to help them observe their true eye color.

Day 3: We reviewed their eyes, talked about where eyes go on their head.  I projected pictures of me when I was little onto the white board.  I trace my head, trace my eyes and ask where my eyes are at on my head.  I then cover the projector and ask again.  I almost always get "Ooooh! - In the middle!"  I then do this again with an older picture of myself and my older brother - trying to prove to them that their eyes are indeed in the middle of their head.  Mirrors were provided.

http://www.pencildreams.com/2011/03/drawing-nose.html
Next, I ask the students to start their final head, put their eyes in the middle, color them.  If, when, they get done with this step they get a sheet that has practice noses on it.  I ask the students to doodle noses for the rest of class.  I explain that I will no longer accept "b, d, c, L," or any version of those letters for noses.  The sheet I pass out is very cartoon-y, but it still gets them to start doodling noses with some nose-like shapes and lines. 

Day 4: We practice some more noses - talk about where their nose goes on their paper (nose starts between the eyes and ends halfway between their eyes and chin).  Final noses go on paper.  Students the practice lips for the remainder of the class.  Mirrors were provided.

Day 5:  Students review/practice lips and draw their lips halfway between their nose and chin.  Next, I explain how to do their hair.  We look at common mistakes boys and girls make -- creating weird bald spots.  They giggle and explain why it looks wrong.  I then have students draw their hair line (not their hair), show it to me and they start to color!  Most kids can finish coloring this class period, but some need another day.  I really stress to them that they need to get colors as close to real as possible - that meant A LOT of students had to layer colors for their skin color and their lip color.  Mirrors were provided.

END:  I have students compare and contrast their pre and post drawings.  It is great to see these side by side - the students often are wide eyed at their before picture. 

3.02.2011

1st Grade - Self Portrait Books


Part of the curriculum in my district is to have the students do a self-portrait each year.  I love the idea of this, but struggle with making the self portraits different enough each year to make them interesting while having the portraits resemble the students.

For first grade I really wanted them to focus on the details of their faces – the shape of their eyes, nose, lips – where their hair falls on their head.  Does their hair touch their eyebrows, or cover their ears, is it really short, long, curly… etc.

This student was proud of how they did their teeth!
To really emphasis that our learning target was to add lots of details to their self portraits I introduced the lesson by drawing three pictures on the board:  1) A really fast drawing with circle eyes, a “L” for a nose, and one curved smile line for my lips.  2) A more detailed picture but WAY too small.  3) An oval head, with oval eyes, glasses, eyebrows, more nose like nose, lips…..  I labeled these with the corresponding number.  I asked the students to show me be holding up 1, 2, or 3 fingers which picture they felt had the best quality.  After a few moments I ask them to put their hands down and then ask them which one has the most detail.  Again, I ask them to put their hands down and ask them one last question, “Which one looks the most like Ms. Novak”.  The majority of students pick number 3 for all three questions.  I then ask the students to tell me what they think about that – they picked the same picture for quality, details, and that it looked most like me.  Students connect that their picture should have lots of details to look the most like them and to have the best quality.
I show the students that the paper I have chosen is much smaller than normal, because most first graders struggle to draw large pictures with detail.  I explain that it is folded in half because one side is for their normal portrait and the other half is for a silly face portrait.  (The kids get really excited about their silly face pictures).  We discuss quickly that just because it is a silly face doesn’t mean that their quality can be silly – it has to have just as much quality! 

Last thing before I pass out materials I also talk with them briefly about why and how to use their mirrors.  I show them how to set it up and how to use it to look at their eyes, nose, mouth, hair and other parts of their face.  The students give me examples of what NOT to do – shine light in other peoples faces, spy on people around them, break them, draw on them….

I have my helping table pass out materials and students get started.  This introduction sounds long but really only takes about 10 minutes at MAX. 

As students work I walk around asking questions and encouraging.  Once students finish their portraits they add backgrounds to their people – giving them a place to be: outside, inside, at the zoo, in the ocean, on the beach, out in space, or whatever else their brains come up with.  When the students are done drawing with pencil they take a sharpie and outline their creations.


Next class the students count out 5 pieces of paper, that have been pre-paper punched and pick out one piece of string (about 2 feet).  The students then have to thread the string through the first paper hole and then the second.  Once the papers are threaded the students use a square knot to tie it all together.  I show the students how to do a square knot – most students can do a square knot since most of them can do the first part of tying their shoes.  I demonstrate how to ask someone to put their finger on the first part of square knot, like perhaps parents do when wrapping presents – this normally helps those students who have not mastered tying their shoes. 
Sewing their books can be very frustrating for some students – so we review that it’s okay to be frustrated, but not to give up.  I encourage the students to help each other, but not to do it for anyone.

Once the books are sewn together the students may color their self portraits and/or start drawing in the inside!

2.10.2011

4th Grade Value Portraits

This project has been modified from a lesson I saw in a magazine where a high school teacher had her students make stencils from a picture and then spray paint it.  I was really drawn to the idea of using positive/negative space in a way in which a portrait is recognizable.

I originally planned to do this project with paint, but after attempting it for my example I switched to colored pencils.

While the the students were finishing up their previous project I took their picture.  I set up an old overhead and had them stand at about a 1/4 turn away from the light - giving me the optimal light vs dark on their faces.  They could smile, be serious, or even do a silly face!  I downloaded those into my computer, changed them to black and white, and then altered the exposure, highlights, and shadows till I got white, one level of grey and black.  These were then printed out on 8.5/11 pieces of paper.

The next class we taped drawing paper on top - took a pencil to the window and traced only what we saw.  I had the students trace their faces upside down.  Many students laughed and asked why and I explained that our brain recognizes faces much too easily and we needed to trick it so that it will see shapes.  The students traced only what they saw - lights, mediums, darks.  If they could not see their eye they did not trace it!

After tracing their faces many students exclaimed both how awesome and strange it looked!

My Example.
For the next two classes the students spent coloring in the correct values determined by their photograph.  The students picked one color for their head, another for their shirt and the complementary color of their head was for the background.  I did a demonstration on how to figure out what color when where - focus on one little shape, hold to the light, observe, put on the table and color.  Pressing hard with a colored pencil creates a dark color, pressing medium produces the same color or lighter, and then barely touching the paper with the colored pencil creates the lightest value needed.

These are breathtaking - the students worked very hard and are impressed to find that it actually looks like themselves!

(I have permission to use these pictures, but in order to protect my students I have cropped them to make them less recognizable.)

1.06.2011

3rd - Before/After Self Portraits

My third graders take the first day of this project to draw the best self portrait they possibly can.  The next time they come to art I take them through a series of pictures on a slide show - each picture I ask them questions and trace different parts on the board.  For example - I put up a picture of my niece when she was a baby - I trace her head and then put a line through her eyes horizontally.  I ask the students where on her head are her eyes - they of course see they are in the middle.  I proceed to do this with her nose, mouth and ears.  The next picture is another picture of my niece at around two.  I start again as I did when she was a baby.  This helps the students understand that the eyes really do belong in the middle of the head and the hair fills up the top of the head.  The last picture I do is of President Obama - I choose him because he has very short hair and the picture is straight on.  I repeat the steps above to really sink in the proportions of the face.

After this exploration the students start a new self portrait using their new knowledge.  I walk around the room and fold heads in half to check for eye placements!  Most students will be really close.


When the project is over the students open their paper and compare their drawings - many students are shocked that they put their eyes so high!

2.14.2010

3rd Grade Self Portraits

It is part of our curriculim that each grade level do a self portrait.

Students Learned/Practiced:
- Proportions of a face
- Shapes and details of facial features
- Problem Solving
- How to handle frustration/asking for help
- Observation of colors/textures

For third graders, I choose to do a realistic self portrait.  I first had them draw the best picture they could of themselves - a 'pretest' if you will.  I looked at those and was impressed by what I saw.  The only thing they really needed direction on was where to place their facial features!

Next time they came we observed ourselves in mirrors and looked at each other to figure out where our eyes really are on our head, along with our nose, mouth and ears.

The students took this new information and started a final composition.