Pages

Showing posts with label Kindergarten. Show all posts

5.06.2013

Kindergarten People

Every year with kinders I use drawing people as my way to see how the kids are progressing.

The 2nd or 3rd project in the year I have students draw the best people they can without any pre-teaching.  I use this to see if they are at a scribble stage, cookie people stage..... etc.  The next class I ask the students to color in their people - I look to see who selects colors, who colors in, who colors over, who sticks with one color crayon.... etc.


Then midway through the year we draw people again.  This time I ask them to draw people with their heads at the top of their paper and toes at the bottom.  We do an example drawing where students help me fill in eyes, nose, hair, ears, mouth, fingers.... on and on.  The students do another drawing and color the next class.  I specifically ask students to pick colors on purpose and to color IN their picture instead of over.  At this point most students have graduated past cookie people and have full bodies -- and most will color IN their picture, but many still pick random colors.


At the end of the year we read "Giraffes Can't Dance" and talk about how they know the animals in the pictures are dancing since the pictures don't move.  It is really interesting to listen to kids try and explain what they see.  After the book we have our own freeze dance party!!!  I play different types of music and the kids dance around - when the music pauses so do the kids.  I have them look around at how they are standing -- bent arms, bent legs, tilted heads....

Then I have the students draw people again - I ask them to draw at least one arm and one leg to be bent.      Next class, just like before, students color IN with colors that make sense.

At this point in the year I am looking for better motor control, the ability to use their favorite color on shirts/pants/shoes instead of faces and hair.

5.01.2013

Paper Weavings (k,1,3,4)

Weaving was one of the classes in college that made me realize that I wanted to be an art teacher.


Weird, right?


Weaving was the first class where everything made sense.  It was the first class I had ever had that I didn't struggle to understand processes, concepts, or anything else.  In my entire school career it was the first class I had where I felt smart.  I have some learning disabilities that make retaining oral information difficult for me - so most classes are tough and lectures were a nightmare.  Weaving was the first class where everything was explained with examples and showing/doing it -- it totally made sense to me.  It was in my weaving class where I realized that other kids who learn just like me are actually smart and they need a space to feel smart - where it doesn't matter if letters move, or you can't read fast, or if numbers just don't make sense.   Art is for everyone, but especially for those kids who aren't 'smart' based on their state test scores.

I could go on -- but back to our weavings.

So, for as much as I LOVE weaving - I have never woven with students.  The idea seemed overwhelming to me.  I struggled with how to organize the materials and be available to help students as they had questions and needed assessment.

At last I decided to jump in and see how it went.

It went WAY BETTER than I expected.

Kids are born weavers.

Kids that I expected to struggle with weaving because the struggled with other art skills -- SOARED and kids that I expected to breeze through it struggled a bit.  Why?  I am not completely sure.  I think it has something to do with the combination of fine motor skills, ability to recognize patterns, willingness to correct mistakes, and other crazy brain functions I can only pretend to know about.

For the Kinders and 1st grade kids I made very simple looms.  I provided students with their "warp thread" precut and attached at the top.  I gave them strips of paper they needed to weave over, under, over, under until they filled their paper.  We then either glued down the flaps or I taped the flaps on the back. Students LOVED seeing their weavings get longer - many even made patterns with the paper they picked.

For the 3rd graders - I had them make their warp threads.  We spent a class with rules and pencils to make sure their warp threads were even and in the right spaces.  A few students had to redo theirs when they quit and did it halfway trying to take the easy way out -- instead they had to do twice as much work.  Once their loom was done I left them pick which design they wanted from some patterns.  I showed them how to read the pattern one line at a time, then weave it -- next line and so on.  Many students caught on after a couple of lines, a few students needed some extra help.  They did GREAT!

4th graders made their own looms as well, but instead of weaving a pre-made pattern, I had them create their own.  Each student got a sheet of paper with 3 grids on it.  Students colored in full squares to make their designs.  Once all three designs were complete, students picked their favorite to weave.  Again, I showed students how to read their patterns one row at a time - off they went.

Now, after our first rounds of weaving I have decided that I love doing paper weavings with the younger kids and yarn weaving with the older kids.  While the grid weavings are neat - they were frustrating for many students because the paper moves around a lot, causing their patterns to distort. I had students glue them down in the end - but it was hard to glue flat without warping their weaving.  Although, I have to admit that the students had very little issue with the grid weaving concept because of Minecraft.  I had TONS of creepers woven.


4.22.2013

Rain Rain Go Away

I don't know about your area of the world, but mine has been filled with grey skies and rain for the last WEEK!  It has rained almost nonstop since Monday.  I am feeling drained and slow moving.

Since spring has decided to take the longest drink of water, I decided to try and jump start it with some Van Gogh inspired flower pots.

This lesson is not new, but is a GREAT one day project to fill the hallways with spring.

We started by learning a little bit about Van Gogh - looked at his paintings, discovered his small brush strokes and use of multiple tints/shades of a color in one area.

I had the kids make a flower - any flower, could be real, made up, or even from Super Mario brothers as long as it looked flower-like.  Many of my boys took advantage of this and drew man eating plants, or ice flowers.  All my girls were excited to draw roses and lilies.  Ha!


I showed them how to draw a simple sunflower (circle and then triangles around the edge, add a stem!)  Then we talked about using short strokes and multiple colors for each spot.

While students were working I drew and painted a pot sitting on a table.  When students were done cutting out their flowers I would arrange them in the vases.

I have received MANY compliments on how much people love them.  I think everyone needs a little sunshine.


12.21.2012

Origami Cats and Dogs - Kindergarten

Here are directions for making origami cats and dogs!

I do these with kinders - it is a perfect introduction to folding. After we make one of each, as a class, I let the make as many as they can for rest of the class. I make sure to supply different sized paper - kids loving making families (mom, dad, baby, brother, sister) and markers to add eyes, noses, spots or stripes. Often the dogs end up with laser vision and purple eyes - it is hysterical.

For students that start to reach ultimate fun with cats and dogs I challenge them to make up different folds to make other animals. This year I got an elephant, turkey(picture above), spider, and some reindeer!

Dog:

Start with a square piece of paper.


Pick up one corner and pull diagonally across paper - match up corners and crease.


You should have a triangle. (make sure the long side of the triangle is at the top)


Pick up top corner - pull towards you and then down.


Crease.  Point of ear should hand off the dogs head.


Repeat with opposite corner.


This is where I stop with Kinders - but if you have awesome folders, try the next few steps!


To add extra detail - pull up top layer of dog's chin.


Pullup as far as desired - crease down.


Pick up top of triangle you just folded and bring down to meet folded edge.


You should get a tiny triangle - here is your dogs snout. 


Add some details!

Cat:

Start with a square piece of paper.


Pick up one corner and pull diagonally across paper - match up corners and crease.


You should have a triangle. (Make sure the long side of the triangle is at the top)


Pick up top corner, pull towards you and then up.


Crease down.


Repeat with opposite corner.


You can decorate this side or flip over.


Add some details!

11.27.2012

Kindergarten - 3D lines

So, in the beginning of the year kinders and I spend A LOT of time on lines and shapes.  I do this because it helps the students learn routines and expectations without overwhelming me or them with complex projects.  Simple but meaty projects like these also show me simple things like - problem solving skills, skills they already have, ability to follow directions, fine motor skills - etc.  I learn a lot in the beginning of the year about where my kinders are at developmentally.


After a few projects that consist mostly of different flat lines and shapes - I take the kids 3D.  We briefly talk about what 3-D and 2-D means, some kids get it, some don't.I show students a variety of ways to make a flap stip of paper stick up in space.  We bend, we fold, we twirl around our fingers, we add pieces to other pieces and build build build!  I also stress as much as I can that glue sticks when it DRIES - if you use A LOT of glue then it takes a LONG time to DRY - a little bit of glue - stick faster!  The students get really excited by the time I am done with my demonstration.

I turn the kiddos loose and tell them they have to build till it is time to clean up!!!  I walk around help students that struggle with concepts they want to try, offer positive feedback to students.  After about half way through class I will walk around with my iPad and record students that struggle with building 3D and using an appropriate amount of glue.

I like to let these rest/dry for a few hours and hang in the hall.

They are impressive when all posted together on a board!


5.12.2012

Bubble Wrap Printed Fish - Kindergarten

This project wasn't really inspired from anything in particular.  I knew I wanted to do printmaking with kindergarten, but I wasn't really sure how I wanted to do it.  I didn't have any styrofoam pieces, and I didn't really want to make a collage that we then rolled ink over... I was at a loss.  Then it hit me - bubble wrap!  I had used bubble wrap for projects in the toddler room when I worked at a 'learning center'.  Perfect - my plan was starting to take shape.

When I arrived at school, I dug out all my bubble wrap and started to cut simple shapes out of big bubbles and small.  I planned to put a set of shapes at each table along with a tray of paint and brayers.

I introduced printmaking by breaking down the work into "print" and "make".  The students explained what "make" meant and then print.  I guided them to the idea that 'printing' something let you have the same image over and over without it changing.  So when we 'print' something to the printer we can 'print' the same thing over and over and it won't change - unless it runs out of ink, of course.

Next, I pulled all the kids around the table and showed them how to load their brayer with paint.  I had them listen to the sticky sound, then had them watch me roll it onto the bubble side of the bubble wrap.  I picked up the bubble wrap and placed on my paper.  I gently, but firmly pressed the bubble wrap onto the paper and then slowly pealed it off. 

::Applause::  I swear printmaking it magic to kids.

I then showed them how to pick up their paper and walk to another table for other colors.  I showed them what it looked like to overlap and to use different shapes!

They were itching to get moving.  I had them all put on paint shirts, write their name on their paper and off they went!  It was a blast watching them fill their papers.

The next class we drew fish on their bubble papers, cut them out, and added a googly eye!  They were looking awesome!

The third class we added the background for their fish.  We brainstormed if the fish were in the ocean or a fish tank -- what would be around them.  It was a ton of fun!!!


Red Fish Blue Fish -- Kindergarten

This lesson would have been perfect for Dr. Seuss's Birthday - I, however, was in the middle of another lesson.

I got this lesson from another art teacher in my district (we actually share one of the other Elementary schools).  She had then up in the hallway and I just couldn't pass up the idea to incorporate Dr. Seuss and primary colors!

Day One:
We read the very first 6ish pages of Dr. Seuss's "One Fish Two Fish Red Fish Blue Fish".  We then took a few moments to really look at the details of the fish - some fish had two eyes, some had one - the kids informed me it was because one fish was looking forward and the other sideways. (I was so proud).  Then we noticed the top and bottom fins along with the tail fins.

I pulled the kids around a table with a large sheet of paper, pencil, and primary colors.  I first asked for a student to decide if our fish should face forward or sideways.  I then drew my fish filling most of my paper.  Next I asked a student to pick the color of my fish and I painted it.  I then took it to the drying rack, but first EMPHASIZING that my name should be on it.

I then asked the students to come to me to receive another piece of paper.  I asked another student to pick a color (could be same or different) and then asked yet a different student for a type of line.  I drew that kind of line a couple of times and asked for another type of line.  The lines went ALL the way across the paper either the long or short way.  This also went on the drying rack with their name.

Day Two:
We looked, again, at the Dr. Seuss fish.  This time we looked at their face -- eyes and mouth.  Turns out Dr. Seuss fish have big eyes, complete with eyelashes and their mouths are smiling.  I showed the kids how to use a white oil pastel for the eye - then use a black oil pastel to outline the eye, give eyelashes, a pupil and a smile.  I then also outlined my fish with the black oil pastel.  Next I cut out my fish showing the kids some strategies for cutting out such a BIG piece of paper.  I showed them how to cut off extra scrap it was in the way and how to 'rough' cut, then go in and cut out the details.  Some students chose to use these techniques and others cut it out in one big cut.

Next, we glued the fish to the background - made sure the name was still visible and put it back on the drying rack.

5.10.2012

Hot and Cold Castles - Kindergarten

I am not sure when or how this lesson came to mind -- we did these a few months back, when it was suppose to be winter.  

The kinders and I looked at pictures of all different kinds of castels.  Their job during the slideshow was to look for different shapes!  We then went through each slide together to find all the shapes we could: square windows, rectangle windows, triangle windows -- triangle roofs, prisms (from one student), circles, arches!  You name it, they saw it -- they saw it in the buildings and the trees surrounding.
The first day we drew our castles with pencils - making sure to use a castle top line and all the shapes we saw!  I drew a couple of example castles to help them see how the shapes went together - then I quickly erased them so that no one would be tempted to copy!  Once the students drew their castels they outlined them with black oil pastel.

I honestly can't remember if we painted these the same day we drew them or not..... wow how long ago did we do these?!

In any case, we discussed hot and cold colors at some point - the kids helped me sort colors with some guided help.  I asked for examples of things they would color orange or yellow.  I get answers that range from  chicken to fire to sun to shoes.  I do my best to stir them towards the sun and fire to help them remember what is hot.  I then ask them what do they color 'blue' -- water, sky, pools, rain.... in most cases kids associate these will a cool feeling.

So, with some examples and guided direction the kids and I sort colors.

I then pass out water colors that are all cool and they can choose to paint either their castel OR their sky.  The next class we use hot colors and paint what they didn't pain before.  (I do them different days and only give them what they can use to help enforce hot and cold groupings.  In Kindergarten we do hot/cold cityscapes in which I give them then whole palate of watercolors and its' their job to use the correct colors in correct groupings.)

Overall the kids had a BLAST drawing these and painting them in.  I even had one student insist on using neutral colors. Ha!

5.07.2012

Group Murals -- All Grades

I, again, saw a lesson on Pinterest that grabbed my attention.  An art teacher, Katie, had her students make group murals at the end of the year to hang on the bulletin boards right away in the fall for the next year.  I thought, 'WHOA! Why didn't I think of that?'  The idea and lesson seemed simple enough.

I had originally planned to do this lesson in a few weeks, but with Art Show and Open House next week - I thought we should do some for open house!  I immediately started to plan.

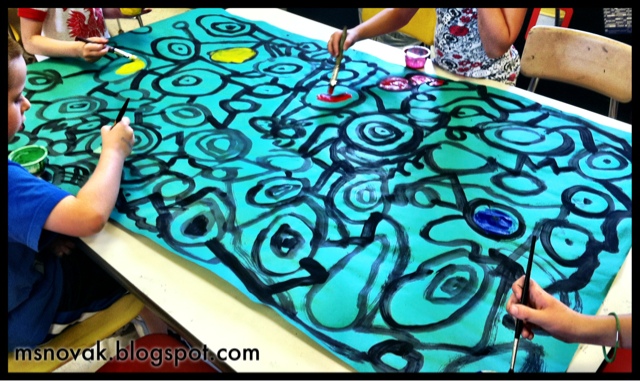
I went and ripped bulletin board paper in different colors, laid them on the tables, poured some black tempra and waited for my kinders to walk in.

There are two rules for the black painting:
1) Your shapes can't touch each other.
2) You can't paint over anyone's work.

I had my kindergarten kiddos draw lots and lots of circles at their tables.  When their paper seemed decently full I gave them the next instruction: connect the circles with different types of lines - leave big spaces between lines.

Amazingly, this took almost all class and my room was almost completely silent - it was weird.

I found random spots around the room for these to dry for the next few classes.

After lunch I pulled them back to the tables with a plan: Have 1st graders paint them.

I told the kids their rules:
1) You can't paint over anyone's work.
2) Stick to one color (you get what you get and you don't throw a fit!)
3) Spread out where you put your color.

I made sure to make each student have a different color of paint - even if it was simply making it a tint or a shade.

 The students started at their own tables painting in spots and shapes.  I set a timer for 2 minutes and when that time was up they rotated to the next table.  The timer helped keep their attention, because each table's mural was unique - but it also spread out all the colors.

Again, the students were focused and quiet while they painted.

I plan to make more of these this week with words like "MUSIC" "ART" and so forth.  I can't wait!