Pages

5.25.2012

We've Got the Beat - Dance Spectacular

What a couple of weeks it has been!  I was in crazy Art Show land for a couple of weeks, sorting, matting, e-mailing and preparing for art show.  Right before Art Show I agreed to do the backdrop for Dance Spectacular at one of my schools.  I almost didn't do it, but I loved the theme so much that I said yes. 

So right after Art Show I got busy on painting the backdrop for Dance Spectacular.  This year's theme was, "We've Got the Beat.  Flashback to the 80's" - so all the music was from the eighties.  
When planning the backdrop I knew I wanted to use neon colors -what is more 80's than neon?!?!  Then as I was googling '80's' pop culture Keith Haring showed up.  DUH!!!!  Keith Haring was literally ALL over the 80's.  Shirts, clothes, posters - anything that could be printed was printed with Keith Haring.  

I had my plan.  I had a graffiti style font I found on the internet, some Keith Haring pictures for inspiration -- off I went.  

I learned a valuable lessons while doing this backdrop.

Lesson 1:  Neon pain is EXPENSIVE
Lesson 2: You can't buy neon tempra or neon  acrylic paint  in stores. (well unless you want only 2 oz bottles).
Lesson 3: Spray paint saved the day.
I had originally planned to have the students help me paint this -but when it was clear that I would need to use spray paint, my plans changed.

All in all I love the way it turned out.  The kids loved it and it worked perfect for flashing back to the eighties!  

Pre and Post Self Portaits -- 3rd Grade

I started this project a couple of years ago and loved it so much, I just keep on doing it.

Day 1: The very first day I hand out paper and ask students to draw their very best self-portraits.  I ask they to draw their heads large, show a their neck and shoulders.  I stress that students can't let other students draw parts of their face for them - even if they like how someone else draws eyes over their own.

The next few classes we spend practicing different sections of the face.

Day 2: I show a slide show of real eyes - close up.  I ask them to notice the shapes, colors, patterns, textures.  We pause it on one eye and break it all down - shape of the eye, shape of the colored part - do we see the whole part of the colored part?!  (I stress that ALL eyes are different - some people see the whole colored part, but most only see part).  Then we talk about the pupil - what is the purpose, what happens when we go from BRIGHT light to DARK and reverse.  The kids get a kick out of learning why it hurts to turn on lights in a dark space.  We then talk about the colored part - what does it really look like?!  Is it one solid color?!  Does it change?! 

Rest of the class we practiced drawing different eye shapes, colored part, pupil and such.  I asked the students to practice finding the combination of colored pencils/crayons that made their own eye color.

I passed out mirrors to help them observe their true eye color.

Day 3: We reviewed their eyes, talked about where eyes go on their head.  I projected pictures of me when I was little onto the white board.  I trace my head, trace my eyes and ask where my eyes are at on my head.  I then cover the projector and ask again.  I almost always get "Ooooh! - In the middle!"  I then do this again with an older picture of myself and my older brother - trying to prove to them that their eyes are indeed in the middle of their head.  Mirrors were provided.

http://www.pencildreams.com/2011/03/drawing-nose.html
Next, I ask the students to start their final head, put their eyes in the middle, color them.  If, when, they get done with this step they get a sheet that has practice noses on it.  I ask the students to doodle noses for the rest of class.  I explain that I will no longer accept "b, d, c, L," or any version of those letters for noses.  The sheet I pass out is very cartoon-y, but it still gets them to start doodling noses with some nose-like shapes and lines. 

Day 4: We practice some more noses - talk about where their nose goes on their paper (nose starts between the eyes and ends halfway between their eyes and chin).  Final noses go on paper.  Students the practice lips for the remainder of the class.  Mirrors were provided.

Day 5:  Students review/practice lips and draw their lips halfway between their nose and chin.  Next, I explain how to do their hair.  We look at common mistakes boys and girls make -- creating weird bald spots.  They giggle and explain why it looks wrong.  I then have students draw their hair line (not their hair), show it to me and they start to color!  Most kids can finish coloring this class period, but some need another day.  I really stress to them that they need to get colors as close to real as possible - that meant A LOT of students had to layer colors for their skin color and their lip color.  Mirrors were provided.

END:  I have students compare and contrast their pre and post drawings.  It is great to see these side by side - the students often are wide eyed at their before picture. 

5.18.2012

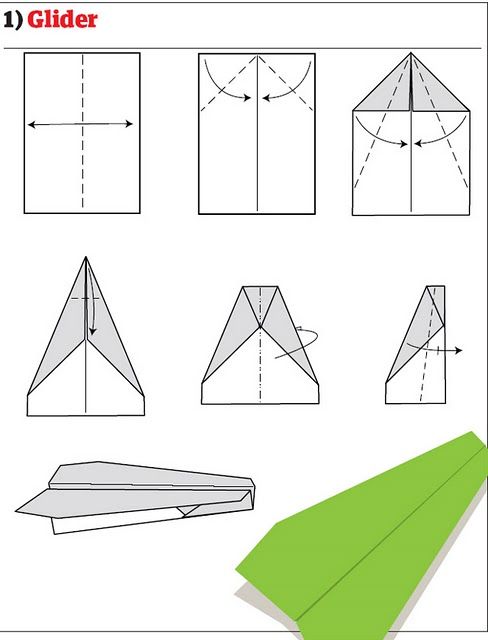
Origami -- Paper Airplanes

I found these instructions on the internet - if these belong to you or to a book, I apologize I found them without any credit.

I picked these varieties because they were simple enough most students could work their way through them, and the instructions are all on one sheet!


End of the Year Lessons -- Whole School

The end of the year is a tricky time to teach -- the kids are antsy, my patience is generally smaller, it's SO nice out, and the kids miss random classes due to field trips and other events.

I design my last month of classes to highly engaging lessons that lean towards 'fun' while still having an educational component.  This way if I miss a class because they are on a field trip - I don't have to go back and teach the lesson they missed.  I also don't have a stack of papers at the end of the year for a student that missed the last week of school.

4/5 Weeks before End:
Clean out projects.  I spend this time passing back everything that I can find.  This year students 'doodled with Jim Henson' - we talked about how truly awesome Jim Henson is and how he 'doodled' all of his puppets/muppets.  The students then spent time creating their own characters -- students actually loved this more than I expected.  They really got into sharing their creations with people around them.  While they were busy 'doodling' I pass back any and all projects that got stored, put on display, mixed up in other classes.
 
3/4 Weeks before the End:
Origami Paper Airplanes.  Students ask all year to make paper airplanes - so we spend a day devoted to making them.
The rules:
- 3 papers total
- Decorate papers (keeps the kids honest about who's plane is who's)
- Grounded when indoors.
We spend class making airplanes based on prior knowledge and instructions.  We clean up early and either fly them in the room or, better yet, outdoors.


3/2  Weeks before the end: Light Graffiti.  I black out all the windows with black paper, find a tripod, digital SLR, cables to hook up to the tv and lots of flashlights/light emitting objects.  The first time we do this - students just experiment.  My lesson and links are here.

2/1 Weeks before the End:
Light Graffiti again.  This time I have paper with simple objects on them and groups make pictures.  Read here.

If we have one more week left we play art games, clean the room, art videos - generally I have some options and let the kids vote on what they would like to do.  The last week of school I rarely see every class - so it's kind of a relax week.


5.15.2012

Art Show - Whole School

Well, it came, it was great - and now it's over.  Art show was tonight and I can't believe how great it was!


I was stressing a little bit last night about how long it would take to set up, how many volunteers I would get, how the community would receive the show.  I teach art very differently than many art teachers I know - for me art is more about guided exploration, learning, problem solving -- truly creating.  I wasn't sure if the community would be looking for more 'glamorous' projects.  From the handful of parents that stopped to chat with me - it sounded well received -- not just the show, but the program I have started this year.  One parent told me her child likes coming to art because I listen to their ideas instead of just telling them what to do -- huh, I just figured that was part of teaching kids.

I had a bunch of volunteers that came in to help, teachers sent down volunteers from their rooms -- the art show grids where set in place, artwork was hung, tables were drug from all ends of the building, and clay was set out -- all in record time.  I was planning on having to crame it all in before the doors opened at 6:30.  Everything was done and completed by 2:30!  Thank you to all of my volunteers that helped!!!  I couldn't have done it without you.


Now for the self reflection on the show.

Things to do again:
- QR codes (there were a hit with parents, especially dads)
- Let kids pick their artwork for the show.
- Hand artwork by class, but not by grade.
- Mat artwork on black paper.
- Hang artwork with binder clips.
- Place grids around outside of gym, tables in the middle.
- E-mail for volunteers
- Ask families to take artwork when they leave for the evening.

Things to change for next year:
- Have students write names on smaller cards for clay.
- Have students write names on labels - stick to 2-D work.
- Buy table cloths for clay tables.
- Label clay by class like 2-D work.
- Take pictures during show.
- Post conversation starters around the area to encourage families to talk about projects.


If there are any other suggestions from parents/teachers out there - leave me a comment.

5.12.2012

Textured Wild Things - 2nd Grade

I have been doing this project with 2nd graders for a few years now.  We did these a few months ago, but I am just now getting around to putting them on the blog - seems odd that I waited to post these, and now Mr. Sendak is no longer with us.

Day 1:
We start out this project by reading the wonderful book "Where the Wild Things Are" by Maurice Sendak.  I tell the kids that their mission is to pay close attention to the Wild Things.  When the book is over we discuss what they noticed about the Wild Things.  Most of the time students catch on quickly to the idea that the Wild Things are made up of different animals.  Slowly through guided questions, we discover that the Wild Things are made up of all sorts of visual texture.  We know that the feet are bird feet because of the shape AND the texture.  I ask the students what different textures we see should feel like: bumpy, sharp, soft, coarse.  I then feel the paper and tell them that the paper feels smooth - so how is it that we see a texture we can't feel.  This takes a few moments for them to think, to find words to describe what they know.  

After a few students explain their thoughts I put words to their explanations - visual texture: texture we can only see.  

While the students are transitioning back to their seats I ask them to think of one animal and raise their hand.  When most people have their hands in the air I start calling on students to tell me animals.  One animal at a time I build a class Wild Thing.  The kids start rolling with laughter when we have a giraffe head, with bat wings, octopus legs, dinosaur tail, and a shark body.  I do one in portrait and a different one in landscape - showing how different animals fit better in either picture.  I then proceed to make sure I draw on some visual texture for fur, scales, etc.  


Next, the students get to start.  
The expectations:
- 5 or more animals to make Wild Thing
- Visual Texture
- Habitat


Day 2: On day two students finish up from day one, outlining with Sharpie and getting ready to color.  I do a quick demonstration with some tips on how to color the texture so it looks even more bumpy or sharp.  Instead of coloring OVER the texture, I show how to color the edges or ends one color and then change to a lighter or darker for the rest.  I got lots of 'ooo's' and 'ahhh's' from the kids when they saw the difference.  I explained that it wasn't about adding stripes to your work, but layering colors together.  (Some students really got this and others really struggled with the idea of layering vs. stripes)  For some of the more difficult textures I let students rummage the texture plate drawer to find textures for their Wild Thing and background.  I really loved seeing what they came up with.


Students colored their wild things with crayons and colored pencils - which ever gave them the best color choices at the moment.  I then had them watercolor large background areas if they wanted/needed.


Day 3: Finishing up visual textures and habitats.


Sign Language Hands - 3rd Grade

This lesson is one of my favorites for 3rd grade -- it is difficult, but also very rewarding for the students. 

I came up with this lesson in my very first year of teaching as my class was coming in.  It was the time of year when snow storms, ice storms, and ridiculously cold days had chopped up our weeks and projects due to days off.  I was teaching my day like normal when BAM it hit me as my kids were walking in - I had no project for them.  Nothing.  Zip. They finished what everyone else was working on finishing -- my mind was reeling!  What on earth was I going to do with a classroom full of 3rd graders for art?!?!?  Then just as fast as I realized I had nothing BAM - an idea. 

I will have them write words in sign language.

I quickly went to the internet, found a sign language alphabet and printed off copies while the class was settling.  As my trustworthy student went to get the copies I explain to the class that this next project was going to be tough - that it might be frustrating.  I asked them if it was okay to be frustrated - they said, "Yes".  I asked if it was okay to give up - they said, "No".  I explained that I would help, but I wouldn't do it for them, and that sometimes they would have to wait for my help.

Once we covered that and students seemed in the right mind set I told them our plan was to draw letters using sign language to spell a word.  Most students became excited, a few winced, a few flashes of fear.  We went through the alphabet as a class - making each letter on our hand (this seemed to help those that winced and panicked).

Next, I did a demonstration where I drew some of the letters - thinking out loud while I looked at my hand and back to my paper.  I also did a couple where I only looked at the print out.

I reminded the kids that it might be harder than they expect, but to just keep trying!

Expectations:
- Pick a word between 4 and 6 letters.
- Draw the hands life size or bigger.
- No giving up.

I passed out papers and let the kids go.  The first day tends to be the most frustrating day, as it is harder than they expect.  The second day it is a lot easier for the kids and they tend to take off!  Make sure on the second day to review where the fingernails and wrinkles go, as many tend to get happy about putting them on.

When they are done with their drawing they come to me to approve - I make sure fingernails are in the correct locations.  Next, they outline with Sharpie.  If there is still time that day they look through magazines for letters to glue above each hand.

When these are complete the kids beam at their final project.  They are often very proud and ready to show them off!

Bubble Wrap Printed Fish - Kindergarten

This project wasn't really inspired from anything in particular.  I knew I wanted to do printmaking with kindergarten, but I wasn't really sure how I wanted to do it.  I didn't have any styrofoam pieces, and I didn't really want to make a collage that we then rolled ink over... I was at a loss.  Then it hit me - bubble wrap!  I had used bubble wrap for projects in the toddler room when I worked at a 'learning center'.  Perfect - my plan was starting to take shape.

When I arrived at school, I dug out all my bubble wrap and started to cut simple shapes out of big bubbles and small.  I planned to put a set of shapes at each table along with a tray of paint and brayers.

I introduced printmaking by breaking down the work into "print" and "make".  The students explained what "make" meant and then print.  I guided them to the idea that 'printing' something let you have the same image over and over without it changing.  So when we 'print' something to the printer we can 'print' the same thing over and over and it won't change - unless it runs out of ink, of course.

Next, I pulled all the kids around the table and showed them how to load their brayer with paint.  I had them listen to the sticky sound, then had them watch me roll it onto the bubble side of the bubble wrap.  I picked up the bubble wrap and placed on my paper.  I gently, but firmly pressed the bubble wrap onto the paper and then slowly pealed it off. 

::Applause::  I swear printmaking it magic to kids.

I then showed them how to pick up their paper and walk to another table for other colors.  I showed them what it looked like to overlap and to use different shapes!

They were itching to get moving.  I had them all put on paint shirts, write their name on their paper and off they went!  It was a blast watching them fill their papers.

The next class we drew fish on their bubble papers, cut them out, and added a googly eye!  They were looking awesome!

The third class we added the background for their fish.  We brainstormed if the fish were in the ocean or a fish tank -- what would be around them.  It was a ton of fun!!!


Red Fish Blue Fish -- Kindergarten

This lesson would have been perfect for Dr. Seuss's Birthday - I, however, was in the middle of another lesson.

I got this lesson from another art teacher in my district (we actually share one of the other Elementary schools).  She had then up in the hallway and I just couldn't pass up the idea to incorporate Dr. Seuss and primary colors!

Day One:
We read the very first 6ish pages of Dr. Seuss's "One Fish Two Fish Red Fish Blue Fish".  We then took a few moments to really look at the details of the fish - some fish had two eyes, some had one - the kids informed me it was because one fish was looking forward and the other sideways. (I was so proud).  Then we noticed the top and bottom fins along with the tail fins.

I pulled the kids around a table with a large sheet of paper, pencil, and primary colors.  I first asked for a student to decide if our fish should face forward or sideways.  I then drew my fish filling most of my paper.  Next I asked a student to pick the color of my fish and I painted it.  I then took it to the drying rack, but first EMPHASIZING that my name should be on it.

I then asked the students to come to me to receive another piece of paper.  I asked another student to pick a color (could be same or different) and then asked yet a different student for a type of line.  I drew that kind of line a couple of times and asked for another type of line.  The lines went ALL the way across the paper either the long or short way.  This also went on the drying rack with their name.

Day Two:
We looked, again, at the Dr. Seuss fish.  This time we looked at their face -- eyes and mouth.  Turns out Dr. Seuss fish have big eyes, complete with eyelashes and their mouths are smiling.  I showed the kids how to use a white oil pastel for the eye - then use a black oil pastel to outline the eye, give eyelashes, a pupil and a smile.  I then also outlined my fish with the black oil pastel.  Next I cut out my fish showing the kids some strategies for cutting out such a BIG piece of paper.  I showed them how to cut off extra scrap it was in the way and how to 'rough' cut, then go in and cut out the details.  Some students chose to use these techniques and others cut it out in one big cut.

Next, we glued the fish to the background - made sure the name was still visible and put it back on the drying rack.

5.10.2012

Hot and Cold Castles - Kindergarten

I am not sure when or how this lesson came to mind -- we did these a few months back, when it was suppose to be winter.  

The kinders and I looked at pictures of all different kinds of castels.  Their job during the slideshow was to look for different shapes!  We then went through each slide together to find all the shapes we could: square windows, rectangle windows, triangle windows -- triangle roofs, prisms (from one student), circles, arches!  You name it, they saw it -- they saw it in the buildings and the trees surrounding.
The first day we drew our castles with pencils - making sure to use a castle top line and all the shapes we saw!  I drew a couple of example castles to help them see how the shapes went together - then I quickly erased them so that no one would be tempted to copy!  Once the students drew their castels they outlined them with black oil pastel.

I honestly can't remember if we painted these the same day we drew them or not..... wow how long ago did we do these?!

In any case, we discussed hot and cold colors at some point - the kids helped me sort colors with some guided help.  I asked for examples of things they would color orange or yellow.  I get answers that range from  chicken to fire to sun to shoes.  I do my best to stir them towards the sun and fire to help them remember what is hot.  I then ask them what do they color 'blue' -- water, sky, pools, rain.... in most cases kids associate these will a cool feeling.

So, with some examples and guided direction the kids and I sort colors.

I then pass out water colors that are all cool and they can choose to paint either their castel OR their sky.  The next class we use hot colors and paint what they didn't pain before.  (I do them different days and only give them what they can use to help enforce hot and cold groupings.  In Kindergarten we do hot/cold cityscapes in which I give them then whole palate of watercolors and its' their job to use the correct colors in correct groupings.)

Overall the kids had a BLAST drawing these and painting them in.  I even had one student insist on using neutral colors. Ha!

5.07.2012

Group Murals -- All Grades

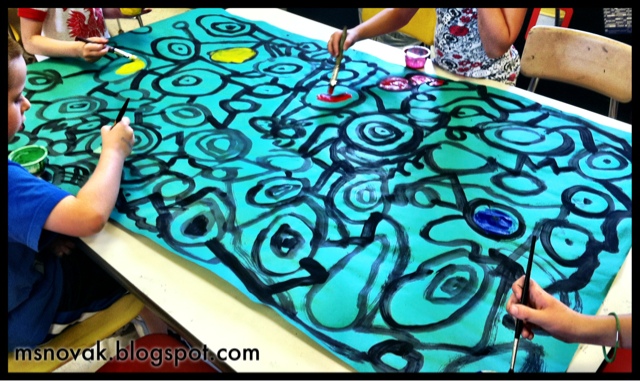
I, again, saw a lesson on Pinterest that grabbed my attention.  An art teacher, Katie, had her students make group murals at the end of the year to hang on the bulletin boards right away in the fall for the next year.  I thought, 'WHOA! Why didn't I think of that?'  The idea and lesson seemed simple enough.

I had originally planned to do this lesson in a few weeks, but with Art Show and Open House next week - I thought we should do some for open house!  I immediately started to plan.

I went and ripped bulletin board paper in different colors, laid them on the tables, poured some black tempra and waited for my kinders to walk in.

There are two rules for the black painting:
1) Your shapes can't touch each other.
2) You can't paint over anyone's work.

I had my kindergarten kiddos draw lots and lots of circles at their tables.  When their paper seemed decently full I gave them the next instruction: connect the circles with different types of lines - leave big spaces between lines.

Amazingly, this took almost all class and my room was almost completely silent - it was weird.

I found random spots around the room for these to dry for the next few classes.

After lunch I pulled them back to the tables with a plan: Have 1st graders paint them.

I told the kids their rules:
1) You can't paint over anyone's work.
2) Stick to one color (you get what you get and you don't throw a fit!)
3) Spread out where you put your color.

I made sure to make each student have a different color of paint - even if it was simply making it a tint or a shade.

 The students started at their own tables painting in spots and shapes.  I set a timer for 2 minutes and when that time was up they rotated to the next table.  The timer helped keep their attention, because each table's mural was unique - but it also spread out all the colors.

Again, the students were focused and quiet while they painted.

I plan to make more of these this week with words like "MUSIC" "ART" and so forth.  I can't wait!


5.06.2012

K and 1 - Piet Mondrian

This lesson started out for one of my Kindergarten classes that tends to work a lot faster then rest of my Kinders.  I needed a lesson that had merit, but that wouldn't take weeks to complete.  I had not originally planned on having other classes do this project until it was clearly a fun and impressive project for the kids.

We started out by watching a video while looking for shapes and colors.  
Immediately after watching this video I projects some of Piet Mondrian's paintings.  I asked the kids to raise their hand when they could tell me a color and a shape.  Once all the kids had their hands in the air I asked them to whisper their ideas to their table mates.  I then brought all their attention back and I asked them silly questions about there being triangles or octagons - oranges and purples.


Next I gathered the kids around the table for a demonstration.  I showed the kids how to use their ruler (straight edge) by holding it down and keeping their fingers out of the way to draw a line with their Sharpie.  We problem solved if the ruler moved or if their fingers got in the way - because you can't erase Sharpie.  I split up my paper into squares and rectangles until it was 'right'.  I asked the students if there was a special number of squares and rectangles to make it 'right' - they said no.  I asked if theirs had to be like mine to be 'right' - they said no (quite enthusiastically I might add).

When my paper was split up I was ready to paint with primary colors.  I asked a student to pick what color they wanted me to start with.  I painted all the shapes I wanted that color without washing out my brush.  When I wanted to change colors I showed/reviewed how to clean out my brush, dry my brush, and start with a new color.  Before I sent the kids back to their seats we problem solved common issues with tempra paint -- brush not cleaned out all the way, not drying the brush, water too dirty.

I then sent the kids back to their seats and passed out paper, Sharpies, rulers, water, and primary tempra paints.

When the students were done they put them on the drying rack!  The next class we outlined their Sharpie with black tempra paint.

These turned out very Piet Mondrian while still being very unique.