Okay, so over the years I have tried to make subs feel as comfortable in my room as possible. I often have no idea if the sub has any experience with art, let alone teaching it. I hate leaving videos - though I am close to doing that.
The first time I had a sub I spent HOURS writing my sub plans so that the kids could keep working on their project and not get behind my other classes - what a mistake. The kids needed to use ONLY primary colors as we were doing a Roy Lichtenstien project. I came back to projects that not only had secondary colors - but that had gold, and silver... The sub went into my cupboards and took out both acrylic and tempera paints to let the kids use. (Note: I left out the primary colors, bolded/underline what the primary colors were in my notes)
A few years later after using 'filler' projects and videos - I thought I'd give it another chance. Perhaps now that I had been teaching a few years maybe my sub plans would be clearer. MISTAKE. I came back to a pile of 1st grade projects stacked on the table. Now, this doesn't seem like a problem - but the kids had to cut and glue things down for this assignment. I came back to a pile of 1st grade projects glued together. It never occurred to me to tell an adult to put glued work on the drying rack - or at least to NOT stack it. ::sigh:: It seemed common sense enough to me that you wouldn't stack glued things together..... alas I was wrong.
So, now - after having these and other painful returns to school I have a list of filler activities for the students to do with subs. I let the subs pick what they want to do with each class on copy paper. (Design your own money, design your dream house, your family wins the lottery - how would you spend it?) The students can use markers and crayons - that's it! The projects are fun, they require students to be creative problem solvers. I like doing it this way because it keeps the kids busy, not videos all day, and I don't have to stress. Well, that is when they follow my plans.....
I had a sub yesterday as I unexpectedly I woke up about 3 am with back spasms - nothing crippling, but bad enough I didn't want to chance it not being better by school time and having to try and teach. I got myself a sub, Advil and called my Mom. (gotta love Moms!) Anyhow, I stopped by school this morning to pick up some stuff for my other school and I realize that my sub used LARGE paper - like 12x18 paper... uhh that's not copy paper. I go to my paper cupboard -- sure enough a stack of paper is gone.
I wanted to scream, cry and throw things all at once!!!
If you don't understand my reaction then you clearly have never had a budget where you get less than 2.oo per kid for the WHOLE school year. All supplies are balanced out, even rationed. I have in my notes to use copy paper as to not use my nice drawing paper. ::sigh::
I really don't want to just show videos when I am gone - or have to fear supplies will be wasted. My next idea is to create a sub BOX. A box that will have lessons in it and the paper and anything else the sub might need.
If you are ever going to sub for an art teacher - PLEASE for the love of Pete, follow the sub plans. PLEASE don't go through cupboards and think you can use anything you want to enhance the projects.
Thanks.
Anyone else got sub-proof ways to keep your classroom on track or, heck, share some horror stories?!
4.26.2013
4.23.2013
5th Grade - Gothic Architecture
 Okay- so this have got to be my FAVORITE new project of the year.
 I saw someone post a picture on Pinterest from Artsonia where a CD was a rose window and then the Cathedral was drawn behind it. I was like "DUH!!!! What a PERFECT project for using CD's! How have I not thought of this? GENIUS!"
I have been waiting for what feels like months for clay to be over and such to try out this idea. I finally had the perfect moment to start this with a group of 5th graders!
I first spent about 45 minutes of planning the lesson trying to find an interesting/short/information video on Rose Windows to show my students.... man was that a task. I could find short boring videos, or interesting documentaries - but nothing that fit my whole criteria... well, that is until I found this:
Okay - so it isn't exactly perfect and I managed to talk over the part where the guy says "bloody hell" and then I skip the part about the commission for a new rose window. (I am okay with mentioning religion when it comes in context of art/architecture - but I didn't feel it was necessary to bring in the modern religious icons.)
 The thing I love about the video, other than the accents, is that it shows rose windows, a brief history, and even a few ruins.
 So, after the video (or before if I remember) I give a little history - set the scene for these mammoth buildings. I try to explain to the kids that these are not 'just stained glass windows' but that these are THE WINDOWS. It is hard to really explain a life to kids where there is no real visual stimulation - there were no billboards, signs, advertisements, ipads, tvs, photographs and such during the time when these were built. People were not use to seeing images at all let alone on such a GRAND scale. I then show some stills of these cathedrals and point out how little the people are, or the chairs on the inside. It is hard to describe how LARGE these structures are without a point of reference.
 After I get done talking at them (which I try not to do - but sometimes it is necessary), we discuss what they notice about the rose windows while looking at some still photographs. -- Round, symmetrical, colors, patterns go around the center.... etc. I then explain to them that they are going to create their own Rose Window.
They can either:
A) Start right away - but there is NO erasing sharpie so they will have to problem solve their mistakes.
B) Get a scrap sheet of paper and practice a few designs.
I hand out CD's and Sharpies and let them go.
The next time they come we look at a slide show of Gothic Cathedrals - complete with Rose Windows. After a few photos I put up the picture shown below with 6 Cathedrals side by side. I ask the students to look at them. Compare, contrast the different buildings. What do they have in common, how are they different? They discuss these things at their table, we share a few as a class -- 3 door sections, LOTS of arches, steeples (though not always symmetrical), rose window in the middle, 3 layers (doors, middle, steeple), recessed doors.

 Then, the last we do is some shading to give the Gothic structures some pizazz. I explain about the sun making shadows and how that helps us understand depth and shape. We discuss that depending on where our light source, the sun, is will determine where our shadows go. I show them how to take a black colored pencil and draw a shadow on the left or right side every line on their paper (excluding where their building and sky meet). (Some struggle with this idea more than others - but its all good).
 At this point if students want to be done - okay. If they want to go above and beyond I have them go in with a white oil pastel and do the same on the opposite side of each line and color the sky in with a sky color.
These are spectacular to look at! I love how each one looks completely different.
Amazing!

4.22.2013
Rain Rain Go Away
 I don't know about your area of the world, but mine has been filled with grey skies and rain for the last WEEK! It has rained almost nonstop since Monday. I am feeling drained and slow moving.
Since spring has decided to take the longest drink of water, I decided to try and jump start it with some Van Gogh inspired flower pots.
This lesson is not new, but is a GREAT one day project to fill the hallways with spring.
We started by learning a little bit about Van Gogh - looked at his paintings, discovered his small brush strokes and use of multiple tints/shades of a color in one area.
I had the kids make a flower - any flower, could be real, made up, or even from Super Mario brothers as long as it looked flower-like. Many of my boys took advantage of this and drew man eating plants, or ice flowers. All my girls were excited to draw roses and lilies. Ha!

I showed them how to draw a simple sunflower (circle and then triangles around the edge, add a stem!) Then we talked about using short strokes and multiple colors for each spot.
While students were working I drew and painted a pot sitting on a table. When students were done cutting out their flowers I would arrange them in the vases.
I have received MANY compliments on how much people love them. I think everyone needs a little sunshine.
4.18.2013
Winter Trees - 3rd Grade
I wanted to do these amazing trees last year - but alas, it NEVER snowed. Well, this year we totally had snow and plenty of it.
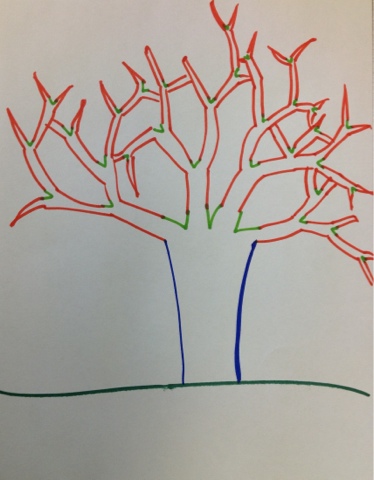
I had third graders learn a new way to draw trees - now, I'm not a big proponent of teaching kids HOW to draw something - but I also know that getting kids to draw two sides of the branch instead of just one wasn't going to happen spontaniously.
 So, first I projected a picture of a winter tree and traced sections of it on the board for the kids - making sure to really drive the point that we are drawing the outside of the branches, not just the middle.
Next I showed students a pattern on my traced tree. There is a "V" and that v grows longer into branches. (see picture).
We continued this pattern till we had a tree.
I explained to students that this pattern may make sense in their brains, but when they go to draw, it might be more difficult than they expected. Most students poo-poo this and think "I got this Ms. Novak - it's EASY" and then when it comes to paper and pencil it is more "Uhh Ms Novak - I need help."
I have students practice trees on some scrap paper till they get the hang of it - then I let them pick out a color of construction paper and start on their final.
 After their tree is finished, they color with brown oil pastel(or white if they want a birch tree - most stick with brown). Once their tree is all colored we talk about how when it snows - the snow sticks to the top of each branch. Students take a white oil pastel and color white on the top of each branch. Now, some kids totally get this and others get lost in the idea that the top of EVERY branch is colored white - not just the top branches. Students that get stuck on this idea often travel with me to a window and look at how the branches don't line up under each other - thus letting snow land on each one.

Last but not least, MY FAVORITE PART!!!! -- If students wish they may add some glue to the snowy parts of their trees/ground and add some white/clear glitter! I know many art teachers and custodians HATE glitter -- I happen to love it. I love how it sticks to everything and travels through the whole school. It makes me feel like there are little art fairies bringing joy to all.
Despite the fact that I tell kids 'how' to draw a tree - they all end up as unique as the students that draw them. Short of giving up on the project EVERYONE succeeds, because - well, all trees look different, no two trees look exactly the same so there is no "my tree doesn't look like a tree".
Yay! High success!
I had third graders learn a new way to draw trees - now, I'm not a big proponent of teaching kids HOW to draw something - but I also know that getting kids to draw two sides of the branch instead of just one wasn't going to happen spontaniously.
 So, first I projected a picture of a winter tree and traced sections of it on the board for the kids - making sure to really drive the point that we are drawing the outside of the branches, not just the middle.
Next I showed students a pattern on my traced tree. There is a "V" and that v grows longer into branches. (see picture).
We continued this pattern till we had a tree.
I explained to students that this pattern may make sense in their brains, but when they go to draw, it might be more difficult than they expected. Most students poo-poo this and think "I got this Ms. Novak - it's EASY" and then when it comes to paper and pencil it is more "Uhh Ms Novak - I need help."
I have students practice trees on some scrap paper till they get the hang of it - then I let them pick out a color of construction paper and start on their final.
Last but not least, MY FAVORITE PART!!!! -- If students wish they may add some glue to the snowy parts of their trees/ground and add some white/clear glitter! I know many art teachers and custodians HATE glitter -- I happen to love it. I love how it sticks to everything and travels through the whole school. It makes me feel like there are little art fairies bringing joy to all.
Despite the fact that I tell kids 'how' to draw a tree - they all end up as unique as the students that draw them. Short of giving up on the project EVERYONE succeeds, because - well, all trees look different, no two trees look exactly the same so there is no "my tree doesn't look like a tree".
Yay! High success!
Subscribe to:
Posts (Atom)