 I start out this lesson by showing a slide show of autumn leaves and ask the students to raise their hand when they can tell me a color or something else about the pictures. Since they are 3rd graders and the pictures are really obvious I wait until EVERYONE has their hand in the air. I call on a few kids and I get answers like, "they are fall leaves" "they all have different shapes" "fall leaf colors: red, yellow, orange, green, brown" "some leaves are multiple colors". Most of the time I need to freeze the slideshow on a picture with lots of flat leaves and ask them a more guided questions to get to 'symmetrical'. We talk about how leaves are not always perfectly symmetrical but they are often close. I then explain that we will be making our own leaf stencils to make a leaf pile picture.
I gather the students around a table to do a demonstration. I explain that the will fold a piece of card stock in half hamburger style. Next, I make the biggest deal possible about starting and ending their leaf off the FOLD. I draw a line off the folded edge a little from the top and another a little from the bottom. I explain that we are going to draw HALF the leaf - just like when you make a 'heart' at Valentines Days. We talk briefly that leaves are all different shapes and their leaf needs to be 'leaf-like' but doesn't have to look like a specific type of leaf. Next, I explain that they must cut their leaf all in one big cut - no coming in off the sides to make it easier!!!

When I unfold the parts I explain that the leaf looking one is a positive shape and the hole it created is a negative shape. I again try and stress that if they don't start and end their leaves ON THE FOLD then their stencils won't work!
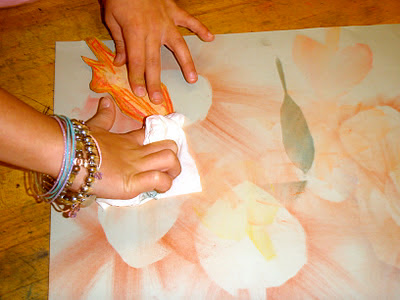
This next part is awesome - so I take the positive leaf shape and place it on the table - then I add chalk pastel around the edges, being fairly liberal but not neat about my coloring. I then place this stencil on a larger sheet of paper, take a kleenex and wipe the chalk dust off the end of the stencil onto the paper. At this point I generally hear 'oooo cool' - that is until I lift the stencil revealing a negative leaf space. This is when the kids get really excited. I then ask them if my positive leaf gave a negative picture - what do they think will happen when I add chalk to my negative stencil?! Most get it, some need to see it. So I repeat the process with the negative stencil. I wipe the chalk dust into the middle, lift the stencil and hear the gasps and exclaims of excitement. I quickly explain they can use multiple colors on a leaf and reuse their stencils with any colors and or color combinations. I also stress that they need to overlap their stencils.

As students work I tell them they may borrow each others stencils and at the end of class they can donate their stencils to a bucket for other 3rd grade classes to use or they can keep theirs safe in their folder. I also stress no blue, purple or black leaves - I occasionally have a student that will challenge my purple leaf stance and if they can make a good case I'll let them do a few - but most purple leaves are not the color purple we have in chalk.
Depending on your students these take anywhere from 2 to 3 classes to complete. At one school I teach at kids were done with amazing results in 2 classes and my other building it's going to take 3 - thus is life between two schools!
5 comments:
Beautiful leaf compositions.
I love the colors.
Hey Amanda! miss ya here...looks like things are going great there...really liked your leaf works...cool!
Kevin J
Thanks! It is one of those projects where every student succeeds and they all look uniquely different, yet impressive!
Kevin, I miss being there as well. I am adjusting and learning all my new kids - personality, names and all!
Thank you so much for this idea! I wrote it up as a lesson plan and I'll be giving it a try next week when I'm observed for my student teaching. My adviser is going to think I do nothing in my free time but read art teacher blogs online. :)
Awesome Amanda! I would love to hear how it goes! There are worse ways to spend your time than reading art blogs!
Post a Comment