Pages

4.29.2011

4th Grade - Weaving friendship bracelets (toe weaving/5 finger weaving)

I wanted to do a weaving project with my older kids that was more than a tapestry, or a woven plate - and so this lessons was inspired by that and  my love of summer camp, weaving, and colored friendship bracelets.

While I was working at a summer camp I noticed a lot of campers doing a type of friendship bracelet that I had never seen before.  One day it was rainy and cold and most of the outdoor activities had been canceled so I asked one of the campers, Rachael, to teach me how to do it!  I found it to be easy, fast, and look really neat!  I made countless bracelets, necklaces and anklets that summer.

As I planned for this unique weaving project for my 4th grades I searched for some printed directions to help my students work through the steps if I was busy helping someone else.  I have directions but they are different than how I teach the students - so I don't tend to use them.


Once I figured out how I was going to teach how to weave the bracelets I had to organize the use of embroidery floss -- I had a vision of a massive pile of wasted string somehow tangled in a massive ball!  To keep my vision from happening I placed out small butter tubs (with lids) - one for each table in each class.  I separated the embroidery floss to give each table the same set of colors.  When each tub was filled I put the lid on and labeled it with their teacher and their table color.  This way if blue table in one class used all their pink string the first day it wouldn't affect anyone else - or if they tangled their orange so badly they couldn't use it - again it wouldn't affect anyone else.  When introducing the lesson I explain this to them - that way there is not "HEY WHO TOOK OUR BLACK?! or people coming over to ask to use another table's orange since theirs is tangled.

The day of the lesson I explain to them our plan for the day.  I emphasis that some of them will understand this right away because either they have done this type of bracelet, they have done others like it, or maybe they are just good at spacial things like this.  There will be other students in class that will feel confused and frustrated for most of class.  I ask if that is okay - is it okay to be frustrated and confused?!  They say 'yes'.  I ask if it's okay to give up -they say no.  I explain that I will travel around the room but that I can only help one or maybe two students at a time -- they will need to be patient.  I prepare them to understand that they may only start to understand and get it today - but that we will do it again and they will master it before we are done.

Next is to show them how to weave their bracelet.  I show them how to measure out 3 pieces of embroidery floss at 2 feet.  Then they are to tie ALL the ends together - they should get a loop.  Tape it to the table and separate the loops.  Make bear claw hands with fingers pointed towards the table.  On one hand put a string on the middle finger and another string on the pointer finger - on the opposite hand put the string on the middle finger.  Take the string-less pointer finger and go over, under, over the strings on the opposite hand - grab the very outside string and pull through.  So the string on the middle finger will transfer to the weaving pointer finger.  Then move the string from the pointer finger to the middle finger and repeat to the opposite hand.  Repeat until the loops are too small for fingers.


The next class up the difficulty and I let the students pick from 3-7 strings.  I show them how to weave with 7 strings -- it's the same process just with more strings.  If students are still uneasy with everything they can stay with 3 strings!

The first day of this project is a little rough since there is only one of me -but the students handle it well and there are generally enough students that catch on fast enough that they can help their peers.

After the first day they ask/beg to make friendship bracelets at every class!

4.28.2011

Kindergarten and 1st Grade - Clay Pinch Pot with Marble Experimentation

I once saw a middle school art teacher do a clay project where the students made something that would have water in it - ie a pool, cup.... and they melted blue glass to make the water.  This intrigued me, as I never thought about trying to melt glass in the kiln before.  The concept seems simple enough.

So this year a couple of the elementary schools in my district began to experiment with this idea.  I had some left over clay from this year and thought 'why not give it a try'.  So I explained to the students that we were going to do our own art room experiment.  I told them the plan and what hopefully would happen - but we would have no idea until we tried it.

Of course the kids were excited about not only the experiment but working with clay AGAIN!  So, I drug out all the clay materials, demonstrated how to make a pinch pot, bisque fired the bowls, glazed them, each student picked out one half marble (the marbles that are flat on one side - used for vases of flowers) and fired them again.


The results are great!  I can't wait to give them to the kiddos.  Most of the marbles melted completely - some of them had a bubble that popped and left an optical illusion of a bubble.  They are magnificent!

4.26.2011

1st Grade - Still Life Plants

post drawing
This project started as a cross-curricular project with the 1st grade science unit about plant life cycles.  The elementary art team in my district had a grant to purchase materials specifically to do projects that corresponded with a unit in their regular education room. 

The original thought was to have the students do a still life -- look at the plant and draw.  I decided to do pre and post still life drawings to see if there would be a difference in their drawings (and boy is there a difference!).  The first day of the project students received a piece of paper (18x11) and folded it in half hamburger style.  Then, with a pencil, they drew the best plant they could making it fill most of the paper.  I did not specify what type of plant, because I wanted to see what they would default to.  After their plant was drawn I asked them to create a background and color it with crayons.

left: post     right: pre
The next class period I explained that we were going to draw plants again - but that this time they were going to have a plant to look at.  I did a demonstration where I did a 'think aloud'.  I said my thoughts out loud as I decided on the shape of the stems and leaves.  For example: "The leaves look kind of like hearts connected to the stem.  I notice that the stem is not straight and tall - but is curvy and falls over the edge of the pot.  Each stem has lots of leaves on them!"  As I talk I draw what I see.  I then ask the students if there are any flowers on my plant (the plant I was using did not).  I then ask them if I should have flowers on my drawing - they reply with no.  The students are encouraged to really focus on drawing their plants and are not given any instructions to color so that they work slowly.  If their plant is done with quality they may add a background with pencil.  After I answer any questions the students head back to their table to start drawing their own plant.

left: pre      right: post (in space)
The following class I pull the students for another demonstration about how to color their plants using oil pastels.  I, again, do a think aloud as I talk about the colors that I see.  Example: "I see that my plant is mostly green - however when I look at the leaf of the plant I notice the top of the leaf is a darker green than the middle, and the tip is almost a tan color"  I then find those colors and color the leaf as I described it.  I do this a couple more times and then ask the students questions like, "Is my plant all ONE color of green?" "Is there any purple on my plant?"  "Is there any red on my plant?"  "Should I color my plant any colors that I don't see?"  The students respond accordingly.

The kids head back to their tables, dump out their oil pastels and get to work!

left:  post        right: pre
The next class I like to put all their pictures up on a wall and we gather around their pictures on the floor - a sort of class critique.  I ask the students to silently find their project with their eyes.  I then ask them to look at both their pre and their post drawing and decide which one they like best.  Then I ask them which one looks the most real.  I then ask them to raise their hand if it was the same answer for both questions.  I ask someone to share why they think their favorite one was also the one that looks the most real.  I then ask students to share which one in the class has the most realistic leaves, the highest quality of coloring, the most unique, the most interesting background.  I ask them to explain why they chose each option. 

This part will sometimes take most of class or only part -- it depends on the students and their level of engagement.  It is wonderful to listen to students and their reasons - great higher level thinking exercise.

2nd Grade - Tints/Shades cylindrical Cakes

This is one of my favorite 2nd grade projects.  I was inspired by another teacher in my district that does this project - though I have modified it a little over the last couple of years.

I start out by showing the students a slide show of layered cakes from Charm City Cakes.  The students 'ooooo' 'awwww' 'COOL!' and so forth.  I like to emphasize that this is a real job - that Chef Duff and his friends get paid lots of money to decorate cakes!  They even have their own tv show.

After the slide show is over, I freeze the slide show on one cake and I explain that they will be creating their own cake on paper.  They will get to decide how many layers, how the cake is decorated, and next time they will get to use paint to finish the decorations!  Often times, at this point students are very excited.  I then explain that even though their cakes will be on paper they will need to look 3-D.  We quickly discuss that we know in real life the cakes are round - but on paper they are flat with the illusion of being round.

At this point I explain that we will learn to draw a cake in 3-D.  I use the cake being projected on the white board, from the slide show, and ask the students what the very top shape is and to raise their hand.  I wait a few seconds and tell them to look carefully and not to be tricked - what shape is on the top.  I wait until most of the class has their hand up and then call on someone.  Sometimes I get a circle and sometimes I get oval.  I don't give them the answer - but instead I trace the top shape.  I ask the students to agree or disagree that I have indeed traced the shape - they agree.  I then cover the projector and ask what shape it is - They say 'oval'.  I then explain that their brain KNOWS that cake is circle - but when viewed at a certain view point that circle LOOKS oval.

I then proceed to trace rest of the cake pointing out key features that make the cake look 3-D, like: There are not corners on it, all the corners are rounded.  The next oval starts up on the edges of the layer above not on the bottom corner. 

After the students have helped me trace the cake I turn off the projector and do one more freehand on the white board having the students tell me what to do.  When the cake is drawn I explain they need to decorate their cake with BIG designs.  Students like to draw small detailed pictures on their cakes and it ends up being too hard to paint, so I emphasize BIG designs.

The next class I introduce tints and shades to the students.  I give them a hint to remember tint and shade -- that when you stand in the SHADE of a tree is it lighter or darker there?!  They reply with darker - that way they can remember that a shade is mixing black with a color and a tint is mixing white with a color.  We also do a quick review of the color wheel and how to use it to get the color you want.

Next,  I pull the students around a table and proceed to show them how I want them to mix colors.  I only give them RED, YELLOW, BLUE, WHITE, and BLACK.  I explain that there are three simple guidelines for mixing paint.  1) No mixing colors in the paint dishes.  2) The mixed color can not be bigger than your hand (if it gets out of control they clean up the paint and use crayons - way not fun) 3) All colors must be a tint or a shade.  I then proceed to mix colors by the input of students.  One student will suggest a color, another will tell me how to make it, and a third student will tell me to make it a tint or a shade.  I have the students scoop a little of the paint they want from the paint dish and put it on the table, wash the brush, and scoop the second color and mix.  I have found that mixing paint this way keeps students from mixing too much of a color.  In three years of mixing paint this way I have only had two students clean up their paint and use crayons.

This project takes 2-3 classes to paint depending on the skill, determination, and craftsmanship of the students.  In the past I have had the students cut out their cakes and mount them on construction paper.


The students really love this project and the cakes are always very interesting and unique.

4.25.2011

Origami Samuri Hats - 1st Grade

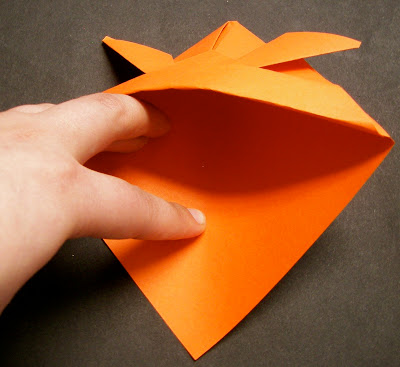
Here is a project that I use to do with 2nd grade - I now do it with 1st!  I use newspaper for the hats so that the students can actually wear the hats.  Start off with a square type piece of paper - luckily the newspapers in my current town re-sized their papers to be almost square.  If your newspapers are more rectangular you will need to make them square-ish.  At the very end I go around and tape the front folds of the hat since newspaper doesn't hold folds too well and the students get frustrated when they unfold.


Start with a square piece of paper.

Fold corner to opposite corner making a triangle.

With the long side of the triangle away from you - take the side corner to the bottom corner.

Repeat on other far corner.

Take only the top layer from the bottom and fold to the top point.

Repeat for other side.

Take the top later again and pull up and over to the side to make wing-tips.

Repeat on other side.

Take only the top layer from the bottom and fold halfway up top triangle.

Fold the part that is hanging below the triangle up and over - makes a rectangle type shape.

The main part of the hat is complete.

Fold the last part of the bottom triangle into the inside of the hat.

Hat is ready to be decorated!


4.14.2011

3rd and 4th Grade Musical -- We Haz Jazz


This is been a great show to prepare for!  The students have learned a lot about jazz and blues.  Tonight is our show for the parents and part of me is excited for the show to be over and part of me is sad.  Ending a show is like ending a good book - you want to know how it ends, but then you miss the characters.

The students have worked very hard and they are doing a great job!  The have learned all their lines, lyrics, notes, and actions in the music room while they painted the backdrop, silkscreened their t-shirts, created a value self portrait, and designed the illustrations for their program in my room.

As they were rehearsing yesterday for the first time ALL together I had goosebumps multiple times and was almost brought to tears.  There is something about the performing arts that is magical.  Putting together a group of people, performing live, having live sound/music, an audience in real time creates something special.  There is a relationship between everyone in that auditorium for the duration of the show -- something that can't be duplicated or even recorded.  It's a feeling, an energy, a connection.   For those 45 minutes nothing else matters - only those kids on stage giving it all they have.


Some of my students may never set foot on a stage after tonight, as all my 4th graders will move onto a new building next year and performances like these become more and more of an extra-curricular.  Those students will always remember this night - the feeling of being under the bright lights, the rush of adrenaline, the sound of applause.  Then some of my students will catch the theatre bug tonight and it will be one of many stages they perform on in their lives.  Actually, one student when he tried out for the show asked for a small, one line part, because he didn't want to be too nervous or stressed.  Today after our dress rehersal he came up to my partner in crime, the music teacher, and told her, "I've learned one thing..... one line is not enough".  He has found the performing arts and will continue.

So, tonight we have our one and only show for families - the music teacher will stand next to me directing them with actions and gestures as I sit hovered over the sound board adjusting levels.  There will be more than families in those seats - there will be love, pride, and I'll say it again -- there will be magic.


::happy sigh::   Have I said before how much I love my job?!

4.08.2011

Sir Ken Robinson on Creativity


I found this video on another art blog, The Art Teachers Guide to the Internet, and found it worth sharing.

I, like the story he tells about Jillian Lynn, had an epiphany in the arts - only instead of being a dancer/choeographer I became an Art Educator.

Sir Ken Robinson has two books about creativity - both of these books will be used in different classes that Jessica is offering through "The Art of Education" that I posted about earlier

The video is kind of long - but moves swiftly.

4.06.2011

Art Educators!

A friend of mine, Jessica (we went to college together), has noticed a need in Art Education classes at a graduate/re-certification level that are tailored to art educators and their busy schedules.  She has/is starting to teacher her own classes -- I wanted to pass on her website with the information.

Art Of Education Classes are Designed Specifically for:
  • Art Educators looking for additional graduate credits
  • Art Educators looking to re certify your teaching license
  • Art Educators looking to advance on the salary schedule
  • Art Educators looking to earn elective credits to apply towards a graduate program
  • Art Educators looking for an economical way to build and learn more about the profession from experts in the field, with ideas you can use in your classroom the very next day!
  • Classroom teachers who would like to enrich the classroom experience by integrating the arts
(http://theartofeducation.wordpress.com/)

4.04.2011

2nd Grade - Abstract Sculptures

This lesson is a great experience in problem solving and creating in 3-D space.  I start out the lesson by showing a slide show of some past examples and asking the students to share what they observe.  They talk about the colors they see, the shapes they see, and sometimes the colors go in a pattern.  I explain that they will be making their own version of these sculptures, but that the first day or two of the project they will be prepping their paper before they can build. 
Their paper needs to have hot colors on one side and cold colors on the other.  I ask the students to observe the lines on the paper and if they are thick, thin, close together or far away -- they respond thick and close together.

Next I do a quick demonstration about how to use the markers to get thick lines (Mr. Sketch are the best but not needed).  I show them how to use the side of the marker tip instead of the top tip.  They can use lines, shapes, words - anything to fill the entire space with thick lines!

Once the students have covered both sides of their paper - one side with hot colors and one side with cold colors the students bring me their paper.  Based on my knowledge of the students ability I drew, with a pencil, a continuous line on their paper splitting up the area - they then pick normal scissors or fancy scissors to cut it out.  The line starts off the paper and ends on the inside with a dot - each line is different.

When the students are done cutting they have one long crazy line of paper that they then twist, fold, then glue their paper together to make a sculpture.  When I demonstrate I focus on not gluing the first solution - but to twist and move the paper to find the most interesting shape.  I show them if I glue all the pieces flat they aren't nearly as interesting as gluing the pieces to other pieces.  As I demonstrate I also turn the sculpture around to view it from all angles to make sure it's interesting from all sides.


After their sculptures are built they put their name on it as well as titling their work - they then bring it to me and I take a picture from the side they find most interesting.

4.01.2011

4th Grade - One Point Perspective with Roy Lichtenstein

My fourth graders have been working hard on their show 'We Haz Jazz' and needed something unrelated to their show to work on.  I decided that we should re-visit one point perspective before they go on to the 5-6 building.  I thought about doing the traditional exercise of using basic shapes and a vanishing point to understand one point perspective - but the thought did not last long - too easy, thus too boring.

Instead we did one point perspective words - they look like they are flying through space.  The students were really excited about the idea.  I started by talking about their landscape projects we did last year.  I told them they were practicing one point perspective and they didn't even know it!  They told me about how things appear to get smaller when they are further away and appear larger when they are closer.  I explained that one point perspective is the same thing.  I showed them with the idea from above - I drew a dot and square and connected the edges of the square to the vanishing point.  They 'whoa'-ed.  I repeated this with a triangle.  It was effective to have the students see the process even though I didn't feel they needed to do it themselves with the shapes.

I then proceeded to tell them that they were going to do this same thing but with a word.  The requirements for their word was this:
1) 4 or more letters
2) School Approprite
3) Robot letters (bubble letters but with corners)

I used my last name on the board as an example.  I drew my name in robot letters (bubble letters that had corners - my 'o' was a square instead of a circle) at the bottom of my paper.  Next I explained that we would be connecting the tops of our letters to the vanishing point with a ruler.  I showed them how to find all the top corners of their letters and connect it with their vanishing point to draw a line.

I told them that I would explain the next step individually when they were done with these first two steps.

When the students were done doing their letters and connecting the top to their vanishing point I made small dots on their letters where they would need to draw a line towards their vanishing point.  This is the trickiest part of the lesson.  I explain to each kid (which takes a little bit of time - but doing it was a class was just too much for their spacial brains to comprehend) that when they line up their dot with the vanishing point and draw their line - IF they run into another line then the STOP and move onto the next dot.  After a couple of sample lines the students understand and race back to their seat to finish.

When all the lines are complete the students draw their background and then Sharpie it all.

The following class the students and I look at a slide show of Roy Lichtenstein - our inspiration for coloring these.  While watching the slide show I ask the students to take notice of the colors he uses as well as what makes his work unique.  It doesn't take long before hands are shooting in the air and I hear an occasional gasp of air when they figure it out.

We discuss that he uses only primary colors: red, yellow, blue.  I explain that their pictures will also only have 3 colors -- they can pick them, but they only get 3 colors for their WHOLE paper.  Next the students make comments about the dots they notice all over his work.  I explain to them about Benday dots - many times a student will interupt and exclaim that, 'it looks like a comic!' in which I continue to talk about the special dots and how and why they are often used in comics.  I always ask if the benday dots are polka-dots and they always tell me 'no' with firm affirmation.  I then ask them why and how they know -- this gets a bit tougher.  (I love listening to kids learn to articulate what they know is true, but they don't know exactly how to say it.)  After a couple of kids we figure out that benday dots are in lines/rows and are the same size -- polka dots can be spaced any way and can be any size.  I then proceed to explain that somewhere on their paper there needs to be benday dots - I don't care where or how much, but they need to be there somewhere. 

The students are jazzed at this point in the second lesson and are ready to pick out their colors and get started.  As students work I walk around and offer encouragement and reminders - mostly that benday dots are in rows not random.