Creating and teaching art requires a sense of humor and an understanding of organized chaos - as there is no way to create something original without spreading out supplies and getting a little messy.
2.25.2011
3rd and 4th Grade Musical - We Haz Jazz
It is that time of year again where the students and I prepare for another musical! I really enjoy being apart of their musicals - for a very short time in college I was a theatre/dance major - and even though being an Art major really stole my heart I stayed very involved in technical theatre. Getting to do what I am really passionate about (teaching art) and then getting to introduce the students to something else I really enjoy, technical theatre, is truly icing on the cake.
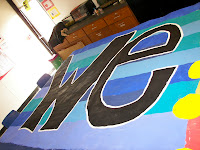
This show is all about the history of Jazz music - how jazz music came to be. The students have been busy with their Value Self Portraits, along with painting the background, and designing the program covers for their show.
These musicals lend so much room for talking about real life art jobs - being a scenic painter, a graphic designer, advertisement, costume design..... it is a perfect example of real life and the kids get to be each one. Each of my students are a graphic designer when they design a program cover - they each are a scenic painter when they help paint the backdrop - and they each will get a chance to silk screen their own t-shirt for the show.
We have a lot to get done before April - but I believe we can make it. I will post again when everything is complete and hung - should be fantastic.
2.24.2011
Basic Classroom Management
A few very basic things I do in my room to create an atmosphere that is safe for students to create, explore, and try new things -- along with keeping supplies organized, projects from getting lost, and making the students feel this is their room when they only see it for 45 minutes about once a week.
I set up the room to give the students the most independence - remember independence for 5 year old students is very different then 10 year old students. To meet everyone's needs, and keep things clean and organized I have a few tricks: 1) Clear Expectations 2) Material center 3) Folders that are coded to a grade, teacher and then table color. 4) Done chart and cart 5) Clean up Song!
4) The done list and cart are great for those students who finish projects with quality and need something to do. At the beginning of the year I explain the activities on the cart. When they are done they may choose something off the list to do.
5) Last but not least - a clean up song. I dreaded the thought of a clean up song because I was sure I couldn't listen to a song about cleaning up 5 times every day -- then a friend asked why I couldn't pick my own song. I have no idea why this didn't occur to me on my own - but it didn't. So after her suggestion I started to look for my own clean up song and settle on "The Pirates Who Don't Do Anything" by Relient K. This song is silly, school appropriate, and I have been able to listen to it for 5 times every day for the last 3 school years! This song is just enough time for students to put their work and supplies way - it also takes the responsibility of cleaning up off of me and puts it on the students. I encourage them to play the air guitar in their seat when they are done cleaning -- a task many of my students take very seriously!
I set up the room to give the students the most independence - remember independence for 5 year old students is very different then 10 year old students. To meet everyone's needs, and keep things clean and organized I have a few tricks: 1) Clear Expectations 2) Material center 3) Folders that are coded to a grade, teacher and then table color. 4) Done chart and cart 5) Clean up Song!
1) The expectations in my room are easy: 1) Ask Questions 2) Problem Solve 3) Be respectful |
2. Material Center: Normal supplies used in the art room all at student height. |
A trick I learned after teaching Kindergarten: Take pictures of supplies and tape them on the shelf where they go. This is also great for student who struggle with reading. |
3. Folded poster board with some colored duct tape on the crease. |
The colored tape corresponds with their table color. This drastically cuts down on the time it takes to collect and hand back student work. |
4) The done list and cart are great for those students who finish projects with quality and need something to do. At the beginning of the year I explain the activities on the cart. When they are done they may choose something off the list to do.
5) Last but not least - a clean up song. I dreaded the thought of a clean up song because I was sure I couldn't listen to a song about cleaning up 5 times every day -- then a friend asked why I couldn't pick my own song. I have no idea why this didn't occur to me on my own - but it didn't. So after her suggestion I started to look for my own clean up song and settle on "The Pirates Who Don't Do Anything" by Relient K. This song is silly, school appropriate, and I have been able to listen to it for 5 times every day for the last 3 school years! This song is just enough time for students to put their work and supplies way - it also takes the responsibility of cleaning up off of me and puts it on the students. I encourage them to play the air guitar in their seat when they are done cleaning -- a task many of my students take very seriously!
2.23.2011
2nd Grade - Origami Jumping Frogs
The students get a kick out of this project. From start to finish takes about 30-35 minutes - leaving about 5 minutes for the students to play with their frogs and clean up for a 45 minute class.
First we review what 'origami' means. I explain what we are going to make frogs that jump - some frogs will jump high, some long, some will do flips! Next, I go over expectations for the class period as it differs from most days. I will do a step at a time at the front of the room and they are to both watch and listen - I will do it twice. After I do it the second time they are to try it on their own. I will walk around and check and help students - but they are to try until I get to their table. I always ask, "Is it okay to be frustrated?" and they say "YES!" then I said, "Is it okay to give up?" and they say "NO!". This little exercise is always a good reminder when we start something that potentially will be frustrating for some students. After I check everyone I will count down from 5 - when I get done I expect the room quite and ready for the next step. I wait until the class is ready.
Be prepared for excitement! The students really enjoy seeing their frogs jump for the first time! If a students frog doesn't jump a few things: 1) Check the back legs - pull them out a little bit so that they have a little spring in them. 2) Make sure they are using one finger to gently launch their frogs. Students tend to pound or squish their frogs when trying to launch them.
Happy folding!
First we review what 'origami' means. I explain what we are going to make frogs that jump - some frogs will jump high, some long, some will do flips! Next, I go over expectations for the class period as it differs from most days. I will do a step at a time at the front of the room and they are to both watch and listen - I will do it twice. After I do it the second time they are to try it on their own. I will walk around and check and help students - but they are to try until I get to their table. I always ask, "Is it okay to be frustrated?" and they say "YES!" then I said, "Is it okay to give up?" and they say "NO!". This little exercise is always a good reminder when we start something that potentially will be frustrating for some students. After I check everyone I will count down from 5 - when I get done I expect the room quite and ready for the next step. I wait until the class is ready.
1. Students decorate one side of index card with markers/crayons. |
2. Flip Over. |
3. Fold top corner to meet side. |
4. Fold other top corner to meet colored corner. Should have smaller triangle and rectangle. |
5. Unfold |
6. Flip Over (should see color). |
7. Fold horizontal line through middle of "X". Should have two rectangles. |
8. Unfold |
9. Flip Over. |
10. Pull horizontal lines together. |
11. Push met horizontal lines to table. |
12. Push down opening - or push down the "hat". |
13. Under the triangle should look like this. |
14. Fold up edges of triangle to point. |
15. Fold in the remaining sides to the middle. |
16. Fold bottom up to the top. |
Another view of step 16. |
17. Fold top layer back to line up with fold on the bottom. |
Another view of fold 17. |
Flip frog over - use finger to pull back..... |
..... let go and let the frog fly! |
Happy folding!
2.22.2011
1st Grade - Abstract Sculptures
I start this project out with the learning target on the board - "build abstract sculptures". The students generally right away start asking what that means - so we break it down. We talk about what "build" means and they agree they know how to build things in general. Then we skip the word "abstract" and go on to talk about "sculptures". Many students will raise their hand to explain what a sculpture is. Answers I generally get are: "Sculptures are like statues" and "Sculptures are made out of things like... hard things" or "Sculptures can be at home or in a museum". Often times their descriptions are correct - but they have trouble articulating that sculptures stick out in space, sculptures are 3-D.
Instead of telling the students that sculptures are 3-D and what that means we discover it together. I will hold up a picture of a person and ask if it's a sculpture - most of my students will tell me "no". I then hold up a clay bobble head and they tell me yes. We compare and contrast the two pieces of artwork - sometimes I have to rotate the artwork to emphasize one is flat and one is not - but every time I will have a student that will notice one is flat and the other sticks out in space.
After deciding what a sculpture is we talk about abstract - this is a little tougher and easier at the same time. I give them concrete sculpture examples - sculpture of a chair (a chair from the room), sculpture of a boot (my boot on a table)... etc. Every sculpture has a concrete name - chair, boot.... Then I show pictures/examples of abstract work and ask the students to describe it. They quickly figure out that abstract is a word for things that don't have any other name - it might resemble a dog but isn't a dog, or it looks like a roller coaster...
Then after this talk, which really only takes about 10 minutes at max - I do a quick demonstration showing the students how to take strips of paper and bend, twist, fold, loop, and curl them to make their own unique abstract sculpture.
This is a high success project!
Kindergarten Bracelets
Due to snow days and early outs my project rotation was off with kindergarten - to fill in the extra days while other classes were finishing we made teamwork bracelets! I pre-cut yarn about 2 feet - I wrapped them around my hand and elbow and then cut them all at once. (this is a great project to get rid of copious amounts of yarn).
When the students come in I explain that we are going to work together to make bracelets. I make a deal with them upfront - if they can be exceptional learners then they get to pick their partners, if they are going to be less than their best then I'd pick their partners. I gather them around a table and show them how to pick 3,4 or 5 strings and make the ends match closely. Next, I ask a student across the table from me to hold onto the strings really tight. I start twisting all my strings together at once. (This is a great project for student's small motor skills.) As I twist I talk to them about if I accidentally drop the strings or my partner does (I then drop my strings) and what I should do - should I scream, cry, stomp my feet?! They all say no, and I agree, I just pick them back up and start twisting again! We talk about how it didn't ruin anything, nothing was broken, just have to keep twisting. The students watch as I twist until the colors get smaller and smaller - when I get close to being done if I move my string ends towards my partner's the string starts to curl on itself.
When the string starts to curl on itself my partner and I hold on to the strings - with a free hand I pinch the twisted string in the middle of the cord and put the two ends together. Pinching the two ends the students let go of the middle and the string should spin together on itself. They bring the string to me and I tie it.
The great thing about these bracelets are that they fit on the students wrist WITHOUT tying them on. Since the string is doubled over it leaves a loop at the end where the knot goes through - making a bracelet that is easy to take on and off!
The kids had a blast and it really worked their small motor skills, team building skills and patients.
2.10.2011
4th Grade Value Portraits
This project has been modified from a lesson I saw in a magazine where a high school teacher had her students make stencils from a picture and then spray paint it. I was really drawn to the idea of using positive/negative space in a way in which a portrait is recognizable.
I originally planned to do this project with paint, but after attempting it for my example I switched to colored pencils.
While the the students were finishing up their previous project I took their picture. I set up an old overhead and had them stand at about a 1/4 turn away from the light - giving me the optimal light vs dark on their faces. They could smile, be serious, or even do a silly face! I downloaded those into my computer, changed them to black and white, and then altered the exposure, highlights, and shadows till I got white, one level of grey and black. These were then printed out on 8.5/11 pieces of paper.
The next class we taped drawing paper on top - took a pencil to the window and traced only what we saw. I had the students trace their faces upside down. Many students laughed and asked why and I explained that our brain recognizes faces much too easily and we needed to trick it so that it will see shapes. The students traced only what they saw - lights, mediums, darks. If they could not see their eye they did not trace it!
After tracing their faces many students exclaimed both how awesome and strange it looked!
For the next two classes the students spent coloring in the correct values determined by their photograph. The students picked one color for their head, another for their shirt and the complementary color of their head was for the background. I did a demonstration on how to figure out what color when where - focus on one little shape, hold to the light, observe, put on the table and color. Pressing hard with a colored pencil creates a dark color, pressing medium produces the same color or lighter, and then barely touching the paper with the colored pencil creates the lightest value needed.
These are breathtaking - the students worked very hard and are impressed to find that it actually looks like themselves!
(I have permission to use these pictures, but in order to protect my students I have cropped them to make them less recognizable.)
I originally planned to do this project with paint, but after attempting it for my example I switched to colored pencils.
While the the students were finishing up their previous project I took their picture. I set up an old overhead and had them stand at about a 1/4 turn away from the light - giving me the optimal light vs dark on their faces. They could smile, be serious, or even do a silly face! I downloaded those into my computer, changed them to black and white, and then altered the exposure, highlights, and shadows till I got white, one level of grey and black. These were then printed out on 8.5/11 pieces of paper.
The next class we taped drawing paper on top - took a pencil to the window and traced only what we saw. I had the students trace their faces upside down. Many students laughed and asked why and I explained that our brain recognizes faces much too easily and we needed to trick it so that it will see shapes. The students traced only what they saw - lights, mediums, darks. If they could not see their eye they did not trace it!
After tracing their faces many students exclaimed both how awesome and strange it looked!
My Example. |
These are breathtaking - the students worked very hard and are impressed to find that it actually looks like themselves!
(I have permission to use these pictures, but in order to protect my students I have cropped them to make them less recognizable.)
ARRRRRG! 2nd Grade Torn Paper Pirate Collages
I did this lesson years ago with 3rd grade students, but felt that my 2nd graders could handle the skills and creativity needed.
First day we read part of the book "How I Became a Pirate" by Melinda Long and Illustrated by David Shannon -- I love to read the pirate parts with my best pirate voice! We only read the first half because otherwise they don't get enough time to work. While I read the book their job is to look at the pirates - their hair, hats, ears, noses, beards, clothes.... etc.
After the book is over we briefly talk about how the pirates are all different - different shapes, some have hair some are bald some have hats some have handkerchiefs, some have earrings, some have eye patches... and so on.
I do a quick demonstration on how to fold their paper for their head in half then tear it -- stressing that they need to tear slow and if it isn't perfect it's okay! In fact most of the time the heads that are imperfect are the best! During my demonstration I also talk with them about thinking about all the other pieces they need as shapes - they are not going to tear a full eye patch from one piece of paper, but instead can tear a triangular shape for the patch and long rectangles for the strap around the head.
The students then pick the color they want for their head out of many skin tones and their background color and off they go!
I spend the class encouraging the ideas and problem solving that my students do.
The next class the students finish up their pirates - giving necks and shoulders, sometimes whole bodies! After their done tearing the paper the students then use oil pastels to give the final details on the pirate and the background - giving the pirate some place to be.
I have a few students who are not allowed to do fantasy or pirates - so they collaged a person instead of a pirate.
First day we read part of the book "How I Became a Pirate" by Melinda Long and Illustrated by David Shannon -- I love to read the pirate parts with my best pirate voice! We only read the first half because otherwise they don't get enough time to work. While I read the book their job is to look at the pirates - their hair, hats, ears, noses, beards, clothes.... etc.
After the book is over we briefly talk about how the pirates are all different - different shapes, some have hair some are bald some have hats some have handkerchiefs, some have earrings, some have eye patches... and so on.
I do a quick demonstration on how to fold their paper for their head in half then tear it -- stressing that they need to tear slow and if it isn't perfect it's okay! In fact most of the time the heads that are imperfect are the best! During my demonstration I also talk with them about thinking about all the other pieces they need as shapes - they are not going to tear a full eye patch from one piece of paper, but instead can tear a triangular shape for the patch and long rectangles for the strap around the head.
The students then pick the color they want for their head out of many skin tones and their background color and off they go!
I spend the class encouraging the ideas and problem solving that my students do.
The next class the students finish up their pirates - giving necks and shoulders, sometimes whole bodies! After their done tearing the paper the students then use oil pastels to give the final details on the pirate and the background - giving the pirate some place to be.
This is the pirates ship driving license picture! |
I have a few students who are not allowed to do fantasy or pirates - so they collaged a person instead of a pirate.
Subscribe to:
Posts (Atom)